• Skip to main content
  • Skip to primary sidebar
  • Skip to footer

The Crafty Classroom logo

USAActivityPack
PhonicsPrintables
MazeWriterHandwritingProgram
NumberoftheWeek
  • Home
  • Curriculum
  • Crafts
  • Printables
  • Bible
  • Notebooking
  • Games
  • DIY Tools
  • Join
You are here: Home / Archives for Full

Full

Free Distance Learning Programs

May 13, 2020 By Valerie Mcclintick 1 Comment

Learning from home is on the rise. However, being home doesn’t mean your educational resources are limited. In fact, this is the best time to try distance learning. The Internet opens a world of possibilities. Better yet, there are masses of free resources to be used for everything from lesson planning and instruction, to supplemental resources and practice. If you are just beginning with distance learning for kids, here is a comprehensive guide with many subjects included to get you started with free distance learning programs.

What is Distance Learning?

While distance learning or distance education seems to coincide with online education, the official definition is a method of studying using live broadcast or classes through correspondence online, without the student requiring to attend a school or college.

Free Educational Websites & Subscriptions

The Internet is teeming with distance learning options. Some are actual online schools or curriculum suppliers. Beyond the curriculum, though, many websites provide educational games, interactive instruction, and incremental learning. There is something for everyone from early learning, to continuing education.

Here is a list of the most popular distance learning websites that are free or offering a free trial. (Note: these were free at the time of posting 5/13/2020, some offers may have changed or expired.)

Free Online Math Resources

If you are looking for awesome math resources online, here are some popular virtual math education portals and cool online math games. You’ll find several videos, articles, and lessons for free for many age ranges and levels.

  • Cool Math
  • Kahn Academy
  • IXL
  • Education.com
  • Corbettmaths
  • DreamBox

Popular Reading Programs

There are a ton of free reading programs for preschool and elementary age kids on the internet. Keep in mind, you’ll find some subscription-based programs with trials while considering what’s best for your emerging reader.

  • 6-Weeks of Phonics from Kindergarten Mom
  • Free workbook from Evan Moor
  • Scholastic Website
  • Reading Eggs Free Trial
  • Homer
  • Sesame Street Online
  • Scholastic Learn at Home
  • Starfall
  • Reading Bear

Online Games for Kids

Kids love games and its a perfect way to teach strategic thinking, problem-solving, and focused learning. You’ll find these amazing websites a great tool to get your kids excited about their education!

  • Scholastic Learn at Home
  • Funbrain
  • Highlights for Kids
  • Learning Games for Kids
  • eLearning for kids

Free Preschool Games

While preschoolers have a hard time sitting still, you may have an easier time keeping them focused on the tasks at hand using these interactive and free websites! You’ll find a ton of free preschool games along with sit down work such as worksheets, coloring pages, and more.

  • Education.com
  • Sesame Street Online
  • Cookie.com Preschool Games
  • PBS.org
  • Turtle Diary

Free All in One Homeschool Curriculum

If you are looking for an all-inclusive learning site, these free online all-in-one resources are some of the most popular in the online world. As you can see, there are some great options. Please note that some may have a free trial for a limited period of time before expiring.

  • Discovery K12
  • Enchanted Learning
  • ABC Mouse
  • Learning A-Z
  • Easy Peasy All in One School
  • Adventure Academy

Virtual Extracurricular Activities

Looking for other subjects besides the 3 R’s? There are a ton of online curriculum homeschool based, but maybe you are looking for extra curriculum activities outside of these core subjects? Here are some websites and apps that teach everything from foreign languages, learning code, music appreciation, and learning to play instruments. These options will help round out your curriculum and serve your child’s unique needs.

  • Old Farmer’s Almanac for Kids
  • Teaching Kids Programming
  • Learn Korean
  • BBC History for Kids
  • Exploratorium
  • Yousician
  • TIME for Kids
  • How Stuff Works
  • Smithsonian Earth App for iPhones
  • NOVA
  • Quizlet
  • P. E. With Joe
  • Berlin Philharmonic Digital Concert Hall

Science Websites and History for Kids using Webcams

Sometimes, you need to close the books (or educational websites) and take an adventure. However, travel can be difficult or impossible for you right now. That’s when you have the adventure come to you! Here’s a collection of interactive experiences to keep your children’s interest piqued.

Science and history often go hand in hand as you take a tour around the world. You’ll discover virtual trips to see exotic animals, amazing space stations, and a broad range of sea creatures!

Science Websites for Kids

  • Ashland Trainspotter Webcam
  • San Diego Zoo Webcams
  • National Zoo Educational Site
  • International Space Station Webcam
  • Los Angeles International Airport Weather Cam
  • ABC Australia
  • National Aquarium
  • Houston Zoo Webcams
  • Animal Webcams from around the World
  • Indianapolis Zoo Webcam
  • Maryland Zoo Animals
  • Kansas City Animal Cams
  • El Paso Zoo Cameras
  • Woodland Park Zoo
  • Skype a Scientist
  • Nasa Virtual Tours
  • Nature Lab
  • Langley Space Center Virtual Tour

History for Kids

  • Anne Frank’s House Annex
  • Florida Public Archeology Network
  • Yellowstone National Park Virtual Tour
  • British Museum
  • Great Wall of China
  • Little House on the Prairie Virtual Tour
  • National Air Force Museum

Geography for kids

Geography may sound a bit dull and boring, but you’ll be pleasantly surprised how fun this subject is with a visual experience! Try these fantastic and free websites to go around the world in a flash, plus you’ll fun some interactive games!

  • Google Earth
  • World Geography Games
  • NatGeo for Kids
  • Ducksters

Online Art Classes for Kids

Museums are a wonderful way to experience the subject of art first hand. Even if you don’t live near a major museum, several offer virtual tours, interactive exhibits, and educational experiences. Below is a list of museums and other points of interest around the world that offer virtual experiences for art distance learning.

  • Uffizi Gallery
  • Louvre Virtual Tour
  • National Gallery of Art
  • MOMA
  • Paul Getty Museum
  • National Museum of Dehli
  • Rijksmuseum
  • National Museum of Modern and Contemporary Art Korea
  • Sistine Chapel Virtual Tour

Free Organization Platforms for Teachers

Now that you have plenty of resources, it’s time to organize your lessons. This could be overwhelming. Thankfully, there are many online tools for teachers to plan lessons for school. These are also wonderful resources for at-home teachers. Therefore, we have a list of free online lesson planning programs, below.

  • Google Classroom
  • NearPod
  • SeeSaw
  • Achieve the Core
  • ReadWriteThink
  • Read Works
  • TES Teach

Free Online Meeting Platforms

Distance learning at home can get lonely. Or perhaps you want to host a virtual activity or club. The Internet makes it possible to connect with other distance learners. Therefore, video conferencing software and apps are important tools for distance education. The following are popular online meeting platforms for students, clubs, and one-on-one instruction.

  • Zoom
  • Google Hangouts
  • Eztalks

Continuing Education Teens & Adults

Parents and Teens, we’ve got awesome online courses and lessons for you too! Discover a new world of learning code, earn a degree, or expand your business skill sets with these continuing ed websites.

  • SAS
  • Coursera
  • Udemy
  • Hippocampus
Free Editable Diplomas from Kindergarten Mom

Free Printable Education Resources

Online resources make distance learning easier than ever. However, distance learning does not have to happen online. Printable resources are a great no-tech option. Likewise, printables are ready immediately. You don’t want to wait for the mail to finally show up. Simply click and print. So, fire up your printer and check out these printable packets for your homeschool. You’ll find a ton of worksheets for multiple subjects including science, spelling, reading, writing, math, and more!

  • Free Student Portfolio
  • Free Unit Studies
  • Superstar Worksheets

Filed Under: Full, Homeschool Tools Tagged With: distance education

Homeschool Year-End Assessment Guide

May 12, 2020 By Valerie Mcclintick Leave a Comment

The end of the year is coming and it’s time to wrap up homeschooling. Before you rush off to your much-deserved summer break, take some time to assess your homeschool. Here is a homeschool year-end assessment guide to help you can finish out the year strong.

Setting and Meeting Homeschool Goals

Did you start the year with lofty goals? Goals are part of planning. Now is the time to take out that list of goals, again. How many have you met? Are there any goals that were unrealistic? Did one of your children blow your goals out of the water? Could you set a bigger goal next year?

Assessing your goals will help you plan better for next year. In addition, you can see how far you have come. Sometimes, we all have difficult homeschooling years. However, every year has its own successes. Yet, it’s difficult to see progress in the every day. So, look at your goals, celebrate the ones you met, and re-evaluate those that you didn’t.

Prepare Homeschool Portfolios for Evaluation

Portfolios are an important part of homeschooling for many families. If your state requires a portfolio, this is a vital step in concluding your year. Here are some simple steps to prepare your portfolios for submission:

  • Gather any required documents and ensure that they are filled out completely
  • Finalize grade sheets
  • Tally hours/days completed
  • Update field trip and book lists
  • Collect any certificates or outside documentation for courses
  • Go through sample work and make final decision on what to include
  • Double check that all subjects are represented
  • Organize all the contents and submit

Assessment of Your Curriculum Choices

Curriculum choices are big decisions. We all invest abundant effort, time, and energy into finding what our family needs. Sometimes those choices are perfect fits. However, sometimes our choices don’t live up to our expectations. So, how did you choices work this year? What did you love? On the other hand, what was a struggle for you or the kids? First, make a list of what worked well. Next, make a list of what didn’t work and why. Now, make notes of anything you would do differently with the curriculum you liked. This will help you plan an even better year for the fall.

Free Kindergarten Assessment Pack

Review Student Progress in Each Subject

Student assessments are essential for reviewing your year. In fact, it should be your central focus.

  • What progress did each child make?
  • What new skills were mastered?
  • Where did they each struggle?
  • What surprised you about their progress?
  • How do your children feel about their school year?

How do I Preform a Homeschool Assessment?

There are many ways to assess your children. In general, standardized tests and final exams are the most common end of year assessments. However, there are endless means for evaluating student progress. Here are some suggestions:

  • End of year narration (Students retell everything that they learned over the year.)
  • Comparison of samples of work throughout the year.
  • Student self-evaluations
    • Score based evaluation
    • Written narrative
    • One on one interview
  • Cumulative project for each subject
  • Administer the same skills test at the beginning and end of year
  • Grade appropriate checklist
Free Homeschool Planning Pack

Review of Homeschool Schedule and Systems

Before you finalize your year, take a moment to review how your homeschool is run. Firstly, how is your homeschool schedule working for you? Consider start times, end times, length of the day, extracurricular activities, and online courses/meetings. Next, consider where you have been homeschooling. Is that space still adequate? What can you change? Do you need a new organization system? Conversely, do you need to re-locate your school area? Lastly, review your habits and systems. What worked and what didn’t?

Make a list of what changes you want to make. In addition, record any items you need to replace, replenish, or would like to try next year. Now, take a deep breath, pay yourself on the back, close your “homeschool door.” and enjoy your summer break with your children.

Do you have the itch to plan out your Summer? Try our Free Homeschool Field Trip Guide!

Filed Under: Full, Homeschool Planning Tagged With: end of year homeschool review, homeschool review

Hummingbird Art

Spring is a wonderful time to learn about hummingbirds! Not only are they amazing creatures with many unique features, but they are in almost every backyard in North America! You can simply hang a hummingbird feeder and watch as they come visit you each morning. We love hummingbirds so much, that we’ve put together a free hummingbird unit study for you! And today, we have a fun, hands-on hummingbird art project that is great for students of all ages.

Hummingbird Zentangle Art

[adthrive-in-post-video-player video-id=”G5gFvLKc” upload-date=”2020-05-10T23:37:56.000Z” name=”Hummingbird Zentangle Art Project ” description=”Create this stunning hummingbird art project with your kids today!” player-type=”default” override-embed=”default”]

Materials:

  • Hummingbird Template
  • Bleeding Tissue Paper (or Pre-Cut Bleeding Tissue Paper)
  • Watercolor Paper
  • Water & Paintbrush

Step 1: Print our Free Hummingbird Template

First, you’ll want to print our free hummingbird template for your students to fill in with zentangle designs. There are a zillion zentangle ideas online so do a quick search to print some examples of different designs and patterns ton inspire your kiddos. Show students how to use different patterns for each section of the hummingbird.

Step 2: Cut Out & Glue to Watercolor Paper

Cut out the hummingbird and glue it to a sheet of watercolor paper. You’ll want to prepare your area with a small dish of water and a bowl of the bleeding tissue paper. Dip your paint brush into the water and apply a small amount to the background (being careful not to get your zentangle wet). (With younger students you might create the background separately, then paste the hummingbird on top once dry.)

Step 3: Place your Colors!

Use a circle punch to cut circle shapes from your bleeding tissue paper. This is not required, but the circles do help give the background a pretty effect. Start placing the bleeding tissue paper onto the wet parts of your background. Overlap different colors for a fun blending effect. You might do a rainbow of colors, or choose to stick with warm or cool colors.

Step 4: Fill the Background

You’ll want t fill your entire background for any area that you want color. The tissue paper will bleed a bit so you will see the colors spread a little. Set your project aside to dry completely.

Step 5: Peel off the Tissue Paper

Once your project is dry, you can use a dry paint brush to gently wipe away the tissue paper. Most of the circles will fall off easily, and you might have to peel a couple off by hand. Underneath, you’ll see that the color from the tissue paper has transferred to the watercolor paper to create a stunning background.

Step 6: Hummingbird Art Project is Complete!

You can see that the blues and greens make a beautiful background for this hummingbird! It almost looks like a blurry photo effect with trees and sky in the distance. Put your beautiful hummingbird art on display!

Looking for more hummingbird fun? Try our Free Hummingbird Unit Study Today!

Free Frogs Unit Study

Spring is a fantastic time to dive deep into a study of pondlife, here we are taking a closer look at frogs and learning all about them. I hope you will hop along on this journey with us and enjoy teaching your own little froglets all about these amphibians.  From books to a hands-on life cycle project you will find loads of fun ideas here for a mini Frog & Toad Unit Study

Frog Sensory Tray

To change it up from the typical deeper sensory bin, I set out a simple sensory tray instead. Grab a tray ( found at Dollar Tree) or a large baking sheet, add a little water, a few plastic frogs, rocks, and moss for ground cover and you have a great hands-on habitat for your children to play in and discover. Add a magnifying glass, tweezers, lilypads, or anything else you like for exploration.

Hands-On Frog Life Cycle-Rather than just complete a worksheet labeling the different stages of a frog’s life cycle why not really get into it? Make it memorable by putting more into it with just a few simple supplies.

You will need:

  • Thick white paper
  • Green stamp pad
  • Green markers, pens, or colored pencils

Look up the frog life cycle online or in one of your books for reference. We chose to do eggs, tadpole, tadpole with legs, froglet, and frog for ours.  Press your finger into a green ink pad (a green marker will work in a pinch) and press it into a thick white paper to stamp out each of the different cycles, use a thumb for the larger full-grown frog. Next use markers or pens to add details like a tail, eyes, legs, etc…

Grab these fun and fabulous life cycle of a frog worksheets — not only will your child learn more about the life cycles of living things, you’ll learn a thing or two! This set includes a free printable chart, life cycle minibook and a sequencing writing activity.

Frog Hopppin’ Math Activities

Math practice is always in order whether you have a full math curriculum you love or you do a lot of hands-on math. This fun and simple activity is a great way to stick with the frog theme and get some math practice in. I have kept it very versatile so it can be done with children from preschool through middle school by changing out a few simple things.

You will need:

  • Green construction paper or craft foam
  • Scissors
  • Permanent Marker
  • Plastic Frog
  • Craft Foam

Lilypad Math- Cut craft foam into lilypad shapes about 2”x2”. Write numbers 0-9 for younger children and go even higher if you are working with older children. Include symbols like +, -, x, and %.

Preschoolers- Line numbers up in order and have your child hop from number to number as they count with a plastic frog. Call out numbers and have them land on the proper number to work on number identification.

Early Elementary- Use your numbers and symbols to create simple math problems for children that they can answer verbally, by placing a lilypad with the correct answer after the equal sign, or let them write the answer on a dry erase board. Hop the frog from lily pad to lily pad to practice skip counting by 2’s,5’s, or 10’s.

Upper Elementary/Middle School- Use the numbers on the lilypad to create more complex problems. Add a decimal point or use fractions and have them add, subtract or simplify them.

Store them in a zippered baggie and pull them out for practice during your study.

Realistic Frog Life Cycle Printables

Additional activities for your frog study:

  • Consider reading Frog and Toad or The Celebrated Jumping Frog of Calaveras County as a read-aloud for your study.
  • List 10 different varieties of frogs and find out where they are native to, find each location on the globe.


Use the following words for spelling and vocabulary.

  • Tadpole
  • Spawn
  • Froglet
  • Lilypad
  • Amphibian
  • Larva
  • Pond
  • Cattail
  • Gills
  • Croak
  • Lily Pad
  • Toad
  • If weather permits and you have one near you head to a local pond and see if you can spot frogs in any of their life stages. Check carefully along the bank, frog eggs rise to the surface and look like a big glob of clear jelly with black dots inside.  Try to catch and release tadpoles so you can get a better look at them. Head outside at night and see if you can find tree frogs, they are attracted to light and will often be right on your own porch. Listen to the sounds of frogs near the pond and in your own back yard.
  • Listen to these frog sounds and calls on Youtube. https://www.youtube.com/watch?v=J1Sc78-TOFs
  • Watch this video about  Amphibians on Homeschool Pop. https://www.youtube.com/watch?v=TIbTs5mKN_0
  • Make this Tree Frog Oil Pastel https://thecraftyclassroom.com/?s=frog
  • Create an adorable Frog shirt to wear! https://thecraftyclassroom.com/2009/06/19/ribbitribbitburp/
  • Create a graph to represent the types of frogs you find at home or on your nature walks for the week.

Keeping Christ at the Center of Easter

April 3, 2020 By Valerie Mcclintick Leave a Comment

Easter is on its way, and the stores are full of chocolates and bunnies. As Christians, we know what Easter is really about. We want our children to focus on Christ’s resurrection, not just the candy. Here are some fun ways to keep Christ at the center of your Easter celebrations.

Be More Christ-Like Ideas

At the Last Supper, Jesus did something amazing. He bent down and washed the apostles’ feet.

You call Me Teacher and Lord, and you say well, for so I am.

If I then, your Lord and Teacher, have washed your feet,

you also ought to wash one another’s feet.

For I have given you an example,

that you should do as I have done to you.

Most assuredly, I say to you, a servant is not greater than his master;

nor is he who is sent greater than he who sent him.

If you know these things, blessed are you if you do them.

John 13: 13-17

Washing the feet of others has become a symbol of service and devotion. Why not try it in your home? You can pair up family members to wash each other’s feet or have each person wash everyone else’s.

You can also do a metaphorical foot washing. Place the name of each family member in a hat or box. Have each member draw one name. Now each person has to decide how he or she will serve their assigned family member. This could be a fun game like “secret Santa.” Or you can serve each other openly. However, you chose to “wash each other’s feet” the point is to serve each other in big ways out of love.

Easter Cross Coloring Pages

Backyard Easter Scavenger Hunt Game

We all know about Easter Egg Hunts. This is a fun, biblical twist. Print out scripture verses on slips of paper. Fill plastic Easter eggs with the verses. Hide the eggs throughout your backyard. Now it is time to find the eggs! This can be done together or individually. For individual hunts, use color coded eggs to make sure everyone finds all the verses.

Finding the eggs is only the beginning, though. Now it is time for the scavenger hunt. You can hide small toys, candies, or tokens that correspond to each verse or have the children get creative. See who can find a symbol for each verse in your yard.

Printable Resurrection Eggs

How to Make Resurrection Rolls

Resurrection Rolls are more than just another Easter treat. They tell the story of the burial and resurrection of Christ. These are easy to make and very kid-friendly. You will need a roll of refrigerator rolls or croissants, marshmallows, melted butter, and cinnamon.

  1. Lay out all the ingredients and wash everyone’s hands.
  2. Pour some cinnamon on a plate and place it next to the melted butter.
  3. Give each child a marshmallow. Tell them that this represents Jesus’ body that suffered to save us from our sins.
  4. Have each child dip and coat the marshmallow with butter. This symbolizes his mother and friends anointing Him with oil.
  5. Roll the buttered marshmallows in cinnamon. The cinnamon represents the spices that were mixed with the oil.
  6. Now give each child a roll or croissant. Stretch them out slightly but be sure not to rip them.
  7. Wrap the dough around each marshmallow, just like Jesus was wrapped in a burial shroud.
  8. Now place the wrapped marshmallows onto a baking sheet and put it in the oven. Tell the children about how Jesus was laid in a tomb that was sealed with a large rock. Close the oven door.
  9. It’s time to set the timer. Just like the centurions stood watch, the timer will make sure we don’t take them out too soon!
  10. When the rolls are ready, take them out and cut one open. The inside is empty, just like Jesus’ tomb.
  11. The rolls will be sweet inside. Remind the children how sweet it is to be forgiven of our sins.
Watercolor Easter Cross Bible Craft

Christ in Easter Ideas

Jesus asked us to spread the Good News to all the nations! Many people will not get to be with family this Easter. They are too sick or frail to be home. The current pandemic has made life even harder for those in the hospital and nursing homes. Most are not allowing visitors. But there is always hope for those who know and love Christ.

Easter Cross Bible Bookmarks

Send messages of hope to your local hospital or nursing home. Make cards, draw pictures, or simply handwrite an Easter card. Include your favorite verse about hope. Let those who feel forgot to know how much they are loved.

Filed Under: EasterCrafts, Full Tagged With: christ centered easter, christ centered easter crafts, christ in easter ideas, easter activities

How to Start a Kids Weather Station

March 29, 2020 By Valerie Mcclintick 1 Comment

Homeschoolers don’t get snow days (most of the time) but the weather is still a part of their learning. Meteorology is an engaging science with plenty of hands-on learning opportunities. Let’s face it, the weather is always there! No matter where you live, you experience weather first hand, on a daily basis. This makes it a perfect real-world science for kids. Ready to get your kids hooked on learning about weather patterns and meteorological terms? Keep reading for a step by step guide on how to start a kid’s weather station in your homeschool.

Annual Weather Tracking Worksheet

Tools to Start a Homeschool Weather Station

Every scientist needs tools. For meteorology, tools can be pretty expensive and high tech, or simple and low cost. However, evey weather station will need a way to measure the following:

  • Temperature (Thermometer)
  • Precipitation (Raingauge)
  • Wind Direction (Anemometer)
  • Wind Speed (Anemometer)
  • Air Pressure (optional)

Pick out tools that fit your budget and outdoor space. Look for opportunities to double up on tools. For example, a thermometer might also have a barometer. Find a safe spot to house each of your tools, then create a routine for checking each tool.

Daily Weather Jourals for Kids

Weather Journals for Kids:

Part of the fun of setting up a weather station is recording the daily weather! Encourage your children to record their findings each day in their weather journals. Using a daily weather journal will help you see patterns and over time help you predict what the weather will be. There are a variety of different types of weather journals available on SuperStarWorksheets.com You’ll find simple daily weather sticker charts, monthly calendar tracking sheets, and more advanced daily weather tracking which includes extras like wind direction, wind speed, precipitaion and more.

Annual Weather Tracker & Monthly Weather Tracker

You can also track the weather on an annual weather journal sheet to see longer-term patterns at a glance. It’s also a fun and colorful way to add some color to your homeschool classroom.

See Inside Weather & Climate Book by Usborne & Weather Sticker Chart

Weather Science Books for Kids:

Now that you have all those special tools and instruments set up, it’s time to learn how to use them!  Grab a couple of good books on weather and weather predicting to get your homeschool weather station off the ground. Some recommendations are listed below. 

  • The Everything Kids’ Weather Book 
  • Weather Tracking For Future Meteorologists: The Ultimate Weather Journal For Kids.
  • The Kids’ Book of Weather Forecasting 
  • STEM Starter for Kids Meteorology Activity Book 
  • Forecasting Weather 
  • A Kid’s Guide to Forecasting Weather 
  • National Geographic Little Kids First Big Book of Weather 
Weather Tracing Pages for Fine Motor Skills

Weather Youtube Channels:

There are also some amazing channels on Youtube about meteorology for children. The best thing about them is they are free to use. It’s like getting your own personal meteorological science tutor delivered right to your school room! Let these experts help you start a homeschool weather station for your family.

  • Be a Weather Watcher: Science for Kids 
  • How Do We Know When it Will Rain? 
  • Weather 101 for Kids 
  • 5 Weather Science Experiments 
  • Hands on Weather Activities for Kids 

Galileo Thermometer

Barometer, Hygrometer, & Galileo Thermometer

There are many decorative weather tracking options available as well. You might find that setting up a children’s weather station, inspires you to add more tracking elements indoors as well. Since these elements will be in your home, you might consider more visually appealing options if that is a concern for you.

Homeschool Weather Station Activities for All Ages

Time to add some hands-on learning activities. A homeschool weather station can be a hobby or a full blown science study. Add activities and experiments to suit your homeschool needs. The printables include everything from a weather journal to STEM challenges. If you really want to dive deeply into meteorology, check out the weather lab kits. These are packed with activities, information, and experiments. 

Weather Lab Kits:

  • SmartLab Toys You-Track-It Weather Lab 
  • The Magic School Bus Weather Lab 
  • 4M STEAM Powered Girls Weather Station
  • WE-R-KIDS Game / Play 4M Weather Station Kit. Science 

Electronic Weather Station:

  • Wittime Latest 2076 Weather Station
  • AcuRite 00589 Pro Color Weather Station with Wind Speed, Temperature and Humidity
  • Davis Instruments 6250 Vantage Vue Wireless Weather Station with LCD Console

If you opt to get a professional level weather station, you can even join the “Weather Underground” and help predict the weather for your area. 

Need more kid-friendly weather station ideas? Try our preschool Kids Weather Station Printables Page!

Filed Under: Full, Science, Science Activities, Science Projects, Unit Studies, weather Tagged With: homeschool weather ideas, homeschool weather station, weather station for kids

Hummingbird Unit Study

We were lucky enough to not only watch hummingbirds sip nectar at this feeder but also grab a video to share with you.  It sparked a desire for a Hummingbird unit study so I pulled together some ideas and we dove into learning about these beautiful tiny creatures, what they eat, how fast they fly, the size of their eggs and nests, and more. Did you know that hummingbirds are the only bird that can fly backward? They are quite the little aerial gymnasts!

Hummingbird Eggs/Nest Craft

Humminbird eggs are roughly the size of a kidney bean, it’s hard to imagine something so tiny!   To give the kids a physical idea of what that means we made our own hummingbird eggs and built a tiny little nest to keep them in. It also makes a pretty little handmade display for your nature table or their desk as well.

You will need:

  • Air Dry Clay
  • Brown string/ Yarn
  • School glue
  • Bits of moss

Directions:

Roll two small pieces of clay into a small egg shape, use a real bean for reference if you need to.

Set aside and allow them to dry while you construct the nest.

For the nest cut several lengths of brown yarn or string and press them into a small bowl of school glue, be sure to coat them well.

Coil a piece of string covered in glue flat 3 or 4 times, or until its roughly the size of a quarter.

Now start coiling upwards until your nest is roughly ½” tall.

While your glue is still wet tuck bits of moss throughout the nest to make it look even more realistic.

Allow nest to dry completely, it will take at least overnight to harden well.

Research 3 types of hummingbirds and where they are most common.

Hummingbird Nectar

You can buy a ready-made humminbird nectar at the store but it is so simple to make your own that you will want to! Also, while many store-bought nectars are colored red there is really no proof that the nectar itself being red attracts them and red dye is just not good for anyone so we will skip adding any food coloring to ours.

You will need:

  • 2 cups of filtered water
  • ½ cup granulated sugar

Directions:

  1. Heat water in the microwave or on the stove, it doesn’t have to be boiling, just very warm to help dissolve your sugar.
  2. Stir in sugar until dissolved, allow to cool completely.
  3. Add to your hummingbird feeder, store remainder in the refrigerator.

Hummingbird feeders should be cleaned out and refilled every few days, while they may still drink from it, the sugar water will grow mold easily and that can make them very sick.

Find out how much sugar a hummingbird must consume each day and how far they travel seeking out nectar.

DIY Hummingbird Feeder

You can easily make your own hummingbird feed to attract them to your yard for observation. We are going to upcycle and old spice jar, it is a great choice for this because it already has holes for them to feed on, and if you use a certain brand then they have red lids and red is one of the hummingbirds favorite colors.

You will  need:

  • A clean spice jar (red lid if possible)
  • string/yarn
  • Silk flowers
  • Twig or popsicle stick

Directions:

Clean out jar very well- soak in vinegar for a while, rinse, and dry thoroughly.

Remove lid and cut off the flip-top portion, use a nail file to smooth the rough edge.

Use a strong tacky glue to secure a twig or popsicle stick to one side of the jar, be sure not to attach it to the lid with holes so this can be removed.

Glue flowers all the way around your plastic jar if you like to decorate it and help attract hummingbirds (and butterflies) to your yard.

Wrap a long piece of yarn around the neck of the bottle.

Fill with hummingbird nectar and replace the lid.

Hang in a tree where you can keep an eye on it.

You’ll enjoy all your new friendly visitors! Just be sure to change the sugar water every couple of days to keep it fresh. Old sugar water can grow mold which is harmful to little hummingbirds, so do take care of your new friends.

Hummingbird Nature Journal

Draw your favorite hummingbird in your nature journal.

Fun Facts

  • The average weight of a hummingbird is less than that of a nickel.
  • Hummingbirds have no sense of smell, rather they are attracted to red and orange flowers.
  • There are over 330 species of hummingbirds in North and South America.
  • While flying, their hearts beat an average of  1200 beats per minute. 250 at rest.
  • They are able to reach speeds of 30mph during forward flight.
  • Hummingbird wings beat between 50 and 200 times per minute.

Hummingbird Zentangle Art Project: This is a great art project for elementary students! Children create their own designs on our free hummingbird template. Then, using bleeding tissue paper, they create a stunning background.

Hummingbird Art Project for Kids

Hummingbird Window Cling Art Project for Kids

Learning about hummingbirds can make a fantastic unit study for your homeschool classroom. Especially if you time your studies up with Spring & Summer when hummingbirds are likely to be out and about. Besides nature journaling, you might consider making some beautiful window art so you can enjoy hummingbirds year-round. Click Here for a full art tutorial!

Hummingbird Science Worksheets

We’ve created a variety of free hummingbird worksheets you can use to put together a simple science journal with your students. You’ll find hummingbird coloring pages, parts of a hummingbird labeling worksheet, fun facts, Montessori cards and more! Click Here for Hummingbird Printables.

Hummingbird Books for Kids:


Use the following hummingbird vocabulary for spelling and vocabulary words, create your own crosswords

  • Nectar
  • Aggressive
  • Hover
  • Territorial
  • Species
  • Migratory
  • Pollination
  • Nutrients
  • Metabolism
  • Aerodynamics
  • Foraging
  • Gorget

Have a suggestion for our Hummingbird Unit Study? Leave a comment below! Looking for more Birding Fun? Try our USA 50 State Birds Activity Pack.

Homeschool Conventions by State

March 6, 2020 By Valerie Mcclintick Leave a Comment

You have made it through the dead of winter and are eagerly looking forward to spring. You are probably also starting to think about next year. Homeschool conferences offer the opportunity to meet other homeschool families, hear inspiring speakers, and browse through curriculum. It is important to fuel your homeschooling “tank” regularly. Homeschool conventions give you the motivation and information to keep going and solve any struggles you may be having. So, what are the best homeschool conventions 2020?


Free Homeschool Planning Pack from The Crafty Classroom

Glad you asked! Here is a list I compiled of homeschool conferences 2020 by state. This way you can determine the best ‘homeschool conventions near me’. Whether you’re looking for the great homeschool convention nearest you or by state, we’ve got you covered!

If you know of any others, I would love to hear about them! Which homeschool conference will you attend this year?

Homeschool Conventions near Me in 2020

Alabama

Birmingham Homeschool Convention and Fair  Birmingham, AL   March 20 

Mobile Teach Them Diligently Homeschool Convention    Mobile, AL    May 7-9

Alaska

APHEA 2020 Convention  Anchorage, AK   March 27-28 

IDEA 22nd Annual Curriculum Fair  Soldotna, AK   April 29

Anchorage, AK   April 30-May 1

Fairbanks, AK   May 4-5

Juneau, AK   May 7

Arizona

AFGE Convention Phoenix, AZ  July 10-11

Free to Be 2020 Unschooling Conference Phoenix, AZ September 3-6

Arkansas

Teach Them Diligently Arkansas Rogers, AR  March 6-8

California

California Homeschool Network Family Expo Garden Grove, CA  May 7-10

SCOPE Homeschool Conference and Curriculum Fair Rockland, CA  June 7-8

HSC Conference San Jose, CA   August 6-9

Colorado

Teach Them Diligently Colorado Homeschool Convention  Aurora, CO May 21-23

Rocky Mountain Homeschool Conference Denver, CO  June 25-27

Connecticut

CT Home Educators Capitol Day   Hartford, CT March 25

TEACH CT Used Curriculum Sale Plainville, CT  May 4

Florida

FPEA Wild Florida Homeschool Convention Orlando, FL May 21-23

Great Homeschool Convention Florida Jacksonville, FL June 25-27 

FACCS Christia Educators Convention Orlando, FL   October 8-9 

Georgia

Teach Them Diligently Georgia Homeschool Convention Athens, GA June 11-13  

Southeast HomeschoolExpo Atlanta, GA July 23-25 

Idaho

Homeschool Idaho Nampa, ID  June 4-5 

Illinois

APACHE Homeschool Convention Edwards, IL  March 27-28

ICHE Family Conference Bourbonnais, IL May 28-31

Indiana

IAHE Conference Indianapolis, IN  March 27-28 

Iowa

Homeschool Iowa Conference West Des Moines, IA  June 12-13 

Kansas

2020 Kansas Homeschool Expo Wichita, KS May 15-16 

Kentucky

East Kentucky Homeschool Convention Pikeville, KY  June 27   

Memoria Press Conference Louisville, KY  July 6-7 

Louisiana

LAgniappe Conference New Orleans, LA  June 3-5

Maine

30th Annual “Lead the Way Home” 2020 Convention Rockport, ME  March 19-21

Central Maine Homeschool Expo Bangor, ME  April 21 

Massachusetts

MassHope 2020 Convention Sturbridge, MA  May 8-9 

Northeast Unschooling Conference Wakefield, MA  August 13-16 

Michigan

2020 INCH Conference Lansing, MI May 15-16 

Minnesota

Minnesota Catholic Home Educators Conference St Paul, MN  May 29-30 

Missouri

Midwest Parent Educator Homeschool Conference Kansas City, MO  April 3-4

Great Homeschool Convention St Charles, MO March 26-28

Nebraska

NCHEA Lincoln, NE  March 7-8

New Jersey

Refresh North Jersey Homeschool Conference Knowlton, NJ   March 7 

IHM New York Mahwah, NJ    July 18

New Mexico

CAPE NM Albuquerque, NM June 19-20

New York

New York Homeschool Convention Rodchester, NY  July 30- August 1

North Carolina

Thrive! The NCHE Annual Conference Winston-Salem, NC  May 28-30

North Dakota

NDHSA Home Educators Association Jamestown, ND  March 7-8


Ohio

Great Homeschool Convention Ohio Cincinnati, OH   April 16-18

Teach Them Diligently Columbus, OH  May 28-30

Oklahoma

Tulsa Homeschool Expo Tulsa, OK February 28-29

HSOK Celebration 2020 Oklahoma City, OK  April 30-May 2

Oregon 

Oregon Christian Home Educator Conference Albany, OR   June 19-20

Pennsylvania

CHAP Conference Lancaster, PA  June 12-13 

South Carolina

Great Homeschool Conventions South Carolina Greenville, SC   March 19-21

South Dakota

Christian Homeschool Conference of South Dakota Sioux Falls, SD  May 7-8

Tennessee

Teach Them Diligently Nashville, TN  February 27-29 

CSTHEA Curriculum Fair   Chattanooga, TN July 17-18

Texas

Texas Unschooler Conference 2020    Waller, TX   April 16-20

Called to Teach Allen, TX   April 30-May 2

The Woodlands, TX  May 28-30

South Texas Homeschool Conference Corpus Christi, TX  May 29-30

Texas Home Educators Conference The Woodlands, TX  August 7-8

Utah

  LDSHE Home Education Conference West Ogden, UT             May 27-29

Virginia

LDSHE Home Education Conference East Virginia Beach, VA  May 6-8

HEAV Virginia Homeschool Convention Richmond, VA   June 11-13

IHM National Catholic Homeschool Conference Fredericksburg, VA  June 19-20

Washington

Life is Good Unschooling Conference Vancouver, WA  May 21-24 

2020 WHO Conference Tacoma, WA   June 26-27

West Virginia

CHEWV Homeschooling 101 Hurricane, WV  March 21

Wisconsin

Wisconsin Parents Association Conference Stevens Point, WI May 8-9 

Wyoming

Homeschoolers of WY 2020 Convention Cheyenne, WY  May 14-16

Online Summits:

Sometimes, attending a homeschool convention isn’t possible. Perhaps you live too far away from the nearest conference. Or it could be that you are going through a season of life that doesn’t allow you to attend. Either way, online summits are a perfect way to bridge the gap between you and the homeschool convention you can’t attend. 

Online conferences come to you. You often get lifetime access, so you can watch when it is convenient for you. Also, they usually have some type of vendor fair. Now, it isn’t the same as holding a book in your hand. However, online homeschool vendor halls still give you the chance to explore new curriculum and resource options. Here are some suggestions if there are no homeschool conventions near you in 2020

Homegrown Generation https://homegrowngeneration.com/

The Homeschool Teaching Online Summit 2.0 https://homeschoolsummits.com/

Homeschool 2.0 Global Summit https://hgsummit.com/

Homeschool Mom Conference https://mailchi.mp/d1e895905925/homeschool-mom-conference

Are you going to a homeschool convention this year? If so, which one are you attending, and is it in person or online?

Filed Under: Full, Homeschool Planning Tagged With: homeschool conference, homeschool conference near me, homeschool conferences per state

Winter Field Trip Ideas to Beat the Cold Weather Blues

December 13, 2019 By Valerie Mcclintick 1 Comment

It’s cold and snowy outside. The kids are restless and spring is months away. Winter can make homeschool difficult. You feel trapped. (Possibly going crazy) Homeschool cold-weather blues are common. Don’t let them get you down. Escape your schoolroom and find these winter field trip ideas.

Winter can be the best time to take a field trip. Everyone needs a chance to get out, stretch their legs, and have a change of scenery.  Here are four ideas for homeschool winter field trips.

Aquarium Exploration

Too cold for the beach? Have the ocean come to you!  Aquariums are fun and fascinating for the whole family. You can take a trip around the world in an aquarium. There may be penguins from the antarctic and hippos from the hot jungle. An aquarium trip can be educational and recreational. Take some time to relax and just watch the fish swim. Or dive deep into learning with educational programs and informational brochures. The perfect way to beat those homeschool winter blues.

A Trip to the Mine

What, really? A field trip to the mine is not your typical excursion. However, caves, caverns, and mines stay at a constant temperature. So no matter how cold it is this winter, they will be tolerable. In fact, you will welcome the relative warmth underground. 

Make sure to find a mine or cavern that is set up for tourists to visit. Exploring caves can be dangerous. However, across the country, there are mine, cavern, and caves that are managed and safe. Take a tour with a knowledgeable tour guide. It’s amazing what you can learn in a couple of hours underground!

Field Trip into the Cold

Sometimes, you just need to embrace the cold. Winter provides plenty of opportunities for fun. What says winter more than ice skating? It’s great exercise and so much fun. Ice skating is also a phenomenal brain-building activity. Skating requires balance and cross-body actions, both of which activate the language centers of the brain. Plus you will be building pathways between the two hemispheres of the brain. This is essential for children to develop their math and reading skills, without even trying. So, head to your local skating rink or a thoroughly frozen pond, and exercise your brain and body. Oh, don’t forget about snow tubing, skiing, and snowshoeing. Bundle up and have some fun.

Field Trip to Nowhere

Sometimes the best plan is no plan at all. Take a drive out to the country, or a cruise around town. Drive down streets you have never traveled. Stop at that local shop that you always pass but never go into. Just see where life takes you. We often spend so much time getting places, we miss everything in between. A field trip to nowhere could keep you close to home or take you as far as time allows. 

Practice map reading skills along the way. Everyone has GPS, and that is a great tool. It will always lead you home. But for the field trip, shut off the GPS and find your way the old fashioned way. Unplug from your devices. Turn off the radio. Just enjoy the scenery and time together. You can become a party of explorers. Sometimes, we need to be tourists in our own backyard.

100 Homeschool Field Trips

If you are looking for more inspiration for finding fun homeschool field trips, we’ve put together a master list of 100 homeschool field trip activities you can add to your calendar! These low-budet trips are just right for homeschooling families and your children will love them!

Homeschool Planning Guide

Are you overwhelmed with planning your homeschool field trip? Here is a free homeschool field trip planning guide that will help you keep organized. We’ve organized this planning guide into six sections with tips and local recommendations.

  • Fine Arts
  • Local Government & Business
  • Museums
  • Parks & Recreation
  • Outdoor Activities
  • Group Tours

Click Here for our Free Printable Guide

Filed Under: Full, Homeschool Field Trips Tagged With: field trip ideas, homeschool field trips, winter field trip ideas

Christmas Coloring Countdown Printable

December 12, 2019 By Valerie Mcclintick 2 Comments

Last Minute Christmas Countdown

Did you forget to do a Pinterest worthy Advent Calendar this year?  Don’t worry, I’m right there with you. I blame Thanksgiving. It was just too close to Christmas this year, wasn’t it?  I mean, I ordered a bunch of tiny treats to put in my wooden advent calendar but I just never got the Christmas Rubbermaid out of the garage in time…and here we are half way through December.

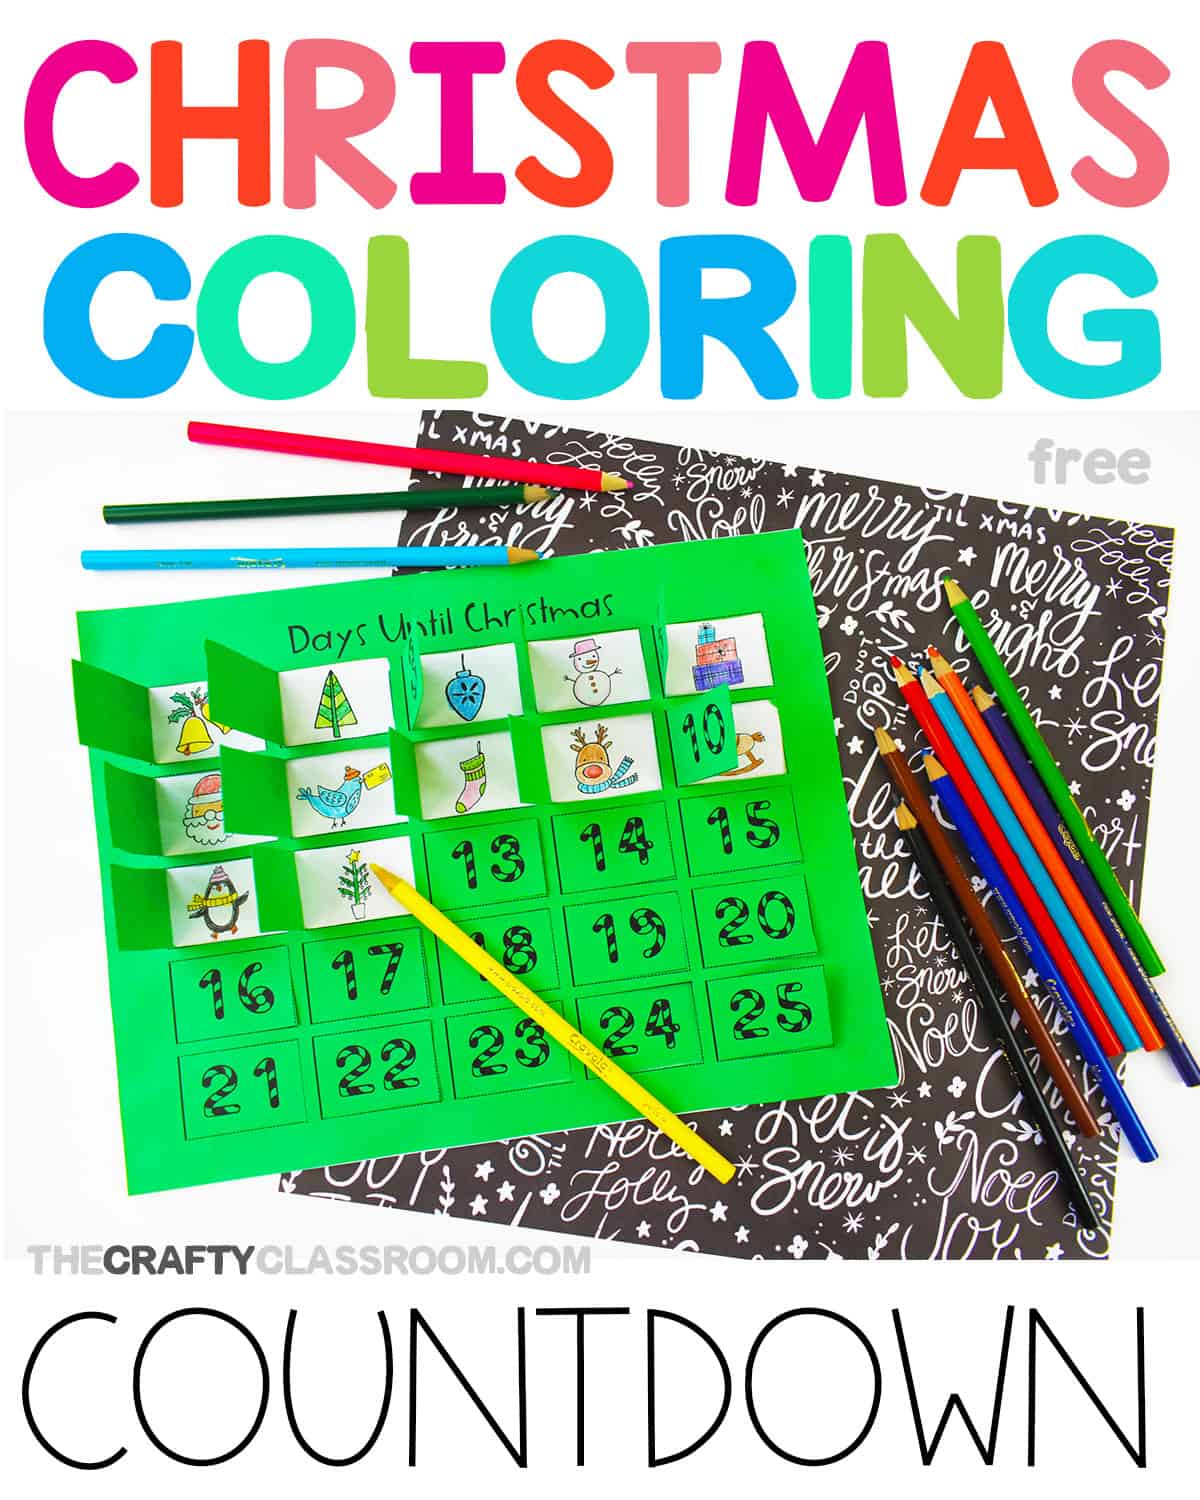
Well, look. Today I have a simple, no-excuses Christmas countdown calendar you can print up for your kiddo.  There are not mini-chocolates or extra things required. Just print it up, make a few cuts, and you’ll have yourself a working countdown calendar that your little one will look forward to for the rest of the month.  And hey…..just tell them they get to color in the first 12 days as a special 12-days of Christmas bonus.

Free Printable Christmas Countdown

Let’s face it….there is just something so FUN about counting down to Christmas Day! Children LOVE to wake up and mark another day off the calendar. You might already have a felt advent calendar, or even a wooden advent calendar, but there is something extra fun and unique about creating your own countdown keepsake.

Simple Christmas Countdown Calendar

I’ve seen quite a few Christmas countdown calendars over the years, and while they are super-cute, sometimes they are just too much work to set up! Especially when Thanksgiving ends up really close to Christmas, there just isn’t enough time to transition from one holiday to the next. Well, this Christmas Countdown Coloring project solves that problem as it couldn’t be simpler.

To set up this countdown calendar, all you need to do is print out the two pages; the cover sheet that includes the numbered windows, and the background sheet that contains the pictures. Use scissors, or an Exacto knife to cut the windows on three sides as shown in the photos, then glue the cover sheet over the sheet with all the pictures.

Each morning, when you child wakes up, have them open another window and color in the Christmas picture! Every day they’ll be greeted with a new festive holiday character to color in. By the time Christmas comes around, you’ll have a special keepsake of their hard work you can keep for years to come! If you have nieces and nephews, or if you are sponsoring a child overseas, this is a lightweight advent calendar you can send along for not very much in postage.

Christmas Coloring Countdown

Print this free countdown to Christmas calendar on cardstock for best results. If you have colored paper for the the numbers that would add some holiday cheer!

PRINT

Filed Under: christmas crafts, Christmas Printables, Coloring Pages, Full, Holiday Printables

Homeschool Spelling Curriculum

November 10, 2019 By Valerie Mcclintick 2 Comments

Interactive Spelling Activities for Any List

I don’t know about you, but spelling has been a constant struggle in our homeschool. We’ve tried many dedicated spelling curricula over the years, and they are either much too easy or much too hard for my children. Often they are quite boring and require hours of writing and rewriting words with little to no interactivity.

Additionally, they are often expensive, requiring us to purchase a teacher’s manual or a slew of manipulatives that my students bore of quite easily. For spelling, what I really need is a variety of engaging ways to encourage my children to practice their spelling words. I want them to have FUN while working on their spelling words. Is that too much for this homeschool mama’ to ask?

Well, this month, I decided that I had enough, and set out to create my own spelling word resources. I chose the following goals for this resource:

Let me tell you that I am BEYOND excited to announce our latest product: Editable Interactive Weekly Spelling List Pack

  • Editable for Any Word List
  • Adaptable for Multiple Ability Levels
  • Weekly Progression of Knowledge
  • Covers Written & Oral Spelling Activities
  • Covers Syllables, Vowels, ABC Order, Beginning Letters
  • Interactive, Hands-On Activities & Games
  • Is Virtually NO-Prep for Me :)

Let me walk you through how this spelling product works! Basically, on the first page of the product, you’ll type in your own word list (10 new words and 2 review words), and it will instantly AUTOFILL your words directly into all 18 pages of the document, giving you an entire week of custom spelling activities and games. Isn’t that exciting? Here is how a typical week will look:

Spelling PreTest

(Optional) If you’d like to see you’re your student knows beforehand, you can have them take the spelling pretest. This is also helpful for students to see their own progress. We recommend having students take this spelling pre-test at the start of the week on Monday. Remind your students that they aren’t expected to know these words, it’s just for them to compare their progress at the end of the week.

MONDAY:

(after the optional spelling pretest)

Robot Roll Game: Students roll the dice, add the number. Students match the number they rolled to their spelling words and write that word in the empty box.
Inspect & Trace: Students identify consonants & vowels, tracing their spelling word with different colors. Next, students circle the number of syllables in their word.

TUESDAY:
Spelling Practice Fold & Peek: Students practice writing their spelling words. Words are written along the right side of the paper where students can fold, cover, or peek as needed.
Dab & Spell Aloud: Students use bingo daubers to find and dab their word. Each time they dab, students spell the word aloud.
Word Worm: Students spin and read their spelling word aloud. Students then write the word on a worm and spin again.


WEDNESDAY:
Letter Boxes: Students write their spelling words in the shaped boxes.The shapes of the boxes give students a clue as to what letter might fit in the box.
Roll & Write: Students roll the dice and practice writing their spelling words in the columns. The first column to fill up is the winner!
Target Word Practice: Each letter has a number value. Students write their words, then calculate the value based on the number chart.

THURSDAY:
Rainbow Alphabet: Students write their words in alphabetical order. Then students write their words in rainbow colors.
Spelling Word Cards: This set provides you with spelling word cards for each of your spelling words. Cards can be used for flashcards, or as a memory
Spin & Dab: Students spin and dab a letter from the word they land on until the word is spelled completely. Students read and spell each word aloud. Crayons can be substituted in place of a dauber.


FRIDAY:
Mystery Spelling Word JumbleStudents decipher the spelling word by identifying the beginning letter of each picture and writing the letters in order on the line.
Spelling List BingoStudents play spelling BINGO in small groups with these bingo board cards. Since each word has the possibility to be called multiple times, students can choose strategically.
Spelling Bee GameStudents practice spelling their words as they collect each one for their game board. Students must collect and spell each word correctly to win the game.Full instructions provided on the game board. (2 pages)

Click Here for more details on Interactive Spelling

Filed Under: Full, Learn to Read, Reading Printables, Spelling Crafts

Pros & Cons of Homeschool Unit Studies

November 1, 2019 By Valerie Mcclintick 3 Comments

If your family is tired of textbook learning, or you have a child who learns best through hands-on projects, unit studies could be your best friend. Unit studies are short or long term curriculum plans that teach most or all of the coursework revolves around the same theme. So, instead of having math, science, history, and language arts as separate subjects, they are all integrated into one subject one a theme, such as horse, the civil war, space, or art history.

Topic-based lessons can be a fascinating way to homeschool. Before beginning them in your homeschool, here are some of the pros and cons of homeschool unit studies.

Free Mushroom Unit Study from The Crafty Classroom

Pros of Unit Studies

Unit studies could be just what your family needs. They are engaging and easily adaptable to various levels. This means the entire family can work together instead of having to teach every child a different program for each subject. Here are some other positive attributes of unit studies.

Passion Led

We are all motivated by our interests. Children learn better and retain more information when they are engaged. The easiest way to engage children is by appealing to their likes. Choose unit studies that your child will love doing. This eliminates the “boredom” of school and makes even the less desirable subject interesting.

Customizable

A unit study is what you make it. It can be on any topic you choose. Even the sky isn’t the limit. Traditional curriculum follows a set pattern. There are only so many different textbooks available. Most are not built around specialized topics. A unit study can also be customized to your family’s schedule and make-up. The same unit study could be used for one student, or adapted to be used with five at different levels.

At Student’s Pace

A homeschool unit study moves at the pace of the student. Unlike traditional lesson plans that tell a student what to do each day. Homeschool unit studies give the student a goal and resources to explore at his own pace. Siblings can explore the same subject matter according to their ability. The point is not to get everything completed, but to master the topic at hand.

Endless Possibilities

The greatest pro for unit studies is the endless possibilities. Anything can become a unit study. They can include field trips, projects, blogs, experiments, and volunteer work. Unit study-based homeschool curriculum is never limited to just books. There is no wrong way to do a unit study and the same topic can be explored many times from different angles.

Cons of Unit Studies

While unit studies have so much to offer, they aren’t for everyone. There are drawbacks to this kind of homeschooling. Before delving into the world of unit studies, consider the following cons.

Can Be Time Consuming

Putting together homeschool unit studies are a good deal of work. It requires much more of an investment than just using a textbook program. You will need to plan out every aspect of the unit study, find resources, create or find projects, and decide what your ultimate goal is. There are pre-made unit study available. These will save time, however, you will still have to gather the resources. Unit studies are doable for most homeschool families. Just make sure to evaluate how much time you have to invest before beginning.

Need to Stay Organized

Tackling a unit study requires organization. You will need to keep on top of what books and resources are needed when. Make sure to allow time for checking out books, ordering supplies, and delivery. Also, it will take a little more attention to stay on top of what students are doing.

Watch the Expenses

Don’t fall down the rabbit hole! Unit studies can easily get very expensive. Be conscious of costs when planning projects, tools, resources, and books. There is so much out there to explore, and so many ways to do it. Have a budget and stick to it. On the topic of getting carried away, it is easy to over-plan and want to do more than is humanly possible to complete. The best unit studies homeschool curriculum does not have to be expensive or elaborate, but it is easy to get carried away.

Non-traditional

Homeschool unit studies are not like traditional schools. There are no daily lesson plans. Assigning grades is not like marking paper tests or quizzes. They are very open-ended and free form. If you like structure and a more traditional school approach, you may not enjoy unit studies. However, unit study homeschool curriculum can be what you make them, just decide how flexible you are willing to be.

Do you have any pros or cons to add?

Now that you are aware of the pros and cons of homeschool unit studies, here’s HOW to create a unit study that’s fantastic and fits your family perfectly!

Or, if you are looking for great examples of fabulous unit studies, grab my favorite free unit studies right here:

  • Pumpkin Unit Study
  • Mushroom Unit Study
  • Trees Unit Study

Filed Under: Full, Unit Studies Tagged With: advantages of homeschool unit studies, free unit studies, homeschool unit study, how to create unit study, why homeschool unit studies

Pumpkin Unit Study

If you love all things fall and harvest, like beautiful imperfect round pumpkins there are many wonderful ways to incorporate them into your homeschool routine. Pumpkins can be turned into math, science, and history lessons, but also so much more. For a pumpkin unit study, you really need no special supplies or expensive curriculum, just a few pumpkins and some basic items you already have around the house.

Pumpkin Math

Grab a ruler, a scale, and a flexible measuring tape. Bring home several pumpkins or head to the pumpkin patch with them and work on some math skills.

  • Measure the height, width, and circumference of several pumpkins. Weigh pumpkins on a scale, remove the pulp and seeds and weigh them separately.
  • Have younger children place pumpkins in a line in order of largest to smallest and reverse. Cut open a pumpkin and count the seeds.
  • Once your pumpkin is cut open measure the amount of seeds vs. pulp.
  • Cut a small pumpkin in half, then quarters, then eighths to introduce or reinforce fractions with your child.
  • Use pumpkin seeds as manipulatives for counting, skip counting, grouping, creating arrays, use a fine tip sharpie to write numbers on clean dry seeds to use to create math problems.

Label the Parts of a Pumpkin

For this hands-on activity, you just need toothpicks and a bit of cardstock. Cut cardstock in small 1”x2” squares. Write the parts of a pumpkin on each piece of cardstock- stem, seeds, pulp, skin, and ribs.

Tape each piece to a toothpick. Cut pumpkin open or in half and have them stick the label in the correct place, hands-on fun is much more memorable than a worksheet!

However, if you’d rather not label an actual pumpkin, I don’t blame you one bit! You can still work on labeling and identification when you use our free Parts of a Pumpkin labeling worksheet. The set includes a Coloring Page, Notebooking Page, Chart, Labeling Sheet and a Cut and Paste Activity. You can also grab the pumpkin clipart to use within your own teaching resources, just be sure to read the Terms of Use first.

Cinnamon and Sugar Roasted Pumpkin Seeds

An easy pumpkin recipe is a great way to enjoy a hands-on activity for math, science, and reading skills. Recipes help children learn to follow directions, introduces them to fractions, scientific reactions, and more.

You will need:

  • ¾ cup Pumpkin seeds
  • 2 teaspoons butter
  • 2 teaspoons sugar
  • 1 teaspoon cinnamon or pumpkin spice
  • Preheat oven to 300 degrees.
  • Remove the seeds from your pumpkin.
  • Wash well, drain in a strainer and remove all bits of pumpkin pulp.
  • Dry seeds well.
  • Toss in a bowl with melted butter, sugar, and cinnamon.
  • Spread in a single layer on a baking sheet.
  • Bake for 25 minutes.
  • Allow to cool then store in a container with a tight-fitting lid.
  • A delicious treat to enjoy while learning all about pumpkins!

Quick Facts About Pumpkins:

  • In Colonial America they sliced to top off the pumpkin, removed the seeds and pulp then filled it with milk, spices, and honey, They then baked it right over hot ashes to make the first pumpkin pies!
  • Pumpkins are made of 90% water.
  • Every single part of the pumpkin is edible, even the stem.
  • Pumpkin is considered a fruit, mainly due to its seeds.

Decorating pumpkins this year but want an educational spin on it? Paint your pumpkin like a globe, label the oceans and continents. Have older children label additional details.

Pumpkin Art Project for Kids

If you want to add a little fall fun to your classroom try these DIY Pumpkin Window clings! Your kiddos can each design their own colorful pumpkin, using these special paints, and our free pumpkin template. You’ll have a unique fall decoration you can hang up for years to come!

Educational Pumpkin Books

Pumpkin Vocabulary

Pumpkin is from the Greek Word ‘pepon’ which means ‘large melon’.

Use the words below as spelling and vocabulary words for your child. There are many ways they can be used such as in sentences for handwriting and grammar,

Pumpkin, Gourd, Seed, Vine, Rind, Pulp, Seedling, Gourd, Harvest, Stem, Tendril, Ribs, Sprout, Skin, Leaves.

Pumpkin Geography

Read the following pumpkin facts aloud and have your child locate the places on a map.

  • Pumpkins are grown on every continent but Antarctica.
  • Morton, Illinois considers itself the pumpkin capital of the world.
  • The world record for the largest pumpkin is 2,600 pounds and was grown in Germany in 2016.

More Pumpkin Printables & Ideas:

We have a great variety of free pumpkin printables and teaching resources you can add to your unit study. These are great for adapting your lesson for younger students:

  • Find Free Pumpkin Printables at PreschoolMom.com 
  • Find Christian Pumpkin Crafts at Christian Preschool Printables
  • Find Pumpkin Bible Verse Cards at Bible Story Printables
  • Find Pumpkin Learning Centers at File Folder Fun

Hummingbird Art Project for Kids

Learning about hummingbirds can make a fantastic unit study for your homeschool classroom. Especially if you time your studies up with Spring & Summer when hummingbirds are likely to be out and about. Besides nature journaling, you might consider making some beautiful window art so you can enjoy hummingbirds year-round.

We’ve designed two different ways to make stunning window cling hummingbirds. The easier version is presented first and the more difficult version is second.

Hummingbird Art Material:

Hummingbird Template

Faux Stained Glass Paints

Laminating Sheets

Hummingbirds Field Guide

For either project, you’ll need the free hummingbird template along with some basic supplies. The reason you’ll need a laminating sheets is because that is how we’ll be making the plastic for the base. You’ll also need a laminator to run the blank laminating sheets through to strengthen the plastic. If you don’t own a laminator, you might consider just purchasing plastic sheets for crafting. However, I believe that the least expensive method is with the laminating sheets, especially if you’re doing this project with a large group.

Hummingbird Art Project 1

This first hummingbird art project tutorial creates a more modern stained glass looking bird. It’s also a bit easier so it might be better for younger children. A hummingbird art project for older children can be found below. However, the first few steps are the same as far as prepping so read through the next few steps before scrolling to the more realistic version.

Step 1:

Before starting the project, you’ll want to prepare your plastic. Basically, you’ll run your laminating sheets through the laminator wihout putting anything in between the sheets. The end result is a stick plastic sheeting you can use as the backdrop for your project. I always run a few extra so I have plastic sheets on hand. TIP: Purchasing laminating sheets is much less expensive online

Step 2:

Tape your plastic sheet on top of your hummingbird template. If you need to be able to move your project while it’s drying overnight, then tape them both to a piece of scrap cardboard as well.

Step 3:

Using black paint, outline the shape of the hummingbird. Set aside to dry. I set mine aside for about 40 minutes, and it wasn’t dry, but it had set enough that I could continue.

Here is how the bird will look when fully outlined. If you are doing this project with younger students, you might consider doing the outlining for them. That way there is no waiting and no frustration with outlining.

Step 4:

Once your outline is set enough, you can fill in the colors. Just be careful not to jab your paint nozzle into the black paint. The outline seems to help the paint settle into the unpainted areas, so don’t worry if you don’t get the paint right up to the edge as it will settle a bit and spread out as it dries. I started with a blue beak and a green head.

Step 5:

Continue to add colors to fill in the hummingbird’s body. I used Pink, orange, white, welly and green on the rest of the body. Then blue on the tail.

Step 6:

Using different hues is a good way to add colors to the bird’s tail. I added turquoise, light blue, and then violet.

Step 7:

Here is how I filled in the hummingbirds wings. I used blue, green and yellow for the top of the wings and then orange, pink and white for the underside of the feathers.

Step 8

Here is how the bird looked once completely painted in. You can fill your bird in any way you want though! The more color the better! When finished, set it aside to dry overnight

Step 9

Here is how the bird looked in the morning. The colors all seem to have darkened up a bit, but don’t worry…once the light shines through you’ll see those beautiful colors again!

Step 10

Use a pair of scissors to cut out around the hummingbird. I don’t know if you can see in the photo above, but I went about 1/3 of an inch all the way around the bird.

Once you’ve got your bird cut out, it’s time to hang it on the window! How stunning is that!? Mine stuck on either side, but the side with the paint did seem more secure. However, I’m not sure if the paint will transfer to the window on a hot sunny day so I’m going to leave it with the plastic side touching the window for now.

Hummingbird Art Project 2 (Realistic)

If you have older students, or maybe you want to create a hummingbird alongside your kiddos, you might appreciate these more realistic version. This tutorial is pretty much the same, however we won’t be outlining the bird, and we’ll be blending the colors as we go.

Step 1:

As mentioned above, there is no outline, so you’ll basically be painting on top of the plastic/template with the colors you want for each section. Here is a look at how I’ve painted my bird. I used purple then blue for the beak. Turquoise for the head, then a row of orange and pink. A section of white, yellow and green. Each time I’ve added a new color, I used the tip of the paint applicator to blend streaks into the previous color. I did so in a curved fashion to create the appearance of texture for the features. It sounds more difficult than it is, once you get going on it, it’s pretty simple to blend.

Step 2:

Here is an up close look at the blending. This was all created simply by dragging the tip of the paint applicator through different colors to create “movement” I’ve also used the purple and darker green to create depth where there should be shadow (at the base of the wings, and where the tail feathers meet the body, those areas should be naturally darker).

Step 3:

I actually used quite a bit of white for the center parts (the center of the body, and the center of the feathers). After the base of white, I blended in some greens and blues to help the appearance of individual wing feathers. I also pulled some orange up into the top of the turquoise head.

Step 4:

Here is how the bird looked when I was done painting. I set it aside to dry overnight.

Step 5:

This is how the bird looked in the morning. Again, it looks as if it has darkened up, but that is just because there isn’t any light shining through the colors.

Step 6:

Once I cut out the hummingbird and hung it on the window the colors brightened up nicely. A lot of the different colors and textures cam through very nicely. In the photo you can see the edges of the plastic, but from a distance, you really can’t see it at all, and it looks quite stunning on the window.

Step 7:

The only problem with this little guy is that he needs some friends! How pretty would it be to have multiple hummingbirds on the window?! This is definitely a project you can do alongside your kiddos. I’ve even recommended that my kiddos make some into Christmas gifts for family members. And this art technique can be used with a variety of different pictures. In fact, I’ll have some more tutorial and templates coming soon so stay tuned for those!

Fall Art Projects for Elementary Students

The first day of fall brings opportunity for all kinds of stunning art projects for your students. These fabulous fall leaves will look fantastic hanging on a hallway bulletin board, or adorning your classroom walls. This is a simple art project that students of all ages will love.

[adthrive-in-post-video-player video-id=”fADfPEWE” upload-date=”2019-09-12T18:21:21.000Z” name=”Autumn Leaf Zentangle Art Project ” description=”Get Creative with this beautiful fall leaf zentangle”]

Fall Leaf Art Project Materials:

Fall Leaf Template

Chalk Pastels

Black Construction Paper

First Day of Fall Art Projects

Step 1:

Cut out your leaf template very carefully. If you are using this project with younger students you might cut out the templates beforehand as they are a bit of a challenge. Tape the leaf in the upper right-hand corner as shown in the photo, with the edge of the stem almost off the paper.

Step 2:

Starting with your red chalk pastel, press the flat edge on the end of the leaf and drag it forward away from the leaf and onto the black paper. Continue this stroke always starting on the leaf and pressing away from the leaf.

Step 3:

Choose another warm color like orange and repeat the steps. It is a bit more difficult to get the color into the smaller curves, so using the narrow end of the chalk pastel might help with those areas. Overlap the orange over the red to blend in the color.

Step 4:

Continue this method around the leaf, using colors like cream, yellow, light green, brown, and more fall colors. If younger students have difficulty getting the chalk into the curved areas, it’s okay to just color those sections in. Just emphasize pulling the color in an outwards direction.

Step 5:

Even though we are using mostly Warm colors for this fall leaf, it’s good to bring in a couple of splashes of cool colors for contrast. Use purple and blue to make narrow streaks randomly around the leaf. Also, make sure that the leaf template is completely covered in colors as we’ll be using it for the next part of the project.

Step 6:

Once you have your colors how you like them, carefully lift up the leaf to reveal the shadow. If you have any mistakes you can use a Q-tip and a dab of water to remove any chalk mistakes or to tidy up the edges.

Step 7:

Crumple up the leaf a bit so that it looks like a dried-up fall leaf. Then, tape it near the bottom of the page so that it hangs off the edges and looks like it has fallen. Use the white chalk pastel to draw dashed lines to show the movement of the leaf.

If you like, you can have students add the word “FALL” by cutting colored construction paper, or from some extra Fall themed scrapbook paper. If your having a classroom full of students doing this project, be sure to hang them up on the bulletin board! You can even have each child put a word of a fall poem on their project so that the final display has a special message for people to read as they walk by.

If you find your students like this project, you might try our other Fall Leaf Art Projects or our Chalk Pastel Butterfly Craft. Both are great for learning new art techniques while having fun.

Free Trees Unit Study

Besides the fact that nature studies are the best way to enjoy the world God created, I love the fact that they are so easy and require very little money or preparation (aside from a couple of good field guides and such).  You really don’t have to have a very structured curriculum or one at all for your children to absorb and learn a lot.  Just get outside and dig deep into whatever topic you are interested in.

Investigating Trees in the Field

Grab your nature journal, a field guide, water and take a walk out into your own yard or a local park and take a deeper look at the trees. Of course, you have noticed them before but how closely have you really looked?

This time notice the bark, the limbs, the leaves, what types of animals and insects make their homes in and on a tree? Does it bear fruit? Investigate a woodpile, what is different about the cut wood from a rooted tree? Find holes made by woodpeckers or boring insects, carefully inspect knots, and exposed roots.

Take out your nature journal and draw a tree or a section of a tree. You can identify it at home later on at home if you are not able to while out in the field.  Look for fallen trees and note the roots, are they wider or deeper root systems? What kind of creatures make their home in a fallen tree? Does the tree produce food for animals or humans? Gather leaves, small fallen branched, acorns, pinecones, and other parts of trees to observe more closely at home.

Use a camera or smartphone to take photos of knots, leaves, signs of animal life, roots, and other parts of trees.

Younger children will enjoy gathering fallen sticks and leaves to bring home, investigating knots and rotten logs as well as making tree rubbings of the various trees you find.

If time and weather permits visit different areas to observe as many different trees as you can. Find trees that produce food for humans as well- citrus, apple, pecan, maple, etc…

Investigating Trees at Home

Once you have enjoyed a wonderful hands-on investigation of trees in their natural habitats you can continue it at home no matter what the weather is like.  Pick up an inexpensive tree slice from the unfinished wood section of your local craft store, I have a large one, some small tree slices that were bought for crafts and these little bitty birch slices I scored a whole bag of at Dollar Tree.   

Use these to check out the bark a little closer, count rings, measure the height, width, and circumference of the tree ring. Test the softness of the wood.

Use the photos you took out in the field to help you identify the trees, fungi growth, and other characteristics.

Pine Cone Science

If you were lucky enough to come across a few pine cones on your nature walk, you can use these free pine cone science notebook pages to expand learning. Students can color, label, and identify different parts of a pine cone.

Leaf Investigations

Grab some of the leaves you gathered from your nature walk and drop several different kinds in a large glass or bowl of water, be sure they are completely submerged. Be sure your leaves are fresh, this won’t work with dried out leaves!

Leaf Science Project for Kids

Set your bowls in a sunny window, you will need to leave them alone for a few hours.

Come back after a couple of hours and observe what you see. Do you notice the bubbles forming on the surface of the leaf? Do the larger leaves have more bubbles?

The leaves are using photosynthesis ( converting sunlight into energy) and they are releasing the excess oxygen and water that they do not need. Using the water gives us a pretty cool look at how the process works, something we would not normally get to see!

Leaf Identification Activity

While you are waiting for your leaves to bubble grab a field guide or other book, we are loving our Nature Anatomy books as a reference, and see if you can identify the leaves you found.

Try some fun art projects with the leftover leaves like pressing and drying them between the pages of a book to add to your art journal, laminating a few for a fun little placemat, or making a leaf collage.

Parts of a Leaf Printables

For students who are ready, you can add in our free parts of a leaf printables. This set includes coloring pages, worksheets, cut & pates labeling, and notebooking sheets that are sure to liven up your leaf nature journals.

Leaf Art Project for Kids:

Students of all ages will love to make these stunning zentangle leaf art prints. These oak leaves turn out just as unique as the children making them! You’ll find a free printable template and step-by-step instructionss to create these fall beauties here.

Books About Trees for Kids:

Here are some fantastic tree books for reference, tuck a field guide for your area into your nature pack for deeper study out in the field!

Tree Vocabulary:

Branch, trunk, bark, photosynthesis, transpiration, deciduous, coniferous, forest, roots, leaves, canopy, rings, deforestation, blossom, foliage, and dendrophile.

Choose words from above depending on your child’s level to use as spelling and vocabulary words during your study. Use them as writing prompts for journaling, create sentences label the parts of the tree during your nature journaling.

Choose some trees that are in your area and include these as well – Ash, Alder, Maple, Douglas Fir, Birch, Pecan, Lime, Oak…

<div>

Fall Science Experiments for Kids

This helpful set is filled with a week’s worth of fun, educational math games, hands-on activities, science experiments, art projects, early readers and writing prompts. Everything you need for fall to add a little holiday fun to your kindergarten or first-grade classroom this year!

Science:

This set includes five simple autumn science experiments and challenges. Each thematic activity guides students through a fun, hands-on science exploration with very little prep-work. Students work their way through the scientific method using the step-by-step science journals. Each experiment includes a follow-up activity for added learning.

Math:

Each day students will play a fun Thanksgiving themed game or activity then follow up their learning with a lesson sheet to show mastery. Games focus on learning to frame numbers to ten, basic addition, counting to 100, and counting by 10’s.

Art:

We include five stunning fall art projects that are perfect for Thanksgiving. Each project comes with a full photo tutorial, printable templates and easy to follow materials list. Students work with oil pastels, paint, textures, blending and more.

Reading:

This set includes three early readers covering social studies and history. Each story includes a carefully controlled word list and incorporates key vocabulary for extended learning. Students are provided narrative and comparison writing prompts that are not only simple to follow, but would make wonderful educational keepsakes.

Take Home:

T is for Take Home Review Sheets. These sheets can be used as review work in the homeschool classroom or as homework in a standard classroom. Each page features reading, writing, vocabulary, and character thinking points.

</div>

Back to Homeschool Signs

While you are gearing up to start your homeschool year, don’t forget to take back to school photos of your kiddos! Even though you children are not in traditional classrooms, you still might want to have some record of your student’s growth at the start of each school year. Today I have some free printable back to homeschool signs you can use for your photos!

Free Back to School Signs

Don’t worry if you don’t homeschool! I’ve made signs that work for both traditional classrooms and homeschooling classrooms! Simply print the one that applies to you and you’ll be good to go!

First Day of Preschool Sign

I’ve designed this set of back to school signs to start at the Preschool year! I know you’ve probably been “tot-schooling” for the past year or two, but I had to start somewhere and the First Day of Preschool sign sounded like a good beginning. This first day of school sign will look adorable when placed inside a frame and used as a photo prop for your first day of school pictures.

Editable First Day of School Signs

I’ve left plenty of room at the top of the sign for you to add your child’s name, and there is room near the bottom to add the year. You can use a white chalk paint marker, or even your NOYO crayons work too! This makes the set super-versatile because you can edit what goes on each sign. If your handwriting is anything like mine, you might want to use alphabet stickers or something across the top instead. How cute would it be with a 3-D glitter name across the top?!

Back to School Photo Signs

Anyway, with so many different grade levels and options, this set is sure to last you through the year and with multiple children! Simply print what you need below (or save a copy to your computer just so you have one).

First Day of School Sign

This is a free printable back to school sign you can use for your back to school photos.

View Resource

First Day of Preschool Sign

This is a free printable back to school sign you can use for your back to school photos. This sign reads, "First day of Preschool," and has room to write your child's name.

View Resource

First Day of Kindergarten Sign

This is a free printable back to school sign you can use for your back to school photos. This sign reads, "First day of Kindergarten," and has room to write your child's name.

View Resource

First Day of First Grade Sign

This is a free printable back to school sign you can use for your back to school photos. This sign reads, "First day of 1st Grade," and has room to write your child's name.

View Resource

First Day of Second Grade Sign

This is a free printable back to school sign you can use for your back to school photos. This sign reads, "First day of 2nd Grade," and has room to write your child's name.

View Resource

First Day of Third Grade Sign

This is a free printable back to school sign you can use for your back to school photos. This sign reads, "First day of 3rd Grade," and has room to write your child's name.

View Resource

First Day of Fourth Grade Sign

This is a free printable back to school sign you can use for your back to school photos. This sign reads, "First day of 4th Grade," and has room to write your child's name.

View Resource

First Day of Fifth Grade Sign

This is a free printable back to school sign you can use for your back to school photos. This sign reads, "First day of 5th Grade," and has room to write your child's name.

View Resource

First Day of Sixth Grade Sign

This is a free printable back to school sign you can use for your back to school photos. This sign reads, "First day of 6th Grade," and has room to write your child's name.

View Resource

First Day of Seventh Grade Sign

This is a free printable back to school sign you can use for your back to school photos. This sign reads, "First day of 7th Grade," and has room to write your child's name.

View Resource

First Day of Eighth Grade Sign

This is a free printable back to school sign you can use for your back to school photos. This sign reads, "First day of 8th Grade," and has room to write your child's name.

View Resource

First Day of Ninth Grade Sign

This is a free printable back to school sign you can use for your back to school photos. This sign reads, "First day of 9th Grade," and has room to write your child's name.

View Resource

First Day of Tenth Grade Sign

This is a free printable back to school sign you can use for your back to school photos. This sign reads, "First day of 10th Grade," and has room to write your child's name.

View Resource

First Day of Eleventh Grade Sign

This is a free printable back to school sign you can use for your back to school photos. This sign reads, "First day of 11th Grade," and has room to write your child's name.

View Resource

First Day of Twelfth Grade Sign

This is a free printable back to school sign you can use for your back to school photos. This sign reads, "First day of 12th Grade," and has room to write your child's name.

View Resource

Fine Motor Skills Activities for Preschool

February 25, 2019 By Valerie Mcclintick 1 Comment

If you have a preschool student who is in need of working on fine motor skills, you’ll want to provide them with numerous hands-on activities and development tools. These activities should provide students with the opportunity to use their small motor muscles while having fun learning.

Our monthly fine motor skills activity packs are filled with engaging resources, worksheets, activities, and games that build those small motor muscles for young students. If you have missed the prior months activity packs, not to worry, you can still pick them up in our TPT store here.

HUGE Brick Building Mat Mega Pack Available Here

April’s pack is filled with fun, thematic learning opportunities covering Weather, Earth Day, and Easter. NOTE: If Easter falls in March you can simply swap out the Butterfly & Frog theme from March for the two weeks of Easter in April. Everything is designed to coordinate and adapt to the changing holiday. Here is a peek inside our April Fine Motor Pack. For each of the themes, there are at least 14 activity pages described below:

Earth Day Fine Motor Skills Activities
  • GEOBOARD: Students use rubber bands to create the pictures on a geoboard. Each sheet features a letter of the alphabet alongside a thematic picture.
  • MAZES: Students solve the mazes and follow the prompts. Each page features thematic mazes alongside a tracing activity or prompt.
Weather Fine Motor Activities
  • TRACING: Students trace the pictures with colored pencils or fine tip markers. Each page features thematic content and prompts students to complete the pictures.
  • PUZZLE PICTURES: Students use puzzle blocks to create thematic pictures. These sheets feature thematic shapes and provide students with easy and more difficult patterns. A full color example is available for easy reference.
  • LISTENING SKILL SHEETS: Teachers will read the directions aloud and the student listens carefully to finish the task. Tasks involve fine motor elements, coloring, and prepositional positioning of drawings
Easter Fine Motor Activities
  • DOT & POKE: Students cut apart the halves. Students solve the dot to dot activities. Then, students use a push pin to poke a picture onto colored construction paper. See full instructions below.
  • CUT & SORT CROWNS: Each crown features a theme alongside a 4-step sequencing pattern. Students cut out the pictures and glue them in the correct order. Students write their name, color the pictures, then staple the sides to make a crown.
  • SNAP CUBE CREATIONS: Students use counting cubes to make thematic pictures These cubes can be snapped together. If you do not have cubes, students can color the squares in the grid to match the picture.
  • PLAYDOUGH: Students use playdough to complete the prompts. Prompts require students to form and shape the dough to make pictures, solve problems, or complete the scene.
Easter Fine Motor Activities
  • DAB & DOT: Students use daubers to dab by number in order to reveal the mystery picture. (Hold at a distance to help students see the pictures).
  • CUT & PASTE CRAFTIVITY: These crafty projects are perfect for little hands.Students color, glue, and cut to make fun, thematic pictures.Pair with a simple writing prompt or poem for extra learning!
  • POM PICTURES x 2: Students use pom-poms to complete the picture.For added difficulty have students use plastic tweezers to pick up the poms. Alternatively students can glue poms to make these sheets into a simple craft project.
Fine Motor Skill Games
  • CUISENAIRE™ ROD PICTURES: Students use colorful centimeter rods to build thematic pictures. Students are asked to color the rod key to show how many rods they used of each color.
  • BRICK BUILDERS: Students use classic building blocks to recreate these thematic pictures. Students work on storing, planning, and stacking before creating their final picture.

With over 60+ pages of fine motor activities, this set is sure to be a hit for spring! With multi-level activities, this pack easily adapts to your homeschool or classroom setting. Read more and purchase from our TPT store here.

Filed Under: Easter Printables, Fine Motor Skills, Full, weather

10 Places to SELL Your Used Homeschooling Curriculum

March 28, 2018 By Crafty Team Leave a Comment

What do you do with your used homeschooling curriculum after the semester is done? Each time you need to purchase new homeschooling curriculum, you also have old curriculum you need to get rid of. One of the best things you can do is to sell your used homeschooling curriculum, helping fund the next set you need to buy.

…

Read More

Filed Under: Art Curriculum, Classroom Products, Full, Homeschool Books, Homeschool Budget, Homeschool Curriculum, Homeschool Deals, Homeschool Fundraisers, Homeschool Tools

Homeschooling at Night: Why it Works

January 31, 2018 By Crafty Team 1 Comment

03 homeschooling at night f

Does homeschooling at night really work? Many families say yes, it does! How do you homeschool at night, then, you ask? How do you know it is effective and doable? Here are four reasons people homeschool after the dinner plates have been put away, and why they say that it works!…

Read More

Filed Under: Full, Homeschool Classroom, Homeschool Schedule

  • Go to page 1
  • Go to page 2
  • Go to page 3
  • Go to Next Page »

Primary Sidebar

Tags

activities art art projects bible bible crafts bible printables bible verse children children's ministry christian christmas craft crafts curriculum educational crafts file folder games first grade free games giveaway history holiday homeschool homeschool crafts homeschool curriculum homeschool printables Homeschool Tools japan kids kids crafts kindergarten math mazes mom crafts notebooking preschool preschool printables printable printables science sewing st patricks day sunday school valentines day worksheets

Kindergarten Math Worksheets

Footer

I am a Christian mother of four, with over 13-years experience homeschooling in Southern Oregon. The resources and products I create are designed to keep the prep to a minimum while also bringing a little educational fun to your classroom

  • Privacy Policy
  • Cookie Policy
  • Disclosure Policy
  • Terms & Conditions
  • Contact Us
Our 15 Free Preschool Color Charts with help your Our 15 Free Preschool Color Charts with help your student learn their colors quickly and easily. Learning colors in these valuable charts will teach children to recognize colors and common sight words. (Link in Bio) #craftyclassroom #homeschooling #homeschoolmom https://preschoolmom.com/preschool-resources/free-printable-charts/preschool-color-charts/?utm_campaign=coschedule&utm_source=instagram&utm_medium=thecraftyclassroom&utm_content=Preschool%20Color%20Charts
#worksheetsforkids #mazesforkids This new pack of #worksheetsforkids #mazesforkids This new pack of shape mazes is a must-have for your math center! Included in this pack are 5 worksheets that will have your students solving shape-like mazes as well as tracing the shape names, as well as 15 single-shape mazes. Purchase them now and help your students with shape recognition, following directions, spelling, and more! (Link in Bio) #craftyclassroom #homeschooling #homeschoolmom
Get ready for some SIGHT WORD FUN with our Sight W Get ready for some SIGHT WORD FUN with our Sight Word Mazes for Kids!  Featuring 20 sight words, your students will practice visual and fine motor skills while learning to read!  #sightwords #homeschooling #learntoread #superstarworksheets Sight Word Mazes for Kids https://www.teacherspayteachers.com/Product/Sight-Word-Mazes-for-Kids-6522979?utm_campaign=coschedule&utm_source=instagram&utm_medium=thecraftyclassroom&utm_content=Sight%20Word%20Mazes%20for%20Kids
#mazesforkids #worksheetsforkids Download our new #mazesforkids #worksheetsforkids Download our new Rhyming Word Mazes now! They will be a great addition to your writing center. These printable mazes for kids are a great combination of learning and fun. While your students are enjoying the mazes, they will be working on following directions, finding rhyming words, and more! Now also part of our growing Maze Bundle. #worksheetsforkids #mazesforkids #phonics #rhyming #kindergarten #preschool #homeschoolpreschool #homeschoolkindergarten (Link in Bio) #craftyclassroom #homeschooling #homeschoolmom. http://bit.ly/3bCB0K8
Load More... Follow on Instagram

SUBSCRIBER FREEBIE:

Join over 100,000 subscribers and receive our free teaching newsletter!  Join FREE today!

Copyright 2018 Valerie McClintick LLC