• Skip to main content
  • Skip to primary sidebar
  • Skip to footer

The Crafty Classroom logo

PhonicsPrintables
HowtoWriteaParagraph
ColorScience
BrickBuilder
  • Home
  • Curriculum
  • Crafts
  • Printables
  • Bible
  • Notebooking
  • Games
  • DIY Tools
  • Join
You are here: Home / Archives for art

art

Fall Leaf Art Projects for Kids

Fall is a great time to start new art projects with your children.  With all the colorful leaves and foliage there is plenty of inspiration to be found. These Fall leaf art projects are designed to teach children new ways they can color, shade and create texture with different art mediums.  Templates are provided as an option for younger children, those who become frustrated with drawing or struggle with perfectionism, that way children can focus on learning with the medium and technique instead.

Watercolor Fall Leaf Art Project

This geometric fall leaf watercolor project is sure to be a hit in your classroom! can be done alongside an art lesson on hues, and radial art, or even adapted for cubism.

View Resource

Fall Art Project for Kids

This fun fall art project for kids is simple enough for students of all ages! All you need to do is collect some fall leaves and break out the paint!

View Resource

Zentangle Fall Leaf Art Project for Kids

This Fall leaf art project for children combines zentangle with oil pastels and watercolor for a stunning look. Great for children in late elementary or Middle School.

View Resource

Fall Leaf Watercolor Spray Art Project for Kids

This fun fall art project for kids will have your little ones begging to make more! Each leaf is silhouetted with a variety of watercolor sprays!

View Resource

Texture & Patterned Fall Leaf Art

This is a Fall Leaf Art project for children of all ages. Using simple techniques, children can design a leaf with multiple colors and textures for a vibrant outcome.

View Resource

Fall Leaf Art Project For Kids

Students of all ages love this Fall Leaf Art Project. Using Chalk Pastels, this project is great for a First Day of Fall Art Project.

View Resource

Abstract Fall Leaf Watercolor Art

Here is another stunning fall leaf art project for kids! Using neon watercolor paints your kiddos can create this stunning abstract painting in no time!

View Resource

Painting Fall Leaves Art Collage

Here is a SIMPLE yet exciting way to capture some of those beautiful fall colors in your classroom. Students collect their own autumn leaves, paint and print them to make a unique fall collage.

View Resource

Parts of a Leaf Worksheets

Free parts of a leaf science notebook printables. A great set including a chart, labeling worksheet, cut and paste activity, notebooking and coloring page.

View Resource

Printable Fall Leaf Art Cards

This set includes five different leaves each with different shapes, colors and textures for your little artists to explore. These are super simple to print out and lay on the table for some quick art projects this Fall!

View Resource

Fall Leaf Printables

A great set of free fall leaf preschool printables, games, worksheets, activities and resources.

View Resource

Homeschool Art Supplies

Over the years we’ve  had the opportunity to try out MANY different arts and crafts supplies.  Often we’ve been surprised that an off brand has a better quality product then some of the more popular, well known brands.And with other products we’re happy to make the investmentfor a quality product that will last.  Read about our favorite art supplies and where to find the best price.  Find more of our favorite Homeschool Tools and Machines.  Read about our Favorite Homeschool Curriculum Here

Simply Art Watercolor Cakes

I was surprised at the value of this watercolor set. Normally, I stay away from off brand watercolors but this set can't be beat! The colors are bright, and vivid and because these are cakes they last much longer then traditional watercolor packs. We have used this set through many art projects over the years, It took almost 5 years to run out of yellow so we finally bought a second set....but for the price....AMAZING!

View Resource

Crayola Oil Pastels

Pastels were one of my favorite mediums when I was a kid. I used to love drawing on the paper, then blending the colors with my fingertip....the possibilities were endless for the colors I could create and I felt like a young and undiscovered Picasso. That's why I keep pastels in my classroom for my children to work with....I love the ease of color blending with them and we work on shading with them

View Resource

Sunworks Construction Paper

Again, another deal you can get online is this heavy weight construction paper from SunWorks. One pack keeps your classroom stocked up for almost the entire year

View Resource

Pro Art Chalk Pastels

Chalk pastels are fun to have on hand as well. We've recently started to use them with this curriculum and this set really gave us a wide varitey of colors for a good price. Another deal that is better online then in store

View Resource

Caran d'Ache Watercolor Crayons

This was one of our more expensive craft room purchases, but they have held up quite nicely over the years. Watercolor crayons are a great way for children to experiment, and this set comes with a handy tin for storage. (the tin is one of the reason I believe this set has held up so well)

View Resource

Melissa and Doug Triangle Crayons

I usually don't purchase much Melisa and Doug unless I can find a coupon or an online deal, but these triangle crayons have been a blessing in our house. My three year old love them, it feels like his own art set he can use and they don't roll away!

View Resource

Fiskars Gel Pens

If you can't stand glitter in your house, you might take a peek at these glitter pens! We purchased this set for my daughters birthday, and I had a hard time keeping my hands off of them. This is a good deal online and you get over 48 pens!

View Resource

Dixon #2 Pencils

If there were a World's Greatest Pencil Award, we would give it to Dixon Ticonderoga hands down! After years of dealing with broken tips and erasers that pop off (or worse leave streaks across your paper instead of erasing) I've decided that the investment in Dixon is well worth it

View Resource

Glitter Shakers

Glitter shakers are much easier for younger children to use, as you don't end up with the dreaded pile of glitter on your table. The lids come off so you can pour back the excess.

View Resource

Our Favorite Homeschool Tools

Have you ever wondered what a laminator is? Or how about a binding machine. Are you on your seventh pencil sharpener of the year? Come on in and read about our favorite homeschool tools. We'll show you how we use them, why you'd need them and where we found the best price.

View Resource

USA State Birds Art Pack

February 23, 2015 By Valerie Mcclintick Leave a Comment

20150222_154212

I’m so excited to share our newest eBook!

This one has been a while in the making and I couldn’t be more happy with how it turned out.


ringspiralbinder_836x1155 (1)USA State Birds Realistic Art Cards      sample
Children can color their way through our Nation’s state birds with these fun and realistic art cards.  Each bird is shown with it’s unique markings for children to copy and color their own.  Each bird features a coloring card, visual fact card for children to fill in, and memory matching cards.  This set include 27 different birds as many states have the same state bird.

$5.00

Add to Cart


20150222_154225 I recommend using United Tweets of America as a reference book but it is not required.  The book has information on each of the state birds, but is done is a colorful and child friendly format.  There is joking and silliness throughout the entire book.  My daughter was laughing along as she read and constantly brought the funny parts to my attention. Alternatively, you can find many birding websites online for kids to find their facts.


Untitled-1

CardWhile there are 50 states, many of them share a state bird so there ends up being 27 different state birds.

Our Art Pack includes pages for each of these 27 birds.

Each page features a fact card with coloring visual, a blank coloring page square, and memory matching cards.


20150222_162217

I recommend printing on cardstock and using colored pencils for the art cards. (these woodless pencils are my favorite!)

Once children fill out the fact card and color the bird, each section is cut out to be used on a final project.

Untitled-2

The coloring squares can be mounted to poster board, a classroom wall or even in a classroom quilt. Keeping a visual in the classroom is a great way to reinforce and build on knowledge.

Children love to see their work displayed and you can use the display as review before handing your child their next art card.

If you are using this within a traditional classroom setting, this is a great way for each child to contribute art work to a group project.

20150222_162513

20150222_162609


Fact Cards can be treated like flash cards or pasted into notebooking journals.

In a traditional classroom setting these cards also look great on the wall, and provide students the opportunity to read about the other birds.

20150222_162949

20150222_163034


Memory Cards are a simple tool that can be used as a fun way to reinforce the key facts.

They can be played individually as a match and label game, or collectively as a game of concentration.

In a traditional classroom setting, you can turn these into out of your seat activities, passing out one card to each child and requiring them to find their match!

(Do this after you have your classroom art boards set up so children have a reference)

20150222_163334

20150222_163340


Untitled-3


ringspiralbinder_836x1155 (1) USA State Birds Realistic Art Cards       details        sample
Children can color their way through our Nation’s state birds with these fun and realistic art cards.  Each bird is shown with it’s unique markings for children to copy and color their own.  Each bird features a coloring card, visual fact card for children to fill in, and memory matching cards.  This set include 27 different birds as many states have the same state bird.

$5.00

Add to Cart

ringspiralbinder_836x1155 USA State Activity Notebook              sample
5o State Activity Pages: For each of the fifty states children map the location, capitol, landmarks, abbreviation, nickname, state flower, and state bird.  Children color the state flag as well as the state flower and state bird with ample room to add interesting facts and notes.  This activity pack includes two games to finish out your unit: USA Bingo & Roll Across America

$5.00

Add to Cart


Shop ALL our Homeschool eBooks Here

Filed Under: Bird Crafts, Homeschool Curriculum, Nature Crafts Tagged With: art, State Birds, USA

How to Draw a Mandala

Wondering what a mandala is and what it looks like? I’ll give you a hint — it has to do with a combination of gorgeous art and geometric shapes. We’re going to share with you all about what a mandala is and how to draw a mandala, step by step with easy to follow instructions.

What is a Mandala?

Generally speaking, a mandala is for any diagram, chart or geometric pattern that represents the cosmos metaphysically or symbolically. You may have noticed that art and textile in India often feature intricate designs and patterns.  Many beautiful patterns like paisleys, mandalas, and other symmetrical designs can be found on walls, fabrics, and even displayed in the temporary staining of skin with henna.  

The main focus of this mandala project is learning radial symmetry being taught as an art concept etc….more like drawing a mandala for artistic purposes.

Make a Mandala Project

This mandala project will teach your children how to draw their own mandala using radial symmetry. It’s a great opportunity to learn how to draw shapes in a beautiful array of artistry. Plus, your student will learn for the first time how to draw a mandala with a compass and color easily with oil pastels.

How to Create a Mandala Materials

  • Compass
  • Cardstock or Computer Paper
  • Oil Pastels
  • Pencil and Eraser
  • Sharpie

How to Draw a Mandala with a Compass Instructions

  1. Using a drawing compass, center the tool in the middle of white cardstock using the pencil part on the outside and draw a large central circle. Move compass 3/4 of an inch, draw another circle. Repeat two more times.

2. Draw a line vertically in the center of the circle. Draw a line horizontally. Draw 2 lines diagonally.

3. Connect semi-circles within the inner circle as shown below.

4. Draw the following shapes:

  • A small circle in the center. Draw a circle on the last inner circle every other section.
  • In the remaining sections, draw a rounded rectangle as shown below.
  • Within the 2nd circle area, connect each section using a semi-circle. In the center of each section, draw a trapezoid.
  • In the 3rd circle area, draw a small circle centered in every other section opposite to the 1st circle section. Draw a rounded rectangle in the remaining areas.

5. Using a sharpie, trace all shapes until complete.

6. Using Oil Pastels, color all mandala shapes step by step using images and video provided. These colors may include light blue, orange, purple, light green, dark green, and pink. However, you can choose your own colors if you prefer. This is a great way to teach symetrical shapes using patterns in an artistic format.

The Mandala Craft is complete. This gorgeous and amazing India style art would make a great framed picture or keepsake!

Sumi-e Painting for Kids

SumiePinSumi-e is a form of Japanese painting involving a bamboo brush, ink, and rice paper. Even young children can learn the different techniques and brush strokes of this ancient, and still modern art form.

Materials:

  • Sumi-e Ink
  • Paintbrush
  • Rice Paper
  • Practice Material:
    Watercolor Paint
    Construction Paper

Suggested Resources for a Unit Study:

sumie Sumi-e is the timeless art of Japanese brush painting. Sumi-e works are typically made up of just a few brushstrokes, but the graceful birds, fish, and plant life they depict seem to move on the page. This portable kit contains all the materials youll need to get started, plus an instructional booklet covering the history of sumi-e and step-by-step techniques to master the four basic strokes necessary to complete any painting  Click Here


Art Project Tutorial:

Purchasing Supplies

This portable kit contains all the materials youll need to get started, plus an instructional booklet covering the history of sumi-e and step-by-step techniques to master the four basic strokes necessary to complete any painting. With young children you'll find you run out of paper quickly. I have them practice strokes on chalkboard with just water, or a paper towel, then when they are ready to do their final work we move to the rice paper.

View Resource

Step 1

Wet your brush and spin the tip to form a point.

Step 2

Prepare your paper. We picked up a roll of You can cut your paper with scissors or draw water lines to separate it. After you draw your water line, you can tear your paper quite easily.

Step 3

Mix your ink! Our kit came with some black and red ink sticks. (You can pick up additional colors here). show the children how to grind it in the water to create the color.

View Resource

Step 4

Dip your brush into the ink. You just want a little bit of ink here....not a lot. The rice paper is very thin and a lot of ink will make it smudgy looking. Provide a towel for children to dab off the extra.

Ready to Paint!

Now you're ready to paint! Use quick strokes and practice leaving a "pointy" tail at

Tiger Eyes Oil Pastel

TigerEyesPinThe tiger is India’s national animal. It’s strikenly beautiful with the contrasting markings of black, white and orange. This oil pastel project is just right for your studies on India. Children will be amazed with the work they can do when given small amounts of instruction.The peacock is the National bird of India. It’s certainly one of God’s most beautiful creatures, and even young children can make these wonderful pictures. We provide you with step by step drawing tutorials, as well as instruction on using oil pastels to bring your peacock to color.


This tutorial is split into two parts:

  1. Part 1 Drawing
  2. Part 2 Coloring

Materials:

  • Cardstock or Pastel Paper
  • Oil Pastels
  • Pencil and Eraser
  • Black Line Marker
  • (Sharpie is fine)

Suggested Resources for a Unit Study:

IndiaTiger   IndiaTiger2   Junglebook    India


Art Project Tutorial:

Prep: Draw Your Tiger Eyes

If you haven't already, check out this simple tutorial for drawing your tiger eyes first.

View Resource

Step 1

For this art project we're using our Crayola Oil Pastels. We're using: white, peach, light brown, light orange, light green, medium green, yellow

Step 2

Using your light orange, color in all the areas shown. I always refer to the inspiration photo to see which way the tigers fur is moving, and make sure that I color in that direction. This is important later as we blend colors.

View Resource

Step 3

Use your light brown and begin adding little marks of color where the eye meets the nose. Use your finger to blend in the direction of the fur.

Step 4

Add in more blended brown in the upper and lower corners.

Step 5

Use peach to color in the eye, leaving a crescent moon shape at the bottom. Use your light orange to draw lines radiating form the pupil. (see next photo)

Step 6

Use your light brown and draw in more lines radiating from the center. Lightly blend with your finger.

Step 7

More lines with black. Gently TAP the black to blend it in.

Step 8

More lines with light green. Tapping to blend.

Step 9

Add a few dabs of yellow. Add a crecent line of yellow at the bottom of your white mood..

Step 10

Use white to go over your crescent moon, then add a white circle just above and right of the pupil.

Step 11

Repeat these steps for the other eye. Notice the white circle is on the upper left of the pupil (like a mirror image)

Step 12

Using your white, begin pulling the orange fur down in the direction that it goes. Refer to your inspiration photo often as a tigers fur changes direction often!

Step 13

You can add small dabs of black, then blend them in with your finger. This will create a depth to your picture.

Step 14

Make sure you're finger blending in the direction of the fur. A little black goes a long way!

Step 15

Use your black to go over your sharpie marker with little fur lines. I did this just so the black areas looked more like fur and had some texture to them.

Step 16

Choosing the color of your frame is half the fun, I love how black looked, and the bottom area is a great spot for tiger facts or even some poetry!

Pollock Art Project for Kids

PollockPinAction Jackson was most known for his painting styles and techniques. He placed his canvas on the floor and used a varitey of different brushes and tools to drip paint. This is a great activitiy for younger children to explore paint splatteringand drips.
Pollock

Materials:

  •  White Paper
  • Paint
  • Water
  • Toothbrush, Straws, Eye Droppers ect.
  • Pollack Art Card


Suggest Resources for a Unit Study:

Pollock pollock ArtBrushes     SeuratArt


Art Project Tutorial:

Step 1

Go thorough your house and find tools you can use for your action painting.

Step 2

Combs and Toothbrushes can be dipped in paint and used as brushes.

Step 3

Then pressed with your thumb for splatter painting.

Step 4

Eye droppers (or old medicine droppers) can be used to slurp up runny paint.

Step 5

Make a series of drips across your paper.

Step 6

Straws can be used to blow the paint droplets around.

Step 7

Fill your paper with all sorts of moving paint!

All Done

You now have your very own Action Jackson painting!

Seurat Art Project for Kids

SeuratPinPointillism is a fun artistic technique for any age level! Children enjoy making these representational pieces of artwork. This is a great craft for children who like to work on details.
Seurat

Materials:

  •  White Paper or Printable Template
  • Paint or Stamping Ink Pad
  • Pencil with NEW Eraser
  • Seurat Art Card


Suggest Resources for a Unit Study:

Seurat3    Seurat     SeuratArt    Art


Art Project Tutorial:

Step 1

Provide children with blank paper or younger children with black line coloring pages. Print up a few black line coloring pages. Look for landscapes, and ordinary objects online.

Step 2

Find some pencils that have brand new erasers. You want a nice flat top for easy stamping. Q-tips work for this technique as well, but I prefer the erasers as they are nice and flat.

Step 3

Tip: Use the lids of your paints, there will be plenty! Dip your erase into the paint, very gently!

Step 4

Hold the pencil vertical and make a dot on your paper! The amount of paint will determine the size of the dot. You can try for uniform dots or use this knowledge to add character to your project.

Step 5

When you want to change colors use a wipee or a wet paper towel to wipe your eraser.

Step 6

Leave spaces between the dots to add in other colors.

Step 7

Try to use a varitey of colors but resist the need to blend them together with your finger.

Step 8

Think about how you will display your artwork.

All Done

Hang up your art and stand way far back! Look for where your colored dots are blending together...do they still look like dots from far away?

Background Idea

Try pasting your project on to a contrasting piece of construction paper

Mondrian Crafts for Kids

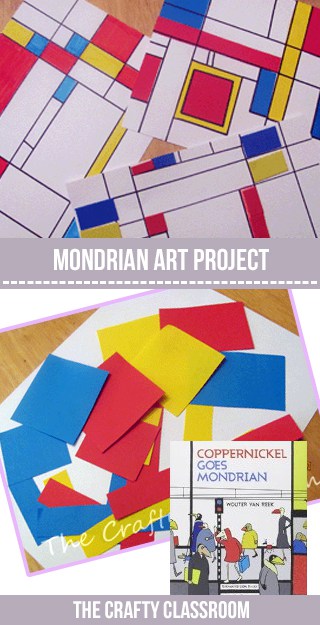
MondrianPinPiet Mondrian was known for white canvas with horizontal and vertical lines, and rectangular shapes filled with primary colors. There are so many ways to explore the art process of line and color, we’ve come up with a couple of different ways you can make Mondrian reminiscent worksof art in your classroomMondrian

Materials:

  •  White Paper, Black Marker, Colored Pens, Construction Paper Shapes, Mondrian Art Card


Suggest Resources for a Unit Study:

Mondrian  teachart    GreatArtists   Art


Art Project Tutorial:

Step 1

Use a ruler to make vertical lines on your paper with your black pen

Step 2

Make some horizontal lines on your paper as well.

Step 3

Continue making lines and sectioning off your paper in an uneven grid.

Step 4

Pick up a pack of sticky back foam shapes (Dollar Tree) and let children fill in the grid.

Step 5

Simply use a red, blue, and yellow marker to fill in the different squares.

Step 6

Cut a variety of shapes from Red, Yellow, and Blue paper. Glue the to the paper in a grid. Then draw your black lines over and around the shapes.

Andy Warhol Art Project for Kids

This is a great project for children who are learning about Andy Warhol and the POP Art movement! The bright colors and bold images used in this fun fifties style makes for some stunning creations in your art classroom. Students of all ages can participate with this Andy Warhol art project. Simply print our free templates (below), or our Pop Art Activity Pack and follow these helpful tips and guidelines for designing in a pop art style.

Andy Warhol Art Templates

To make things easier for younger children, we’ve created these fun and free Andy Warhol Art Templates. Students can use these templates to create their own pop art by adding a variety of bright and complementary colors. We highly suggest using a strong medium to achieve the vibrant colors found in pop art. Try using paint crayons, oil pastels, or really bright markers for best results.

We’ve created two different Andy Warhol templates you can use; Cupcakes and Doughnuts. (UPDATE: Scroll down for Warhol’s Infamous Campbell’s Soup Art Template) We think that these designs will appeal to most kids, because…..well, YUM!! But your art students can design anything their heart desires! Just draw the design a single time and trace it into four quadrants on a separate sheet of paper. They can even make small changes to the design to add a little visual appeal, as we’ve done in our free printable templates below:

These doughnut graphics are hand drawn! Older kiddos can certainly draw their own.

Doughnut Template

Thanks to Zip a Dee Doo Dah Designs for these fun Cupcake graphics!

Cupcake Template

While we have the two FREE art projects available above, we also have an Andy Warhol Pop Art Activity Pack that includes 5 Instructional pages alongside 12 more art project sheets with a variety of themes. This pack is a paid resources available in our TPT store.

Pop Art Coloring Tips

One reason we suggest using paint crayons or oil pastels is because of the ability to blend different colors together! This is a fun way to add some dimension to your pop art projects. Here are a few blending and coloring tips to keep in mind as you complete your project.

Highlighting Shapes

As you fill in the different shapes of your project, look for opportunities to highlight. You can do this by leaving white space around the edges of your shape, then returning to fill them in with a bright color. In the example above the doughnut is colored brown and highlighted with a vibrant pink around the edes of the icing and the edges of the doughnut itself.

Complimentary Colors with Pop Art

When choosing coloring for your shapes and your background, look for complimentary colors to help them POP! Complimentary colors are visually interesting and they compliment each other. You might consider printing up a color wheel for students to use as a reference for this project.

Gradients & Color Choices

You might think that pop art is a bunch of randomly chosen colors, but it’s not! Besides choosing complimentary colors, you might also look for opportunities to reuse colors throughout your entire project. In the example above, you can see that the green is used in two different scenes. This helps tie your project all together. Additionally, look at the yellow glaze of the top right doughnut. It’s hard to tell in the photo, but multiple colors were used starting with a Yellow-Orange, then a medium yellow, then a bright yellow. You can create more visual interest in your drawing by creating different gradients within your shapes.

Stop Coloring!

Okay, with all the vibrant colors in pop art, you might think you need to fill in every single space with color. But white space is your friend! You can leave areas white for visual interest, or even to strategically highlight a specific area. In the photo above you can see white space was left on the cupcake with the cherry in such a way as to represent a shine of light reflecting off the frosting.

Get Creative With Your Frame

Pop art is fun and whimsical style of art, and your frame should match! Try to think of a creative way to frame your artwork that will bring attention to it’s unique qualities. In the photo above you can see that two corners of the black construction paper have been removed, and white paint is used to add a little flair. A custom frame can add a lot of fun to your art project!

Ready for more?! Try our Andy Warhol Pop Art Activity Pack Today! This extra set includes 12 unique designs and layouts to inspire your students to get creative with their pop art projects. This pack also includes the infamous Campbell’s soup template for students to draw and design. With all the unique pop art activity pages, this set is sure to be a HIT in your homeschool or classroom setting.

Famous Artist Projects for Kids

  • Monet Art Project for Kids
  • Van Gogh Art Project for Kids

Monet Craft for Kids

Claude Monet is well known for his beautiful water scenes! This Monet Art Project for Kids is a fun (and messy) finger painting craft that will leave children with beautiful results. The materials used are simple and you’re sure to have them on hand in your art supply closet. I suggest you try this craft beforehand to get a feel for removing the tape.

Monet Art Project Materials:

  • Cardstock Paper
  • Fingerpaint
  • Painters Tape or Masking Tape


Monet Art Project for Kids:

Step 1: Build Your Bridge

For this craft, you’ll need some masking tape to make your bridge shape. I cut our tape in half to get thinner strips. You want to form the shape of the bridge using your masking tape. You can do this ahead of time for younger children if needed.

Continue building your bridge using small sections of tape for the slats. Try to add five or six of them across the bridge at equal intervals.

Step 2: Monet Finger Paint Art

Time to fingerpaint! Provide students with a rainbow of colors for them to dip their fingers in, then show them how to dab their finger multiple times to start filling in the canvas.

This is a great time to teach children about color blending and using similar colors (hues) together to create depth. Show children how to overlap their fingerprints to blend the different colors together.

Continue to fill in your canvas with a multitude of colors and blends. Don’t worry about painting over the tape. As long as it’s securly fixed to your paper the paint will not seep through.

Add more fingerprints over the bridge and below until your entire canvas is filled up.

Step 3: Allow to Dry

As tempting as it is to peel off the tape, set your art asside and allow your art to dry. Keep the little ones busy by reading one of the many beautiful children’s stories of Monet.

Step 4: Peel to Reveal Your Masterpiece!

Once your art project has dried, carefully peel back the sections of tape to reveal Monet’s bridge! Mount these masterpieces to colored construction paper and hang up in your homeschool classroom or in your classroom bulletin board.

Homeschool Art Curriculum

October 22, 2014 By Valerie Mcclintick Leave a Comment

Draw3dPinAs a kid I loved Art.

It was my favorite subject.

Besides Recess and P.E. of course.

Art is something I try to include in my homeschool curriculum every year, but it always seems to take the back seat when life gets busy.

(If you follow my blog you may notice that I post TONS of art projects over the Summer when we actually have time for art.  I call it Summer Art School)

Anyway, this year I found an amazing drawing curriculum that is ONLINE and requires NO help from me.

Let me repeat that.

NO HELP FROM MOM.

I provided art journals, #2 pencils, and when asked a drawing stump.

But that was it.

I set up their username and password and let them be for a couple of weeks.  (i.e. Take it over Mark Kistler, this Mama is tired!)

Imagine my surprise when I picked up my daughter’s art journal and found this. (Continue Reading)

Filed Under: Art Curriculum, Homeschool Curriculum Tagged With: art, curriculum, drawing, homeschool

Tiger Eyes Oil Pastel Tutorial

July 9, 2013 By Valerie Mcclintick 3 Comments

20130706_150334

We are getting tons of use from our Crayola Oil Pastels.
I’ve purchased other pastel kits in the past, but I love the amount of crayon you get with this set. They are so much thicker and have lasted us much longer.

Plus they are nice for little hands.

pastels

Amazon currently has them for $3.88 and free shipping as an add on for Prime
I highly recommend them!
They are wonderful quality, and produce stunning results:

tigeroil

I know right?!

This is our latest project, Tiger Eyes!

I’ve posted the two part photo tutorial

Drawing your Tiger Eyes
Using Oil Pastel on Tiger Eyes

I’m guessing that this would be perfect for 6th and 7th graders,
or very enthusiastic elementary students.

The tiger is the national animal of India, and would also tie ie with our previous oil pastel tutorial of India’s national bird, the peacock.

TigerPin

Can you guess what country we’ll be studying this coming year?

Siggy

Filed Under: Animal Crafts, India Crafts, Oil Pastel Tutorial Tagged With: art, christian, india crafts for kids, instruction, oil pastel, peacock, step by step, tiger, tutorial

Australian Dot Painting

June 12, 2012 By Valerie Mcclintick 4 Comments

Lynn and I just wrapped up another Free Preschool Bible lesson
on our sister site PreschoolPost.com

In case you’re wondering how our partnership works;
Lynn is the actual writer of the lessons,
and I am the web-designer/printable maker (what else right?)

It’s really a great arrangement for both of us!


(That’s Lynn….she’s great!)

Actually, one of my other responsibilities is to “shoot” the crafts….
meaning for each month Lynn sends a lesson,
I actually “do” the craft with the kiddos and take photos along the way.

How fun is that?

Well as I was saying, we just wrapped up lesson,
so that means we got to try out a new craft!

So here’s how it all went down:

Don’t you just want to make your own now?

preschool bible lesson

Check out the rest of the lesson for more
Down Under printables & resources!

Filed Under: Australia Crafts, Preschool Crafts, Preschool Printables Tagged With: art, australian, bible, god made animals, kids, lesson, lizard, preschool, printable, shapes, sunday school, template

Australia Crafts

July 21, 2011 By Valerie Mcclintick 1 Comment

I’ve been meaning to post these for a while now,
We finished up our Unit on Australia before the start of Summer,
and I’m just now getting around to sharing them.

Learning about Australia was great fun!

We used HOAC Continent Study on Australia

As well as Discovering God’s Animals (from COAH)

And of course we did lots of crafts too:

We made Cave Drawings:
australia crafts for kids

We made boomerangs (That work!)
boomerang craft for kids

We made music with a “Didgeridoo”:
didgeridoo craft for kids

We even painted our faces:
aboriginal art

We had a GREAT time learning about the Land Down Under!
I added these all to our Australia Themed Crafts on the main site!

Feel free to Bookmark, Pin, Staple….or whatever if you see something useful :)

Filed Under: Australia Crafts, Countries & Places Tagged With: aboriginal, art, Australia, boomerang, cave drawing, continent, countries and places, crafts for kids, didgeridoo, educational crafts, geography, geology, history, homeschool craft, social studies

Starting Nature Journals

July 12, 2011 By Valerie Mcclintick 12 Comments

Do your children have a nature journal?

Do you?

I’ll admit that I’ve tried them.

But first let me just tell you a little story….

So sit back……grab your coffee,
and enjoy my failure for a moment.

A few years ago when I first decided to homeschool,
I was introduced to the idea of Nature Journals.
There were so many amazing examples online of what
could be included, so many beautiful watercolors paintings
amid pressed flowers and texture rubbings of important things.

It was overwhelming.
But I like a good challenge

I decided that I would create (see the problem here)
lasting memories of a happy, outdoorsy childhood, spent
among wildflowers, babbling creeks, white tail deer that stood
still for hours.

Ha.

So I set out with my then 2 children
I packed up our watercolor pencils, sketchbooks,
apple juice boxes and peanut butter crackers.

I drove for a half hour, to a scenic viewpoint,
one I was sure would inspire my children to create magic.
We hiked for 20 minutes and finally sat down in the Summer
heat to begin our journaling.

So, I’m sure you can imagine,
(or at least infer by the tone of this post)
How it all went down.

And it went Down. Hill. Fast.

Think sticky juice box fingers mixed with expensive sketchbooks
Colored pencils with ever breaking tips. Not a sharpener in sight.
Peanut butter cracker crumbs.
And only ONE green pencil, in a field of green trees and flowers.
682 feet above sea level, Snickering onlookers, and two children coming down
from an Apple Juice high.
(Ooooh I could have just….)

MY DREAMS of inspiring, keepsake worthy nature journals
was shot.

I loaded the children back up in the car.
And drove home.
Defeated.

I haven’t attempted Nature Journals since.

Until Now.

WHY?

Because I had the privilege of hearing This Funny Lady,
speak at a Homeschool Conference last month.

And I was again inspired to try Nature Journaling.

However.

And this is a big However.

HOW – EV – ER
(are you catching my tone here?)

This time I’m going in with little to NO EXPECTATIONS.
This time I understand that I can’t expect a child to draw a bird
while it’s flitting around everywhere.
That it’s OKAY to just sit back and enjoy the creature, and then LATER
*gasp*
look up images and facts about the animal.

So, as you check out the following photos,
DO NOT BE DECIEVED.
There was no magic peaceful moment as we drew them.
It was actually an instructional time for us, sitting around the table
and working hard at where to put little eyes, and beaks, and toes.

But we do spend peaceful mornings together watching these little birds
fly around our yard. We talk about what kind of birds they are, and each time they visit we look for new things to learn about them.

And then later we looked up images and poetry online,
and added them to our nature journals.

And here’s how that all translates:

Didn’t they turn out cute?
Now those are keepsakes!

I was so jealous inspired with how easy things went
that I went out and got myself a sketchbook.

Oh. And colored pencils too.
The good ones.
I just can’t resist an opportunity for new pencils.

And you know what?
I forgot how therapeutic drawing was.

And I love that I can use my journal to document the “real life”
that causes us to add something to our journals in the first place.

I’m feeling pretty good about nature journals,
And this time around
I think we’re off to a great start!

Filed Under: Animal Crafts, Bird Crafts, Bug Crafts, Earth Day Crafts, Garden Crafts, Nature Crafts Tagged With: art, homeschool, journaling, lapbooking, nature journal, notebooking, sketchbook

Warhol & Pollock

March 27, 2011 By Valerie Mcclintick 1 Comment

I just finished uploading two more of our Famous Artist Crafts!

jackson pollock craft for kids>

Jackson Pollock

This was a well loved activity for my kids,
they loved blowing with the straws!
Me? I wan’t really into passing out
for an art project, but they were in dizzy oblivion.

andy warhol craft for kids

Andy Warhol

These were really fun, Sissy enjoyed this a bit more then Bub,
who found it daunting to color in one color for each open space.

andy warhol printables

I included some fun Warhol printables,
you can snag the boy & the girl as well as
some adorable cupcakes or some sneakers!

Older children can design their own!

Eveything is uploaded to our Famous Artist Craft Section!

PSSST…. Here’s a sneak peak at who’s coming next:

Stay Tuned!

Filed Under: Famous Artists, New Posts, printables Tagged With: activities, andy warhol, art, bible, craft, crafts, homeschool, jackson pollock, kids crafts, lesson

Primary Sidebar

Tags

activities art art projects bible bible crafts bible printables bible verse children children's ministry christian christmas craft crafts curriculum educational crafts file folder games first grade free games giveaway history holiday homeschool homeschool crafts homeschool curriculum homeschool printables Homeschool Tools japan kids kids crafts kindergarten math mazes mom crafts notebooking preschool preschool printables printable printables science sewing st patricks day sunday school valentines day worksheets

Kindergarten Math Worksheets

Footer

I am a Christian mother of four, with over 13-years experience homeschooling in Southern Oregon. The resources and products I create are designed to keep the prep to a minimum while also bringing a little educational fun to your classroom

  • Privacy Policy
  • Cookie Policy
  • Disclosure Policy
  • Terms & Conditions
  • Contact Us
#worksheetsforkids #mathforkids Our Q-Tip painting #worksheetsforkids #mathforkids Our Q-Tip painting, number worksheets will have your students learning and having hands-on fun at the same time. Allowing your students to use their hands to learn will help them retain knowledge. Your students will use Q-Tips and paint to fill in each circle as they trace numbers and letters, and color in the cute pictures! Purchase them today and get your students excited about numbers. (Link in Bio) #craftyclassroom #homeschooling #homeschoolmom https://www.teacherspayteachers.com/Product/Dip-and-Dot-Q-Tip-Number-Activity-6747861?utm_campaign=coschedule&utm_source=instagram&utm_medium=thecraftyclassroom&utm_content=Dip%20and%20Dot%20Q-Tip%20Number%20Activity
Loving the Spring sunshine here in southern Oregon Loving the Spring sunshine here in southern Oregon!! My tulips are hiding out on the porch away from the deer.
#worksheetsforkids #numbermats Fine Motor Number C #worksheetsforkids #numbermats Fine Motor Number Charts, numbers 0-30. Our number charts will help your students learn one-to-one correspondence, numbers in order from 0-30, patterns, numerals, and their names. Our number charts are colorful and fun, making them a great first step to getting your students to count. Add them now to your math center! (Link in Bio) #craftyclassroom #homeschooling #homeschoolmom https://www.teacherspayteachers.com/Product/Fine-Motor-Numbers-Charts-6734309?utm_campaign=coschedule&utm_source=instagram&utm_medium=thecraftyclassroom&utm_content=Fine%20Motor%20Numbers%3A%20Charts
Load More... Follow on Instagram

SUBSCRIBER FREEBIE:

Join over 100,000 subscribers and receive our free teaching newsletter!  Join FREE today!

Copyright 2018 Valerie McClintick LLC