• Skip to main content
  • Skip to primary sidebar
  • Skip to footer

The Crafty Classroom logo

NumberoftheWeek
InteractiveMath
FineMotorWorksheets
ShapeoftheWeek
  • Home
  • Curriculum
  • Crafts
  • Printables
  • Bible
  • Notebooking
  • Games
  • DIY Tools
  • Join
You are here: Home / Archives for famous artist

famous artist

Van Gogh Oil Pastel Project

VanGoghPotatoPinFor children who want to explore more then just Van Gogh’s Starry Night, you might introduce them to The Potato Eaters. This is such a great painting to study, not only in context, but in color, and movement as well. We used the book, “What Makes a Van Gogh” for reference.
VanGogh

Materials:

  •  Paper
  • Oil Pastels
  • Pencil
  • Van Gogh Art Card
  • Visual of The Potato Eaters by Van Gogh.


Suggest Resources for a Unit Study:

Vangoghcolors    Vangogh2    VanGogh1    SeuratArt


Art Project Tutorial:

We are going to use our Oil Pastels. This is our recommended set of pastels from Crayola. You get a larger crayon, a variety of colors and the price is right. We've had this set for over two years and we still have huge crayons left.

Look closely at The Potato Eaters. We're going to be focusing on the hanging light in the middle of the picture. Take note of how the light is shown on the women's faces, and their backs are dark with shadow.

We're going to make the background first. Choose neutral colors, like grey, black, brown. Also choose some yellows, greens, purples to add dimension. Look closely at Van Gogh's painting for other hints of color.

Add in layers of color by using the broad side of your crayon, up and down the paper. When you get your colors laid down, use your fingers to blend the background. I added a layer of gold right before I blended.

It's time to draw! Use a pencil and sketch out the outline of the handing oil lamp. It doesn't have to be perfect, in fact if you look closely at the painting you'll notice that it's a tad bent and not exactly symetrical.

Your pencil drawing will lightly show up over your oil pastel. Draw your entire picture before we color it in.

Using your Black, Fill in the shadow areas of the oil lamp. Study the painting to really see where the colors of black are.

Add in some light! Use your hues of yellow to fill in the underside of the lamp shade. You might find it hard to color a light color over your dark background. You can press hard, or use your fingernail to scratch away the background first.

Move to the base of your lamp. Notice how the colors blends horizontally across from white/yellow/black. Use what you know about blending, and your fingernail to scratch out some white areas.

Continue your horizontal blending all the way up your lamp base. Color in the knob, and the flame of the lamp. You can see that it's like an elongated triangle. Pull rays with your yellows and your fingernail. Not to many, just enough to show that it's flickering.

Use your fingernail and go around the metal wire surrounding the lamp. Then study the painting. Use your yellow and black in the appropriate areas around the wire. Play special attention to what areas are lit with yellow and what areas fall into the shadow with black.

Use your yellows and go around your lamp adding color to your background. Try to think about what area would be the most lit up and blend in some yellows into that area. I even added some more black to my corners so that I can draw the eye toward the center light.

All Done

Framing your project in black construction paper would look really nice

Pollock Art Project for Kids

PollockPinAction Jackson was most known for his painting styles and techniques. He placed his canvas on the floor and used a varitey of different brushes and tools to drip paint. This is a great activitiy for younger children to explore paint splatteringand drips.
Pollock

Materials:

  •  White Paper
  • Paint
  • Water
  • Toothbrush, Straws, Eye Droppers ect.
  • Pollack Art Card


Suggest Resources for a Unit Study:

Pollock pollock ArtBrushes     SeuratArt


Art Project Tutorial:

Step 1

Go thorough your house and find tools you can use for your action painting.

Step 2

Combs and Toothbrushes can be dipped in paint and used as brushes.

Step 3

Then pressed with your thumb for splatter painting.

Step 4

Eye droppers (or old medicine droppers) can be used to slurp up runny paint.

Step 5

Make a series of drips across your paper.

Step 6

Straws can be used to blow the paint droplets around.

Step 7

Fill your paper with all sorts of moving paint!

All Done

You now have your very own Action Jackson painting!

Seurat Art Project for Kids

SeuratPinPointillism is a fun artistic technique for any age level! Children enjoy making these representational pieces of artwork. This is a great craft for children who like to work on details.
Seurat

Materials:

  •  White Paper or Printable Template
  • Paint or Stamping Ink Pad
  • Pencil with NEW Eraser
  • Seurat Art Card


Suggest Resources for a Unit Study:

Seurat3    Seurat     SeuratArt    Art


Art Project Tutorial:

Step 1

Provide children with blank paper or younger children with black line coloring pages. Print up a few black line coloring pages. Look for landscapes, and ordinary objects online.

Step 2

Find some pencils that have brand new erasers. You want a nice flat top for easy stamping. Q-tips work for this technique as well, but I prefer the erasers as they are nice and flat.

Step 3

Tip: Use the lids of your paints, there will be plenty! Dip your erase into the paint, very gently!

Step 4

Hold the pencil vertical and make a dot on your paper! The amount of paint will determine the size of the dot. You can try for uniform dots or use this knowledge to add character to your project.

Step 5

When you want to change colors use a wipee or a wet paper towel to wipe your eraser.

Step 6

Leave spaces between the dots to add in other colors.

Step 7

Try to use a varitey of colors but resist the need to blend them together with your finger.

Step 8

Think about how you will display your artwork.

All Done

Hang up your art and stand way far back! Look for where your colored dots are blending together...do they still look like dots from far away?

Background Idea

Try pasting your project on to a contrasting piece of construction paper

Mondrian Crafts for Kids

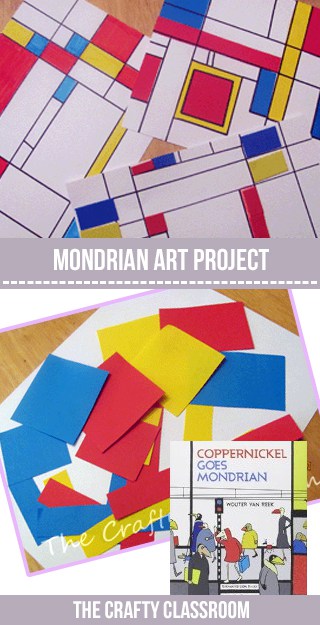
MondrianPinPiet Mondrian was known for white canvas with horizontal and vertical lines, and rectangular shapes filled with primary colors. There are so many ways to explore the art process of line and color, we’ve come up with a couple of different ways you can make Mondrian reminiscent worksof art in your classroomMondrian

Materials:

  •  White Paper, Black Marker, Colored Pens, Construction Paper Shapes, Mondrian Art Card


Suggest Resources for a Unit Study:

Mondrian  teachart    GreatArtists   Art


Art Project Tutorial:

Step 1

Use a ruler to make vertical lines on your paper with your black pen

Step 2

Make some horizontal lines on your paper as well.

Step 3

Continue making lines and sectioning off your paper in an uneven grid.

Step 4

Pick up a pack of sticky back foam shapes (Dollar Tree) and let children fill in the grid.

Step 5

Simply use a red, blue, and yellow marker to fill in the different squares.

Step 6

Cut a variety of shapes from Red, Yellow, and Blue paper. Glue the to the paper in a grid. Then draw your black lines over and around the shapes.

Andy Warhol Art Project for Kids

This is a great project for children who are learning about Andy Warhol and the POP Art movement! The bright colors and bold images used in this fun fifties style makes for some stunning creations in your art classroom. Students of all ages can participate with this Andy Warhol art project. Simply print our free templates (below), or our Pop Art Activity Pack and follow these helpful tips and guidelines for designing in a pop art style.

Andy Warhol Art Templates

To make things easier for younger children, we’ve created these fun and free Andy Warhol Art Templates. Students can use these templates to create their own pop art by adding a variety of bright and complementary colors. We highly suggest using a strong medium to achieve the vibrant colors found in pop art. Try using paint crayons, oil pastels, or really bright markers for best results.

We’ve created two different Andy Warhol templates you can use; Cupcakes and Doughnuts. (UPDATE: Scroll down for Warhol’s Infamous Campbell’s Soup Art Template) We think that these designs will appeal to most kids, because…..well, YUM!! But your art students can design anything their heart desires! Just draw the design a single time and trace it into four quadrants on a separate sheet of paper. They can even make small changes to the design to add a little visual appeal, as we’ve done in our free printable templates below:

These doughnut graphics are hand drawn! Older kiddos can certainly draw their own.

Doughnut Template

Thanks to Zip a Dee Doo Dah Designs for these fun Cupcake graphics!

Cupcake Template

While we have the two FREE art projects available above, we also have an Andy Warhol Pop Art Activity Pack that includes 5 Instructional pages alongside 12 more art project sheets with a variety of themes. This pack is a paid resources available in our TPT store.

Pop Art Coloring Tips

One reason we suggest using paint crayons or oil pastels is because of the ability to blend different colors together! This is a fun way to add some dimension to your pop art projects. Here are a few blending and coloring tips to keep in mind as you complete your project.

Highlighting Shapes

As you fill in the different shapes of your project, look for opportunities to highlight. You can do this by leaving white space around the edges of your shape, then returning to fill them in with a bright color. In the example above the doughnut is colored brown and highlighted with a vibrant pink around the edes of the icing and the edges of the doughnut itself.

Complimentary Colors with Pop Art

When choosing coloring for your shapes and your background, look for complimentary colors to help them POP! Complimentary colors are visually interesting and they compliment each other. You might consider printing up a color wheel for students to use as a reference for this project.

Gradients & Color Choices

You might think that pop art is a bunch of randomly chosen colors, but it’s not! Besides choosing complimentary colors, you might also look for opportunities to reuse colors throughout your entire project. In the example above, you can see that the green is used in two different scenes. This helps tie your project all together. Additionally, look at the yellow glaze of the top right doughnut. It’s hard to tell in the photo, but multiple colors were used starting with a Yellow-Orange, then a medium yellow, then a bright yellow. You can create more visual interest in your drawing by creating different gradients within your shapes.

Stop Coloring!

Okay, with all the vibrant colors in pop art, you might think you need to fill in every single space with color. But white space is your friend! You can leave areas white for visual interest, or even to strategically highlight a specific area. In the photo above you can see white space was left on the cupcake with the cherry in such a way as to represent a shine of light reflecting off the frosting.

Get Creative With Your Frame

Pop art is fun and whimsical style of art, and your frame should match! Try to think of a creative way to frame your artwork that will bring attention to it’s unique qualities. In the photo above you can see that two corners of the black construction paper have been removed, and white paint is used to add a little flair. A custom frame can add a lot of fun to your art project!

Ready for more?! Try our Andy Warhol Pop Art Activity Pack Today! This extra set includes 12 unique designs and layouts to inspire your students to get creative with their pop art projects. This pack also includes the infamous Campbell’s soup template for students to draw and design. With all the unique pop art activity pages, this set is sure to be a HIT in your homeschool or classroom setting.

Famous Artist Projects for Kids

  • Monet Art Project for Kids
  • Van Gogh Art Project for Kids

Monet Craft for Kids

Claude Monet is well known for his beautiful water scenes! This Monet Art Project for Kids is a fun (and messy) finger painting craft that will leave children with beautiful results. The materials used are simple and you’re sure to have them on hand in your art supply closet. I suggest you try this craft beforehand to get a feel for removing the tape.

Monet Art Project Materials:

  • Cardstock Paper
  • Fingerpaint
  • Painters Tape or Masking Tape


Monet Art Project for Kids:

Step 1: Build Your Bridge

For this craft, you’ll need some masking tape to make your bridge shape. I cut our tape in half to get thinner strips. You want to form the shape of the bridge using your masking tape. You can do this ahead of time for younger children if needed.

Continue building your bridge using small sections of tape for the slats. Try to add five or six of them across the bridge at equal intervals.

Step 2: Monet Finger Paint Art

Time to fingerpaint! Provide students with a rainbow of colors for them to dip their fingers in, then show them how to dab their finger multiple times to start filling in the canvas.

This is a great time to teach children about color blending and using similar colors (hues) together to create depth. Show children how to overlap their fingerprints to blend the different colors together.

Continue to fill in your canvas with a multitude of colors and blends. Don’t worry about painting over the tape. As long as it’s securly fixed to your paper the paint will not seep through.

Add more fingerprints over the bridge and below until your entire canvas is filled up.

Step 3: Allow to Dry

As tempting as it is to peel off the tape, set your art asside and allow your art to dry. Keep the little ones busy by reading one of the many beautiful children’s stories of Monet.

Step 4: Peel to Reveal Your Masterpiece!

Once your art project has dried, carefully peel back the sections of tape to reveal Monet’s bridge! Mount these masterpieces to colored construction paper and hang up in your homeschool classroom or in your classroom bulletin board.

Van Gogh Art Project for Kids

September 17, 2013 By Valerie Mcclintick Leave a Comment

FamousArtistVanGoghPotato

We’re diving into our Artist studies this year, starting with Van Gogh. A couple of years ago we did this Starry Night Art Project, and this year we’re starting off with The Potato Eaters.

20130916_143426

This is a fantastic painting to study for children of all ages, and I highly recommend looking into this book series by The Metropolitan Museum of Art. Each artists most famous paintings are discussed in great detail and these books would make a fantastic addition to your homeschool library.

20130916_143457

We used our Oil Pastels for this project, which worked really well for blending, and overlapping color. We even used our fingernails in some parts to scratch away color.

20130916_144159

20130916_151055

All of our Master Artist projects come with a printable artist card you can use for displaying children’s artwork.

Click Here for the Full Art Project Tutorial.

Siggy

Filed Under: Famous Artists, Oil Pastel Tutorial Tagged With: art for children, art project, children, craft, famous artist, kids, middle school, potato eaters, primary school, van gogh

Primary Sidebar

Tags

activities art art projects bible bible crafts bible printables bible verse children children's ministry christian christmas craft crafts curriculum educational crafts file folder games first grade free games giveaway history holiday homeschool homeschool crafts homeschool curriculum homeschool printables Homeschool Tools japan kids kids crafts kindergarten math mazes mom crafts notebooking preschool preschool printables printable printables science sewing st patricks day sunday school valentines day worksheets

Kindergarten Math Worksheets

Footer

I am a Christian mother of four, with over 13-years experience homeschooling in Southern Oregon. The resources and products I create are designed to keep the prep to a minimum while also bringing a little educational fun to your classroom

  • Privacy Policy
  • Cookie Policy
  • Disclosure Policy
  • Terms & Conditions
  • Contact Us
#worksheetsforkids #numbermats Fine Motor Number C #worksheetsforkids #numbermats Fine Motor Number Charts, numbers 0-30. Our number charts will help your students learn one-to-one correspondence, numbers in order from 0-30, patterns, numerals, and their names. Our number charts are colorful and fun, making them a great first step to getting your students to count. Add them now to your math center! (Link in Bio) #craftyclassroom #homeschooling #homeschoolmom https://www.teacherspayteachers.com/Product/Fine-Motor-Numbers-Charts-6734309?utm_campaign=coschedule&utm_source=instagram&utm_medium=thecraftyclassroom&utm_content=Fine%20Motor%20Numbers%3A%20Charts
Our HUGE Maze Activity Bundle includes a wide vari Our HUGE Maze Activity Bundle includes a wide variety of hands-on learning opportunities for your students!  Includes 15 maze activity packs filled with differentiated learning material for multiple ages and abilities.  Includes our popular Editable Word Mazes set that will allow you to create your own mazes using spelling words, sight words, student names, and more! (Link in Bio) #craftyclassroom #homeschooling #homeschoolmom https://craftyclassroom.com/product/maze-activity-bundle/?utm_campaign=coschedule&utm_source=instagram&utm_medium=thecraftyclassroom&utm_content=Printable%20Mazes%20for%20Kids
A-Z Beginning Letter Alphabet Mazes: This set incl A-Z Beginning Letter Alphabet Mazes: This set includes 26 individual letter mazes for students to practice the beginning letter sound. Students will follow this letter from start to finish by identifying different beginning letter sound pictures.
Alphabet Order Letter Mazes: Additionally, this set includes 10 A-Z mazes where students will follow the alphabet in order through the maze. These are a fun challenge for students who are ready for more. #superstarworksheets #craftyclassroom #homeschooling #preschoolprintables #sped #finemotorskills (Link in Bio) #craftyclassroom #homeschooling #homeschoolmom https://www.teacherspayteachers.com/Product/Beginning-Mazes-for-Kids-A-Z-and-Single-Letter-Alphabet-Order-Sheets-6502236?utm_campaign=coschedule&utm_source=instagram&utm_medium=thecraftyclassroom&utm_content=Beginning%20Letter%20Picture%20Mazes%20and%20Alphabetical%20Order%20Mazes
Load More... Follow on Instagram

SUBSCRIBER FREEBIE:

Join over 100,000 subscribers and receive our free teaching newsletter!  Join FREE today!

Copyright 2018 Valerie McClintick LLC