• Skip to main content
  • Skip to primary sidebar
  • Skip to footer

The Crafty Classroom logo

ShapeoftheWeek
HowtoWriteaParagraph
InteractiveMath
FineMotorWorksheets
  • Home
  • Curriculum
  • Crafts
  • Printables
  • Bible
  • Notebooking
  • Games
  • DIY Tools
  • Join
You are here: Home / Archives for art projects

art projects

African Mask Art Project for Kids

AfricaArtProjectsForChildren

Learning about African culture is an amazing experience for children of all ages.  Traditional African art captivates with it’s stunning use of shape and color.  This art tutorial will help children create a special African inspired mask and while it is recommended for late elementary or middle school students, children of all ages can learn these simple drawing techniques.


Materials:

  • Magic Scratch Paper
  • Sharp Object (Cuticle Stick)
  • Inspiration Photo  (do a google search)


Step 1

You'll need a single sheet of Scratch Paper for this project. We purchased this set of four scratch boards for under $5.

View Resource

Step 2

Using a sharp stick (included with your scratch art boards) draw an oval shaped outline. I am actually using a cuticle stick from the beauty supply store because it has a sharp end and a flat end.

Step 3

Using the flat end curve two parallel lines across the forehead of the mask.

Step 4

Switch to the pointy end and fill in the space between the lines with a pattern of your choice. I did triangles.

Step 5

The African mask I'm using for inspiration has an additional head covering with an angular shape so I add them above the crown of the head.

Step 6

Add a pattern of stripes, curving them slightly so that it implies the physical shape of the crown.

Step 7

Using the sharp edge of the stick, draw for our five small horizontal lines across each stripe. This has a fun pattern effect.

Step 8

Fill in the crown with your choice of patterns. My lines are still curving a bit as if there were a large forehead underneath.

Step 9

Start the nose at the center of and draw it down at an angle for each side. Connect to form a triangle shape and add nostrils.

Step 10

Draw almond shape eyes angled up and away from the face.

Step 11

Curve three lines from each cheek and connect to the bridge of the nose.

Step 12

Add in some patterns. I added some vertical lines like above because I like the effect. Add in a mouth at the bottom by drawing an arc shape.

Step 13

My inspiration mask also has some ears, so I've added those in on each side.

Step 14

The basic outline for my mask is complete. IT's time to fill it in with shapes. You can see how I filled in the ears and the face by putting many triangles in the corners, adding lines and different textures.

Step 15

If you want to add a necklace at the bottom, it's pretty simple. Just draw a long triangle (with a curved bottom) in the center. Then draw smaller and smaller triangles on each side, trying to visualize the curve as the necklace wraps around.

Step 16

Add a tear drop shape to each piece of necklace.

Step 17

Connect the pieces of the necklace with a small line.

Step 18

All Done! Hang your amazing piece of art work in you classroom!

Salt Painting for Summer Art Projects

June 11, 2016 By Valerie Mcclintick 1 Comment

KoiArtProject10

Recently I was introduced to a new form of textured painting called salt painting.  Basically, you take glue cover it with salt, then drop watercolors on top to absorb the color.  Well, can I just say, “Wowza!”  This is such a fun technique and it creates beautiful art work that children can really be proud of.

A quick pinterest search for Salt Painting is sure to inspire you to try this out, but today I wanted to share our own Salt Painting Project: Koi Fish Watercolor

I created a Step-by-Step photo tutorial you can follow to make this project with your own children.

Of course they will want to make their own creations as well, so after you show them this technique, give them the supplies and let them spend their Summer day creating!

Tip: Use Foam Core Board or Poster Board for this project.  The weight of the glue and salt overwhelms carstock, and you’ll need something a little sturdier.  (Construction paper glued to cardboard would work well too.)

Here is an example of another project my daughter made with this technique:

SaltPainting


SaltPaintingTutorialIsn’t that beautiful!  This would be a fun way for a Tween or Teen to add some custom art to their bedroom!

Check out the full tutorial here: Salt Painting fo Kids

Find more Japanese Art Projects for Kids Here

Find more Ocean Art Projects for Kids Here


Filed Under: Art Projects for Kids, Japanese Crafts, Ocean Crafts, Watercolor Art Projects Tagged With: art projects, japan, jellyfish, koi fish, ocean, watercolor

Koi Watercolor Art Project for Kids

KoiArtProjectPinKoi fish are beautiful carp that hold special symoblism in Japanes culture.  Koi ponds are placed in beatiful, tranquil settings and japanese gardens.  Encourage children to learn more facts about Koi before you create this stunning project.

Materials:

  • PosterBoard
  • Watercolors
  • Salt
  • Glue
  • Eye Dropper
  • Pencil/Paintbrush
  • Reference Photo

Suggested Resources for a Unit Study:

japanesecelebrations tokyo      japan     japancrafts


Art Project Tutorial:

Step 1

Choose an inspiration photo for your project. Using a pencil lightly sketch a drawing on your poster board.

Step 2

Using glue and a paintbrush fill in the shapes you just drew.

Step 3

Cover the glue with table salt. Let dry for a minute then turn your board over so the extra salt falls off. If you wait to long to do this the glue will flatten out under the weight of the salt and your shape will be distorted a bit.

Step 4

Using a water dropper, fill your water color paints with water. Mix well then used the dropper to slurp up some colors.

Step 5

Drop the watercolor over the salt and watch it spread out and blend.

Step 6

Use your photo reference as a guide, but don't feel you need to stick with it exactly

Step 7

Finish dropping colors on your board until you're happy with how your project looks! Let dry and give this project to a friend!

Polar Bear Art Project For Kids

Here is a unique and exciting polar bear art project for kids. This is a fantastic art project to try with your students when you are learning about cubism or anytime you are learning about the arctic. Each section on this art project is created with oil pastels, then etched with a unique pattern. Etching is the process of removing material to create visual interest. In this case, were creating patterns and nature scenes inside each section. Additionally, students will learn warm and cool colors as the bear and the background are made with different hues.

Polar Bear Art Project Supplies:

  • Polar Bear Template
  • Oil Pastels
  • Sharp Object

Step 1

Print your polar bear template as a guide. The template includes grey lines separating each shape.

Step 2

Choose cool colors (blues, greens, purples) to color in the shapes of your polar bear.

Step 3

You want a good variety of colors and try not to have the same colors touching eachother.

Step 4

Choose warm colors (reds, oranges, and yellows) and start filling in the shapes of the background.

Step 5

Color in every shape leaving no white space. Make sure you pressed hard enough with your oil pastels to ge a thick layer of color on your paper.

Step 6

You can stop here and frame on black construction paper if you like

Step 7

Or you might want to add in some patterns. Oil pastel can be scratched away to reveal a lighter hue of the same color. This is a great way to add texture and patterns to your polar bear.

Step 8

You can even add in things you might see in an Arctic landscape; iceburgs, winter trees, a full moon, inukshuk, etc....


Arctic Art Projects for Kids

These art projects and activities are a wonderful accompaniment to your lessons on the Arctic and polar regions.  You could easily tie this unit in with our Inuit (Eskimo) craft projects to add in cultural studies as well.  While the focus of these art projects is the Arctic, we’ve included penguins and other polar animals as well.  Winter is a great time to learn about these amazing creatures that can survive in the lowest of temperatures.  Migration and Hibernation would also be good subjects to tie in to a thematic unit.

Polar Bear Landscape

Based off the beautiful arctic landscape scenes by Ted Harrison, this project is fun for children of all ages and definitely adds a color pop to your classroom!

View Resource

Arctic Paw Print

This stunning Arctic craft uses a bear paw print template. Children use watercolor, ink and oil pastel to create a beautiful winter scene of a polar bear and her cub.

View Resource

Northern Lights Art Project

This is a dreamy way to create a beautiful sunset or Northern lights backdrop for your winter scenes.

View Resource

Inukshuk Rock Art

A simple way to make inukshuk statues is to glue them to cardboard. Older children might try their hand at balancing them instead. Find a collection of Inuit Art Projects Here.

View Resource

Polar Bear Art Project

This art project is simple yet stunning and each project turns out so differently. Children work on warm and cool color blocking as well as patterns and design work.

View Resource

Love these bear graphics?  Check out Fish Scraps Graphics for more.

Tree Frog Oil Pastel

TreeFrogPinTreeFrogPinThis is a fun way to build a textured canvas.  Children use black glue on black construction paper to outline the frog.  Then use colored oil pastels to fill him in.  The results are stunning and worthy of any classroom gallery!

Materials:

  • Black Construction Paper
  • Glue
  • Black Paint
  • Oil Pastels
  • Inspiration Photo

rainforest2

Amazon Rainforest

There is so much to explore in the Amazon! Readers are taken on an adventure through the Amazon rainforest to learn about the lush plants and beautiful animals, deforestation, and rainforest conservation in this fascinating nonfiction reader that features striking photographs and riveting facts.


Step 1

Using your inspiration photo, draw an outline of your rainforest animal. Use pencil so that it can be seen but easily covered up.

Step 2

Add some black paint to your glue bottle and stir. Carefully outline your animal with black glue.

Step 3

Set your drawing aside to dry. I put mine outside with a rock on top so it wouldn't blow away. You could use a hairdryer to speed up this process just be careful not to blow your glue too hard.

Step 4

Using your inspiration photo again and your oil pastels begin to add color to the appropriate areas. In this case my frogs eyes are black and red, and I added in bright green on his face, and legs.

Step 5

Look carefully at the colors. I see blue in the belly and chin. Yellow and orange at the tips of the feet. And more blue and purple in the middle of the legs. Use your finger to blend.

Step 6

Add in white along the belly and chin area. Blend the blue towards the center of the belly.

Step 7

Highlight the edges of the face with a lighter green (or mix green and white if you don't have a lighter color) I added a white highlight stripe on some of the legs as well.

Step 8

I colored my leave in orange and read so as to contrast with the green of the frog. You don't have to make your image exactly like your inspiration photo, it is only meant to be a guide!

Rainforest Art Projects & Printables

Learning about all the amazing animals in the rainforest is so exciting for children. The levels of the canopy as well as the diverse creatures hidden within make this a fantastic topic of study for children of all ages. The art projects and printables below are the perfect addition to your Rainforest unit study, and they can be adapted for children of different age and ability levels.


Rainforest


Rainforest Floor Puzzle  (We Love This!)

  • 100 Piece puzzle
  • Colorfull and Detailed Graphics
  • Great Quality
  • Heavy-duty Cardboard
  • Recommended Age Rating is 6 years and up


Rainforest Tree Frog Art Project

This is s fun way to build a textured canvas. Children use black glue on black construction paper to outline the frog. Then use colored oil pastels to fill him in. The results are stunning and worthy of any classroom gallery! You might even do a variety of rainforest animals with this technique.

View Resource

Chameleon Zentangle Art Project for Kids

Zentangle is like doodling with purpose! These Chameleons are full of character and children can fill them in with different patterns and zentangle designs.

View Resource

Rainforest Coloring Pages

Two rainforest coloring pages, one for older children featuring a sloth and a toucan, and another featuring two toucans with thick black lines for easy coloring.

View Resource

Tin Foil Toucan Art Project

Another fun art technique is drawing on tinfoil. Children can use sharpie marker, paint or oil pastels to create a vibrant toucan .

Hammered Ferns Art Project

The rainforest is not only filled with amazing animals, but plants as well. Children can learn how to hammer prints of different leaves onto watercolor paper for a stunning effect. This is a great way to "frame" an animal or drawing of the rainforest.

Ocean Waves Oil Pastel for Kids

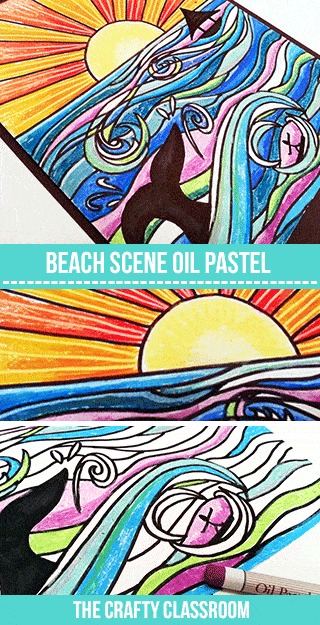
BeachOilPastelWho doesn’t love a beautiful ocean sunset?  With this art project you can introduce your children to a variety of art techniques.  Children draw and ink their own ocean scene, then use oil pastels and various blending techniques to fill their project with color.  You can use this lesson to discuss warm and cool color combinations, overlaping, shadow, hue, blending, line and movement.   This lesson is broken up into two parts:

  1. Drawing
  2. Coloring

Materials:

  • Oil Pastels
  • Paper
  • Sharpie Marker
  • Pencil, Ruler, Cup, Spoon

Suggest Resources for a Unit Study:

OilPastels   PastelPaper   seahorse3   seahorse4


Art Project Tutorial:

Step 1

Using a ruler and a pencil draw a horizon line across your paper.

Step 2

Find something round you can trace to make your sun. Line it up on your horizon so that only half of the sun is showing and trace the arch around.

Step 3

Use your ruler to draw the suns rays coming from the circle.

Step 4

Be sure to fill up your paper with lots of rays coming from the sun, but keep them above the horizon line.

Step 5

Begin to draw swirling waves in your ocean. I'm drawing one coming from the left and a smaller one coming from the right.

Step 6

I'm using curved lines and ending them with more curls. Sort of like you would draw a cloud.

Step 7

Begin to fill in your waves by drawing just below your original wave line and adding to your drawing, see the photo.

Step 8

Continue to make shapes of your waves. Start thinking what colors you might want to place in these shapes. I'm thinking some of these new shapes might be white to show the tumbling water.

Step 9

Starting at the bottom of your page, add in ocean lines. I'm making horizontal waves across my paper, ending them to create different shapes I can color later.

Step 10

Now is the time to add in any creatures you want in your drawing. I'm going to add a whale's tail, but you might want to add a dolphin or sea lion peeking out....

Step 11

You can even draw in some splashes near your creature if you like.

Step 12

Add a boat or a rock somewhere in your drawing. Try to balance your page visually. My whale is in the bottom left, so my boat is near the mid upper right. This gives my eye different things to look at over the page, without all the interesting moments all in one spot.

Step 13

Once you have your animal and boat in the page you can continue to draw more horizontal waves across your paper. It's okay to draw over your waves, where the lines intersect there will be more shapes created and you can color them differently.

Step 14

Here is how my paper is starting to look. There are lines going everywhere, but that is okay, we want it nice and full because out entire paper is going to be colored in.

Step 15

I decided to add a little surfer in my bottom wave

Time to Color!

Your drawing it done, it's time to Ink and Color your art project. Click to view the second part of this tutorial

View Resource

Indian Design Project

PaislyDesignPinArt and textile in India often features intricate designs and patterns.  Paisleys, mandalas and other symmetrical designs can be found on walls, fabrics, and even displayed in the temporary staining of skin with henna.  This project explores a method of transferring designs that might be too difficult to draw by hand, and leaves children with a beautiful card they can share with friends or family.

Materials:

  • Paisley Pattern
  • Cardstock or Computer Paper
  • Oil Pastels
  • Chalk Pastels
  • Paperclips
  • Pencil and Eraser

Suggested Resources for a Unit Study:

IndiaDesign4   IndiaDesign3   IndiaDesign   IndiaTiger2


Art Project Tutorial:

Printable Designs

Before starting this project print out our designs or search online for an inspiration design.

View Resource

Step 2

Cover a single sheet of paper with chalk pastel. Color doesn't really matter too much, but I'm choosing pink,.

Step 3

Color over your paper with oil pastel. I'm using brown.

Step 4

Layer papers as follows: Oil Pastel (right side up), Blank paper, Design (Right Side Up)

Step 5

Paper clip your papers in place, being careful not to press hard as at this point the oil pastel can transfer. I'm placing my image in the upper left hand corner, so that I can make a card.

Step6

Using a sharp pencil, press hard and trace your design completely.

Step 7

Slowly remove your blank paper from the middle and your transfered image will be there

Step 8

When you fold you paper, your image now lines up perfectly to make a greeting card. Use

Step 9

Use oil pastels to create more interest on your card. I'm using brown and green to pull color to the edges.

All Done

Your Indian design is now complete! This is a great way to add complex patterns to arwork.

Taj Mahal Art Project

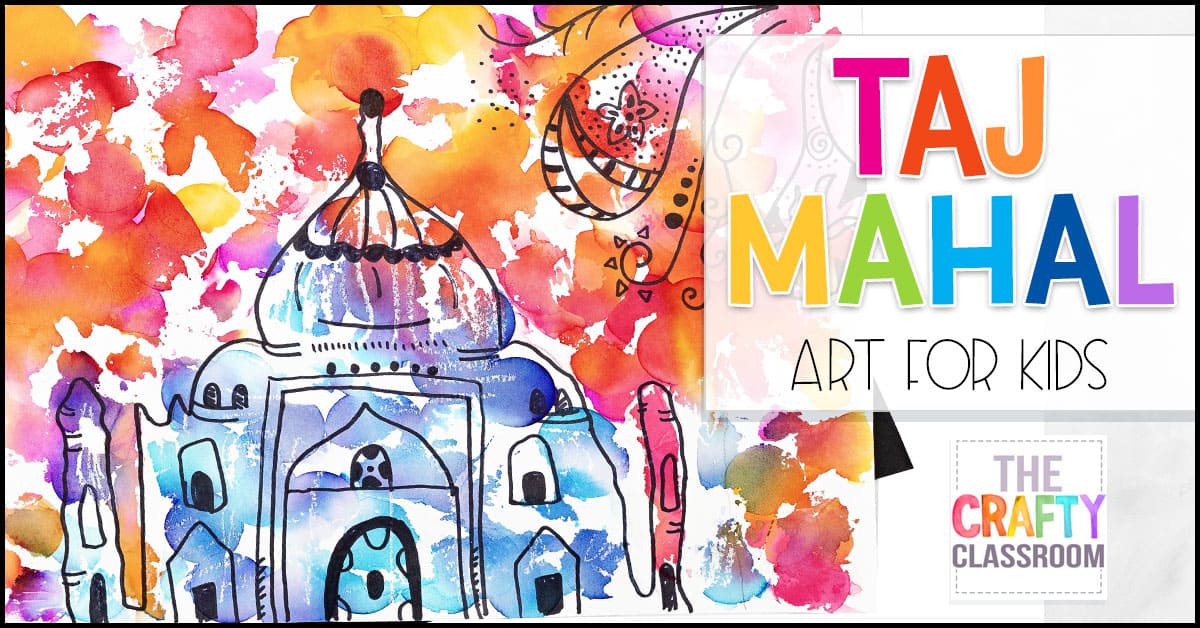
This Taj Mahal art project is a great way to introduce children to ink transfer using bleeding tissue paper.  This technique is not only fun, but the result is a stunning color combination as the inks blend together. Students as young as preschool age can make stunning recreations with just a little assistance. Best of all, you can pair this art project with a unit study on India and add a little cultural studies to you homeschool classroom.


Taj Mahal Art Project Materials:

  • Bleeding Tissue Paper
  • Taj Mahal Template
  • Watercolor Paper
  • Water Color Pencil or Sharpie
  • White Oil Pastel
  • (Optional) Circle Punch for cutting tissue paper.

India Art Projects for Kids:

Print up the Taj Mahal Template and cut it out. It doesn’t have to be perfectly cut, just enough to get the general shape of the Taj Mahal. You’ll also want to cut out your bleeding tissue paper. I used my Circle Punch to quickly punch out the different colors of bleeding tissue paper. And yes, in case you are wondering, Bleeding Tissue Paper is different than normal tissue paper that you would wrap a gift with. So be sure to pick up the right kind of paper for this project or the results will be disappointing.

Place the template so that it is lined up with the bottom of your watercolor paper and trace it lightly with a pencil. For younger students, you might already have this part of the project done in advance, that way you are not spending the majority of your time helping them cut or trace.

Using a white oil pastel, draw lines and shapes inside the shape of the Taj Mahal. This is another aspect that doesn’t have to be perfect. We are simply laying down a layer of oil that will resist the ink so the paper won’t soak it up. You’ll want it to be streaky, with defined lines and shapes because any missed spots will add a little character to your project.

Dip you paintbrush into a bit of water and begin to fill in your paper with the tissue paper circles. A little water will allow them to stick to the paper. You want to use your warm colors, and arrange them around the background of your picture. Try not to put any warm colors on the Taj Mahal.

Overlap the circles so that the colors will bleed and blend together. You will want a lot of color in your background, so to make it vibrant add lots of layers. Don’t overdo it on the water or you will end up with a runny mess and a wrinkled paper. It only takes a little bit of water for this project to work, just enough for the tissue paper to stick to the watercolor paper.

Continue around until your background is filled with warm colors. Then, start on the Taj Mahal with your cool colors. Remember, you laid down oil pastel here earlier so this section will pick up the color in some areas and no color in others.

Once your paper is filled with color, set it asside to dry. Resist the temptation to peek at your project before it is completly dry. You want every last drop of color to soak into your picture.

Once the paper is dry, you can easily lift it up and gently brush away the tissue paper circles. You will be left with a stunning piece of artwork, but we are not finished yet!

Using a black sharpie marker, or a watercolor crayon outline the basic shape of the Taj Mahal again. You can look at your template for reference if you need help remembering where things go.

This time, add the doorwways, windows, and architectural elements to the design. This is another step where you might want to help younger children. Even outlining the main shape and allowing them to add the decorations might help your smaller students.

If you have been learning about India, or doing a unit study, this is a great time to add a paisley motif or other common Indian design to the background of your picture.

Mount your picture with black construction paper and hang up somewhere in the classroom for everyone to enjoy! This is one of those projects where each one turns out a little different so it’s fun to see each student’s interpretation. More India Art Projects for Kids

Australia Crafts: Cave Drawings

CaveDrawingPinThis is a fantastic project to follow up learning about all the amazing and beautiful cave drawings found in Australia.  I love crafts that showcase children’s original work and this is a great way to add a little flair to your classroom walls!

Materials:

  • Butcher Paper
  • Pastels or Chalk
  • Examples of Cave Drawings


Suggest Resources for a Unit Study:

aus5    aus6  australia  australiapeople


Art Project Tutorial:

Step 1

First of course you'll want to show your children examples of Aboriginal art work.

Step 2

Unroll a large sheet of butcher paper and tape it to your table. (Or better yet, outside to the sidewalk!)

Step 3

Provide children with colored chalk or pastels. We used the charcoal and crayons above but it was SUPER powdery and messy so be warned :)

Step 4

Illustrate some figures and shapes for children to copy. Encourage them to try to find symbols and other ways to represent people, animals or objects.

Step 5

Let children experiment with the qualities of the chalk, and make drawings representing what they've seen.

Step 6

Show children ways to outline and add dimension to their drawings

Step 7

When your cave drawing is complete, hang it up in your classroom for the duration of your unit study. (Hair Spray keeps the chalk from dusting)

Van Gogh Oil Pastel Project

VanGoghPotatoPinFor children who want to explore more then just Van Gogh’s Starry Night, you might introduce them to The Potato Eaters. This is such a great painting to study, not only in context, but in color, and movement as well. We used the book, “What Makes a Van Gogh” for reference.
VanGogh

Materials:

  •  Paper
  • Oil Pastels
  • Pencil
  • Van Gogh Art Card
  • Visual of The Potato Eaters by Van Gogh.


Suggest Resources for a Unit Study:

Vangoghcolors    Vangogh2    VanGogh1    SeuratArt


Art Project Tutorial:

We are going to use our Oil Pastels. This is our recommended set of pastels from Crayola. You get a larger crayon, a variety of colors and the price is right. We've had this set for over two years and we still have huge crayons left.

Look closely at The Potato Eaters. We're going to be focusing on the hanging light in the middle of the picture. Take note of how the light is shown on the women's faces, and their backs are dark with shadow.

We're going to make the background first. Choose neutral colors, like grey, black, brown. Also choose some yellows, greens, purples to add dimension. Look closely at Van Gogh's painting for other hints of color.

Add in layers of color by using the broad side of your crayon, up and down the paper. When you get your colors laid down, use your fingers to blend the background. I added a layer of gold right before I blended.

It's time to draw! Use a pencil and sketch out the outline of the handing oil lamp. It doesn't have to be perfect, in fact if you look closely at the painting you'll notice that it's a tad bent and not exactly symetrical.

Your pencil drawing will lightly show up over your oil pastel. Draw your entire picture before we color it in.

Using your Black, Fill in the shadow areas of the oil lamp. Study the painting to really see where the colors of black are.

Add in some light! Use your hues of yellow to fill in the underside of the lamp shade. You might find it hard to color a light color over your dark background. You can press hard, or use your fingernail to scratch away the background first.

Move to the base of your lamp. Notice how the colors blends horizontally across from white/yellow/black. Use what you know about blending, and your fingernail to scratch out some white areas.

Continue your horizontal blending all the way up your lamp base. Color in the knob, and the flame of the lamp. You can see that it's like an elongated triangle. Pull rays with your yellows and your fingernail. Not to many, just enough to show that it's flickering.

Use your fingernail and go around the metal wire surrounding the lamp. Then study the painting. Use your yellow and black in the appropriate areas around the wire. Play special attention to what areas are lit with yellow and what areas fall into the shadow with black.

Use your yellows and go around your lamp adding color to your background. Try to think about what area would be the most lit up and blend in some yellows into that area. I even added some more black to my corners so that I can draw the eye toward the center light.

All Done

Framing your project in black construction paper would look really nice

Scripture Art: Trees

April 10, 2012 By Valerie Mcclintick 3 Comments


This week we finished up our third scripture art project!

I thought I would take a second to share a bit behind the scenes.
These projects usually take two 30minute lessons.
The first day for the artwork, and the second day for the scripture.

Even though I’m kinda flying by the seat of my pants,
I try to spend each of the days with small amounts of discussion and instruction.

Day 1: Instruction in technique
Day 2: Discussion of the verse

And since I didn’t really share this with the first two projects I posted,
I am backtracking a bit so you know what the actual deal is:
(This is classic me type of organization)

Soaring Eagles Project
Verse: “Because you are my help,
I sing in the shadow of your wings.” Psalm 63:7
Day 1: Blending, Hue
Day 2: God is my protection

Seasonal Trees Art Project
Verse: “There is a time for everything,
and a season for every activity under heaven.” Ecclesiastes 3:1
Day 1: Repetition of same basic object (same tree branches in four spaces)
Day 2: God created an ever-changing world.

Tall Trees (today’s project)
Verse: All the trees of the field will know that I the LORD
bring down the tall tree and make the low tree grow tall…” Ezekiel 17:24
Day 1: Resist, Texture (Dry brush painting), Background painting
Day 2: God decides everthing! He can bring down the mighty and lift up the meek.

There, now we’re all caught up!

So here’s how we did our latest scripture art project:

First I taped down three strips of masking tape across the paper.
These are for the trees. (resist)

Then I got out the watercolors a flat paintbrush, and puff balls!
(btw-We always watercolor on cardstock or watercolor paper….not looking for a pulpy mess)

I encouraged them to find a line where the land meets the sky.

The puff balls are nice and watery, making for fun blotchy backgrounds.

We set these aside to dry, and then lifted off the tape.

Now to paint the tree bark, we turn the paper sideways,

Use a dry brush (so we can see the strokes) and start making our way up
and down the trees.

Then of course we add in our scripture!

All the trees of the field will know that I the LORD
bring down the tall tree and make the low tree grow tall…” Ezekiel 17:24

(Don’t look too close or you might notice a spelling mistake I didn’t see until post photo-shoot)

Sissy cut her’s to the shape of a tree which looked pretty neat too!

More beautiful Scripture Art for our gallery!

Filed Under: Scripture Art Tagged With: art projects, bible verse, notebooking, scripture art, scripture art projects for children

Primary Sidebar

Tags

activities art art projects bible bible crafts bible printables bible verse children children's ministry christian christmas craft crafts curriculum educational crafts file folder games first grade free games giveaway history holiday homeschool homeschool crafts homeschool curriculum homeschool printables Homeschool Tools japan kids kids crafts kindergarten math mazes mom crafts notebooking preschool preschool printables printable printables science sewing st patricks day sunday school valentines day worksheets

Kindergarten Math Worksheets

Footer

I am a Christian mother of four, with over 13-years experience homeschooling in Southern Oregon. The resources and products I create are designed to keep the prep to a minimum while also bringing a little educational fun to your classroom

  • Privacy Policy
  • Cookie Policy
  • Disclosure Policy
  • Terms & Conditions
  • Contact Us
January Preschool Themes & Printables: Arctic Anim January Preschool Themes & Printables: Arctic Animals, Snowmen, Snowflakes, Hot Cocoa, MLK, Penguins, Polar Bears, New Year, Winter Sports, Hibernation and more! 

 #winterprintables #homeschoolpreschool #prek #distancelearning #tpe #freeworksheets #freeprintables #preschoolprintables #SPED #OT #finemotor  January Preschool Themes
 https://preschoolmom.com/preschool-printables/preschool-themes-by-month/january-preschool-themes/
#freeworksheetsforkids #calendarforkids These mon #freeworksheetsforkids  #calendarforkids These months of the year worksheets will help your students organize, sequence, and recognize months of the year, while working on counting, writing, drawing, numbering, fine motor skills & much more! (Link in Bio) #craftyclassroom #homeschooling #homeschoolmom 
 https://superstarworksheets.com/reading-worksheets/spelling-worksheets/calendar-worksheets/months-of-the-year-worksheets-2
15 Following Directions Skills Worksheets with a L 15 Following Directions Skills Worksheets with a LOVELY Valentine's Day Theme! No-Prep, Print & Go activity pages that are sure to build key listening skills while engaging your students!⠀
⠀
More Than Coloring Pages! Students will be asked to perform a variety of steps that are specifically developed to build key fine motor skills. We've added important skills-based activities throughout our following directions worksheets. Here is a look at some of the skills your students might work on within this pack:⠀
⠀
Prepositional Phrases⠀
Sequential Steps⠀
Writing First & Last Name⠀
Writing Common Words/Sight Words⠀
Underlining, Circling, X's etc.⠀
Drawing Shapes⠀
Drawing Pictures⠀
Coloring (Warm & Cool, Dark & Light, Shading, Blending)⠀
Simple Math (addition and subtraction)⠀
#followingdirections #listeningskills #preschool #sped #distancelearning #tpt  Following Directions: Listening Skills Worksheets for Valentine's Day

https://www.teacherspayteachers.com/Product/Following-Directions-Listening-Skills-Worksheets-for-Valentines-Day-6442774
Subtraction Worksheets for Kindergarten! Free subt Subtraction Worksheets for Kindergarten! Free subtraction worksheets for preschool & kindergarten. Students will learn to count and take away objects, decompose with number bonds, frame numbers into 5 and 10-frames, solve horizontal, and vertical subtraction equations, solve subtraction word problems, and more!  These free subtraction worksheets, games, and activities will be a great addition to your math curriculum! #mathworksheets #mathforkindergarten #kindergartenmath #freeworksheets #kindergartenprintables #homeschoolpreschool #tpt #kindermath #handsonlearning (Link in Bio) #craftyclassroom #homeschooling #homeschoolmom.  https://superstarworksheets.com/kindergarten-worksheets/kindergarten-math-worksheets/kindergarten-subtraction-worksheets/
Load More... Follow on Instagram

SUBSCRIBER FREEBIE:

Join over 100,000 subscribers and receive our free teaching newsletter!  Join FREE today!

Copyright 2018 Valerie McClintick LLC