• Home
  • Crafts
  • Printables
  • Bible
  • Lapbooking
  • Notebooking
  • eBooks
  • Games
  • DIY Tools
  • Reviews
  • Join
You are here: Home / Archives for Famous Artists


Van Gogh Oil Pastel Project

VanGoghPotatoPinFor children who want to explore more then just Van Gogh’s Starry Night, you might introduce them to The Potato Eaters. This is such a great painting to study, not only in context, but in color, and movement as well. We used the book, “What Makes a Van Gogh” for reference.
VanGogh

Materials:

  •  Paper
  • Oil Pastels
  • Pencil
  • Van Gogh Art Card
  • Visual of The Potato Eaters by Van Gogh.


Suggest Resources for a Unit Study:

Vangoghcolors    Vangogh2    VanGogh1    SeuratArt


Art Project Tutorial:

We are going to use our Oil Pastels. This is our recommended set of pastels from Crayola. You get a larger crayon, a variety of colors and the price is right. We've had this set for over two years and we still have huge crayons left.

Look closely at The Potato Eaters. We're going to be focusing on the hanging light in the middle of the picture. Take note of how the light is shown on the women's faces, and their backs are dark with shadow.

We're going to make the background first. Choose neutral colors, like grey, black, brown. Also choose some yellows, greens, purples to add dimension. Look closely at Van Gogh's painting for other hints of color.

Add in layers of color by using the broad side of your crayon, up and down the paper. When you get your colors laid down, use your fingers to blend the background. I added a layer of gold right before I blended.

It's time to draw! Use a pencil and sketch out the outline of the handing oil lamp. It doesn't have to be perfect, in fact if you look closely at the painting you'll notice that it's a tad bent and not exactly symetrical.

Your pencil drawing will lightly show up over your oil pastel. Draw your entire picture before we color it in.

Using your Black, Fill in the shadow areas of the oil lamp. Study the painting to really see where the colors of black are.

Add in some light! Use your hues of yellow to fill in the underside of the lamp shade. You might find it hard to color a light color over your dark background. You can press hard, or use your fingernail to scratch away the background first.

Move to the base of your lamp. Notice how the colors blends horizontally across from white/yellow/black. Use what you know about blending, and your fingernail to scratch out some white areas.

Continue your horizontal blending all the way up your lamp base. Color in the knob, and the flame of the lamp. You can see that it's like an elongated triangle. Pull rays with your yellows and your fingernail. Not to many, just enough to show that it's flickering.

Use your fingernail and go around the metal wire surrounding the lamp. Then study the painting. Use your yellow and black in the appropriate areas around the wire. Play special attention to what areas are lit with yellow and what areas fall into the shadow with black.

Use your yellows and go around your lamp adding color to your background. Try to think about what area would be the most lit up and blend in some yellows into that area. I even added some more black to my corners so that I can draw the eye toward the center light.

All Done

Framing your project in black construction paper would look really nice

New Graphic
 

Matisse Art Project for Kids

MatissePinMatisse had a very colorful style to his artwork, and in his later years he used paper cut-out arranged on canvas to create beautiful, fluid scenes. Use our templates or your own precut designes to provide younger children with a simple cut and paste activity. Older children can be encouraged to draw with their scissors

MatisseTemplate2MatisseTemplate1

Materials:

  • Colored Construction Paper
  • Glue Stick
  • Scissors
  • Printable Template 1, Printable Template 2,  & Artist Card

Suggest Resources for a Unit Study:

Matisse4    Matisse5   Matisse22    Matisse1


Art Project Tutorial:

Step 1

Gather up a bunch of colored construction paper....the brighter the better.

Step 2

Cut out a variety of shapes, if you have younger children help them with the more intricate cut-outs.

Step 3

Show them how they can use the "negative" of their cut-out as well.

Step 4

Arrange the bigger pieces in the background. Show them how to overlap.

Step 5

Add in more and more pieces to your paper.

Step 6

Cut around the edges to clip any overhanging paper. If you like you can provide representations of Matisse for children to add to their work (like have pink horse or dancing silhouette... Something that is common throughout each students work

All Done

New Graphic
 

Pollock Art Project for Kids

PollockPinAction Jackson was most known for his painting styles and techniques. He placed his canvas on the floor and used a varitey of different brushes and tools to drip paint. This is a great activitiy for younger children to explore paint splatteringand drips.
Pollock

Materials:

  •  White Paper
  • Paint
  • Water
  • Toothbrush, Straws, Eye Droppers ect.
  • Pollack Art Card


Suggest Resources for a Unit Study:

Pollock pollock ArtBrushes     SeuratArt


Art Project Tutorial:

Step 1

Go thorough your house and find tools you can use for your action painting.

Step 2

Combs and Toothbrushes can be dipped in paint and used as brushes.

Step 3

Then pressed with your thumb for splatter painting.

Step 4

Eye droppers (or old medicine droppers) can be used to slurp up runny paint.

Step 5

Make a series of drips across your paper.

Step 6

Straws can be used to blow the paint droplets around.

Step 7

Fill your paper with all sorts of moving paint!

All Done

You now have your very own Action Jackson painting!

New Graphic
 

Seurat Art Project for Kids

SeuratPinPointillism is a fun artistic technique for any age level! Children enjoy making these representational pieces of artwork. This is a great craft for children who like to work on details.
Seurat

Materials:

  •  White Paper or Printable Template
  • Paint or Stamping Ink Pad
  • Pencil with NEW Eraser
  • Seurat Art Card


Suggest Resources for a Unit Study:

Seurat3    Seurat     SeuratArt    Art


Art Project Tutorial:

Step 1

Provide children with blank paper or younger children with black line coloring pages. Print up a few black line coloring pages. Look for landscapes, and ordinary objects online.

Step 2

Find some pencils that have brand new erasers. You want a nice flat top for easy stamping. Q-tips work for this technique as well, but I prefer the erasers as they are nice and flat.

Step 3

Tip: Use the lids of your paints, there will be plenty! Dip your erase into the paint, very gently!

Step 4

Hold the pencil vertical and make a dot on your paper! The amount of paint will determine the size of the dot. You can try for uniform dots or use this knowledge to add character to your project.

Step 5

When you want to change colors use a wipee or a wet paper towel to wipe your eraser.

Step 6

Leave spaces between the dots to add in other colors.

Step 7

Try to use a varitey of colors but resist the need to blend them together with your finger.

Step 8

Think about how you will display your artwork.

All Done

Hang up your art and stand way far back! Look for where your colored dots are blending together...do they still look like dots from far away?

Background Idea

Try pasting your project on to a contrasting piece of construction paper

New Graphic
 

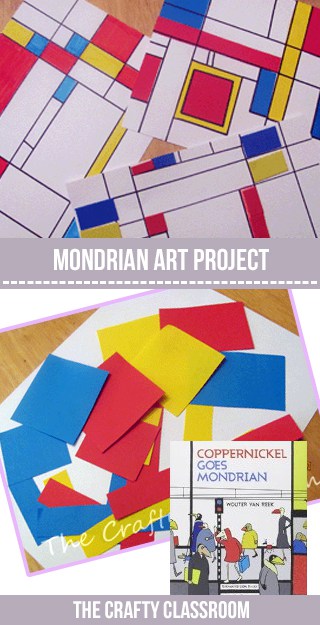
Mondrian Crafts for Kids

MondrianPinPiet Mondrian was known for white canvas with horizontal and vertical lines, and rectangular shapes filled with primary colors. There are so many ways to explore the art process of line and color, we’ve come up with a couple of different ways you can make Mondrian reminiscent worksof art in your classroomMondrian

Materials:

  •  White Paper, Black Marker, Colored Pens, Construction Paper Shapes, Mondrian Art Card


Suggest Resources for a Unit Study:

Mondrian  teachart    GreatArtists   Art


Art Project Tutorial:

Step 1

Use a ruler to make vertical lines on your paper with your black pen

Step 2

Make some horizontal lines on your paper as well.

Step 3

Continue making lines and sectioning off your paper in an uneven grid.

Step 4

Pick up a pack of sticky back foam shapes (Dollar Tree) and let children fill in the grid.

Step 5

Simply use a red, blue, and yellow marker to fill in the different squares.

Step 6

Cut a variety of shapes from Red, Yellow, and Blue paper. Glue the to the paper in a grid. Then draw your black lines over and around the shapes.

New Graphic
 

Andy Warhol Art Project for Kids

WarholPin

Children who love to use bright colors love to create Warhol inspired artwork. You can use our pre-printed Warhol artist cards, or use this activity to teach children how to transfer and copy images.

Materials:

  •  White Paper
  • Black Marker
  • Colored Pens
  • Subject Photo or Printable Template Below


Suggest Resources for a Unit Study:

Warhol3    Warhol4Warhol6 warhol5


Art Project Tutorial:

Printable Art Templates

If you are working with younger children I recommend printing up their page beforehand.

Step 1

Print a photo of your child in BW to highlight the edges. Alternatively you can use carbon paper to copy your subjects onto your art page.

Step 2

Trace the basic outlines and shapes that come through.

Step 3

Go over your drawing with black marker. It doesn't have to be perfect, but try to close each shape.

Step 4

Scan your image to your computer and copy and paste it till you have the amount desired. Or have children copy their drawing onto a paper four different times.

Step 5

Start filling in the drawing with bold, bright and unusual colors. Choose different colors for each copy.

Step 6

Be sure and pick one color per space and get those backgrounds colored in too.

Step 7

Leaving some white makes it interesting as well.

All Done!

Frame your artwork or display side by side for a fun effect!

More Famous Artist Projects for Kids

New Graphic
 

Monet Craft for Kids

ArtistMonet

Claude Monet is well known for his beautiful water scenes! This is a fun (and messy) finger painting craft that will leave children with beautiful results. The materials used are simple and you’re sure to have them on hand in your art supply closet. I suggest you try this craft beforehand to get a feel for removing the tape.

Materials:

  •  Cardstock Paper
  • Fingerpaint
  • Painters Tape or Masking Tape


Suggest Resources for a Unit Study:

Monet2    Monet1Monet4Monet3


Art Project Tutorial:


Step 1

For this craft you'll need some masking tape to make your bridge shape. I cut our tape in half to get thinner strips.

Step 2

You want to form the shape of the bridge using your masking tape. You can do this for younger children if needed.

Step 3

Press down to make sure that no paint will come through the tape.

Step 4

Give children an image of Monet's Bridge over a Pond of Water Lilies and a paper plate to blend on.

Step 5

Using fingers, begin to dab the colors onto the paper. Go ahead and dab over the bridge.

Step 6

Encourage children to cover their entire sheet of paper, It will create a more dramatic effect when the tape is removed.

Step 7

Time to let your project dry.

Step 8

When it's dry remove the tape carefully and slowly.

Step 9

Be careful as you pull the tape, you will start to see the shape of the bridge.

Step 10

I didn't wait long enough and the tape began to pull up the paper as well. It's okay, still looks great, but not as crisp.

All Done

Stand back and enjoy your work!

New Graphic
 

Van Gogh Art Project

ArtistVanGogh

Van Gogh is a name every young child knows, and Starry Night is the title they remember! Uses this fun technique to create movement on your canvas!

Materials:VanGogh

  •  Black Construction Paper
  • White School Glue
  • Oil Pastels
  • VanGogh Artist Card


Suggest Resources for a Unit Study:

vangoghstarry     VanGogh1     Vangoghcolors     Vangogh2


Art Project Tutorial:

Step 1:

Using your white glue, begin to draw the dark shape in the foreground.

Step 2:

Add in your horizon line, accounting for the hills and the village below.

Step 3:

Add in some swirls in the background.

Step 4:

Continue buiding your image with glue.

Step 5:

Be sure to add in the moon and lots of stars, making sure your glue is moving around them.

Step 6:

Allow your glue to dry for a few hours. It will almost disappear but you'll still be able to see it and feel it.

Step 7:

When your glue is dry, provide children with Oil Pastels.

Step 8:

Begin to draw over the lines you made with your glue.

Step 9:

When you draw over the glue, you'll begin to see different textures coming through

Step 10:

Use different colors along your lines. Show children how to choose a variety of different hues of blue.

Step 11:

Highlight with white and yellow on top of your blues.

Step 12:

Use darker yellows to draw in your Moon and Stars.

Step 13:

Use black and purple to add shadow and depth to the image in the foreground.

Step 14:

Color in your village. Use dark colors in the background and whites and yellows for the buildings. Add in a little light blue to highlight areas in the darkness.

All Done!

These look wonderful when mounted on a classroom bulletin board, or framed with black construction paper.

New Graphic
 

Van Gogh Art Project for Kids

September 17, 2013 By Valerie Mcclintick Leave a Comment

FamousArtistVanGoghPotato

We’re diving into our Artist studies this year, starting with Van Gogh. A couple of years ago we did this Starry Night Art Project, and this year we’re starting off with The Potato Eaters.

20130916_143426

This is a fantastic painting to study for children of all ages, and I highly recommend looking into this book series by The Metropolitan Museum of Art. Each artists most famous paintings are discussed in great detail and these books would make a fantastic addition to your homeschool library.

20130916_143457

We used our Oil Pastels for this project, which worked really well for blending, and overlapping color. We even used our fingernails in some parts to scratch away color.

20130916_144159

20130916_151055

All of our Master Artist projects come with a printable artist card you can use for displaying children’s artwork.

Click Here for the Full Art Project Tutorial.

Siggy

New Graphic
 

Filed Under: Famous Artists, Oil Pastel Tutorial Tagged With: art for children, art project, children, craft, famous artist, kids, middle school, potato eaters, primary school, van gogh

Famous Artist Curriculum Resources

July 25, 2013 By Valerie Mcclintick Leave a Comment

This year I was blessed to be able to attend our state wide homeschool convention.

WITHOUT THE KIDS.

I know that there are people out there that can brave these conferences with their adorable, quiet, well dressed and well behaved children.
And they don’t even need a double dose of prescription strength deodorant to get through it all.

Me?

I am not said person.

I am the Mom who begs and begs for someone to take my crazy rambunctious hooligans away for the weekend, secrectly hoping that by the time they are returned to me that they too will be adorable, quite, well dressed and behaved.

Ha!

Well, besides the blessing of attending different seminars on parenting and homeschooling (and how not to loose you mind while doing both), I also got to shop the HUGE used curriculum fair.

OK.

Let me just admit up front here that 50% of my desire to go to said conference was to shop.

OK.

65%

Anyway, I scored some killer deals and it was nice to build up our homeschool library with some awesome resources.

One of my favorite finds were these Famous Artist books and reference guides.

20130725_201744

Usborne Famous Paintings
Usborne Famous Artists

20130725_201804

Usborne Impressionist Sticker Book

20130725_202157

Masterpieces Up Close

This one is really cool. It is a very large book with huge photos of famous paintings. Then on the sides it has facts and information about all of the little details in the painting. I know this will encourage my children to look very closely at art.

20130725_201829
What Makes A…..
This is probably the series I’m most excited about! It’s filled with details and information about each artist and how to identify their work. There are full color photographs of art pieces and the story behind their creation. The series is put out by The Metropolitan Museum of Art, and I plan on picking up additional titles on Amazon. Grade level recomendation is 6th-8th, but they would make great read alouds, or even brush ups for Mom to read before teaching. See sample pages here.

20130725_202119

Best of all, all these art resources fit into my new storage containers…..more on that later!

Stay Tuned!

FamourArtist

Pssst…Don’t forget to check out all of our Famous Artist Art Projects for Kids!
Maybe we’ll have some more to add in the coming year :)

New Graphic
 

Filed Under: Famous Artists

Claude Monet Craft

August 30, 2011 By Valerie Mcclintick 12 Comments

monet craft for kids

This week we revisited our Famous Artist studies,
and added Monet to our list!

If you’re new to our blog we’ve been using The World’s Greatest Artist series to
take a mini-survey of various artists and their work.

It’s a pretty low-key approach.
We read the book. Look at the art.
Then we make our own.

The real learning occurs over the following weeks/months/years
in which I bring up things like;

“Hey Bubba, Look at those water lilies, they look just like that artist….” or
“Hey Sissy, check out that billboard! They are using that cool Pop-Art style…..”

And the conversations and natural learning run wild from there.
You just can’t keep them from telling you what they remember.

way better then a paper test if you ask me ;)

Well, this week we broke out the masking tape
(inspiration via: Frugal Family Fun Blog)

famous artist crafts for kids

And we broke out the paint.

claude monet craft children

We tried our best to be patient:

world's greatest artists

And we were rewarded with these beautiful representations of
Monet’s Bridge over a Pond of Water Lilies

These are keepers for sure!

Check out the Full PhotoTutorial,
and more Famous Artist Crafts here


New Graphic
 

Filed Under: Art History, Famous Artists Tagged With: crafts for kids, degas, famous artist crafts, impressionism, matisse, miro, monet, pollock, world's greatest artist

Van Gogh & Matisse

April 4, 2011 By Valerie Mcclintick 1 Comment

We have completed a couple more of our Famous Artist crafts
this time we learned about Vincent Van Gogh and Henri Matisse.

We are continuing to use the “Getting to Know the World’s Greatest Artists” series

For Van Gogh we turned this:
van gogh craft

Into this:

van gogh printables

And for Matisse we used these:

famous artist printables
matisse craft

To make these:

matisse craft kids

All instructions are up on the main site as well as printable artist cards for each artist!

artist printables

Stay Tuned or Subscribe for more Crafty Fun!

New Graphic
 

Filed Under: Art History, Famous Artists, homeschool printables, New Posts Tagged With: activities, crafts, famous artists, kids crafts, matisse, printables, van gogh

Warhol & Pollock

March 27, 2011 By Valerie Mcclintick 1 Comment

I just finished uploading two more of our Famous Artist Crafts!

jackson pollock craft for kids>

Jackson Pollock

This was a well loved activity for my kids,
they loved blowing with the straws!
Me? I wan’t really into passing out
for an art project, but they were in dizzy oblivion.

andy warhol craft for kids

Andy Warhol

These were really fun, Sissy enjoyed this a bit more then Bub,
who found it daunting to color in one color for each open space.

andy warhol printables

I included some fun Warhol printables,
you can snag the boy & the girl as well as
some adorable cupcakes or some sneakers!

Older children can design their own!

Eveything is uploaded to our Famous Artist Craft Section!

PSSST…. Here’s a sneak peak at who’s coming next:

Stay Tuned!

New Graphic
 

Filed Under: Famous Artists, New Posts, printables Tagged With: activities, andy warhol, art, bible, craft, crafts, homeschool, jackson pollock, kids crafts, lesson

Homeschool Recon: Art History

March 15, 2011 By Valerie Mcclintick Leave a Comment


Since I’ve already posted all about our
instructional Art Curriculum,

I thought I’d better share what we have been doing for
Art History.

It’s actually something I’m just making up,

…gasp!

Okay, I actually took a few courses of Art History in college

And Believe it or not, I got an A+.
(I know….everyone gets an A in art…..
but indulge me with the plus will ya?)

Anyway, we found this great set of
children’s books at our local library to help us along:

picasso art

They’re called, “Getting to Know the World’s Greatest Artists,”
and they are just the right level for my children.

You get to read a little bit about the artist,
and most importantly, view pictures of their most famous masterpieces.

So lately, we’ve been choosing one artist at a time, learning a little about them,
then making our own masterpieces based
on their specific techniques or style.

We’ve been having a blast!

And I’ve posted a couple of the projects weve done so far up on the main site:

Mondrian

Seurat

I’ve even made little sheets with a
picture and facts about the artist.

famous artist printables

We paste these on the back of artwork.
(that way we can review what we learned later!)

I have more to upload and share soon!
Everything will be posted on our Famous Artist Page.

Incorporating Art History into our routine has
been a HUGE blessing for my son!
I never would have thought!

But, he is fascinated with each new artist
and style we learn about.
All over town he seems to find a way to compare posters and artwork to the artists he knows.

The boy is 5. and I love it.

Except, not so much when he points out
what he knows to other people.

He’s really not bragging,
just carrying on conversation about Mondrian and Pollock,
(as if they were old buddies)

And maybe it’s just me but
I hate that “look at my smart kid” kinda of feeling.

(Does anyone know what I’m talking about here?)

You know That “look at me, my five year old knows about art”
kind of a feeling.

It’s kinda yucky.

I’m much more comfortable with the
“look at my crazy unruly children who apparently
have never heard of the word manners”

kind of a feeling

I’m used to that one more…..

I’ve got a slew of quirky antidotes to pacify
those types of situations.

But situations in which my child wants to discuss impressionism and pointilism with the dear sweet Granny ahead of us in line at the supermarket

….I’ve got nothing.

Thank goodness that doesn’t happen all the time
And thank goodness I’m not alone in this
or I might never leave the house.

New Graphic
 

Filed Under: Art History, Famous Artists, Homeschool Books, New Posts

ABC Curriculum


  • 4 Easy and Frugal Homeschool Art Projects

    4 Easy and Frugal Homeschool Art Projects

  • February Fine Motor Pack

    February Fine Motor Pack

  • Winter Fine Motor Skills: January Pack

    Winter Fine Motor Skills: January Pack

  • Fine Motor Skills Printables for December

    Fine Motor Skills Printables for December

    November 30, 2018
    Winter is coming!!  Here in Southern Oregon, we have yet to have snowfall this year. Which, is a-okay with me because this homeschool mama has a very steep driveway to …
  • Bible ABC Mazes

    Bible ABC Mazes

    October 6, 2018
    Sometimes you just need to add a little FUN to your Bible lessons!  Our Bible ABC Letter of the Week program is filled with fun, hands-on activities, games, and teaching …
  • Bible ABC Dab & Dot Worksheets

    Bible ABC Dab & Dot Worksheets

    September 28, 2018
    One of our best-selling curriculum notebooks is our Letter of the Week Bible ABC program.  If you haven’t yet had a chance to check it out, you’ll definitely want to …

Tags

activities art art projects bible bible crafts bible printables bible verse children children's ministry christian christmas craft crafts curriculum educational crafts file folder games first grade free games giveaway history holiday homeschool homeschool crafts homeschool curriculum homeschool printables Homeschool Tools japan kids kids crafts kindergarten math mazes mom crafts notebooking preschool preschool printables printable printables science sewing st patricks day sunday school thanksgiving worksheets
  • Privacy Policy
  • Cookie Policy
  • Disclosure Policy
  • Terms & Conditions
  • Contact Us

Copyright 2018 Valerie McClintick LLC

Terms