


Who doesn’t love a beautiful ocean sunset? With this art project you can introduce your children to a variety of art techniques. Children draw and ink their own ocean scene, then use oil pastels and various blending techniques to fill their project with color. You can use this lesson to discuss warm and cool color combinations, overlaping, shadow, hue, blending, line and movement. This lesson is broken up into two parts:
Materials:
- Oil Pastels
- Paper
- Sharpie Marker
- Pencil, Ruler, Cup, Spoon


Art Project Tutorial:

Step 1
Using a ruler and a pencil draw a horizon line across your paper.

Step 2
Find something round you can trace to make your sun. Line it up on your horizon so that only half of the sun is showing and trace the arch around.

Step 3
Use your ruler to draw the suns rays coming from the circle.

Step 4
Be sure to fill up your paper with lots of rays coming from the sun, but keep them above the horizon line.

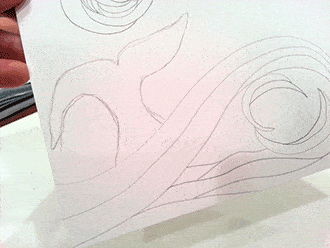
Step 5
Begin to draw swirling waves in your ocean. I’m drawing one coming from the left and a smaller one coming from the right.

Step 6
I’m using curved lines and ending them with more curls. Sort of like you would draw a cloud.

Step 7
Begin to fill in your waves by drawing just below your original wave line and adding to your drawing, see the photo.

Step 8
Continue to make shapes of your waves. Start thinking what colors you might want to place in these shapes. I’m thinking some of these new shapes might be white to show the tumbling water.

Step 9
Starting at the bottom of your page, add in ocean lines. I’m making horizontal waves across my paper, ending them to create different shapes I can color later.
Step 10
Now is the time to add in any creatures you want in your drawing. I’m going to add a whale’s tail, but you might want to add a dolphin or sea lion peeking out….

Step 11
You can even draw in some splashes near your creature if you like.

Step 12
Add a boat or a rock somewhere in your drawing. Try to balance your page visually. My whale is in the bottom left, so my boat is near the mid upper right. This gives my eye different things to look at over the page, without all the interesting moments all in one spot.

Step 13
Once you have your animal and boat in the page you can continue to draw more horizontal waves across your paper. It’s okay to draw over your waves, where the lines intersect there will be more shapes created and you can color them differently.

Step 14
Here is how my paper is starting to look. There are lines going everywhere, but that is okay, we want it nice and full because out entire paper is going to be colored in.

Step 15
I decided to add a little surfer in my bottom wave

Time to Color!
Your drawing it done, it’s time to Ink and Color your art project. Click to view the second part of this tutorial
Suggest Resources for a Unit Study:

Leave a Reply