


Who doesn’t love a beautiful ocean sunset? With this art project you can introduce your children to a variety of art techniques. Children draw and ink their own ocean scene, then use oil pastels and various blending techniques to fill their project with color. You can use this lesson to discuss warm and cool color combinations, overlaping, shadow, hue, blending, line and movement. This lesson is broken up into two parts:
Materials:
- Oil Pastels
- Paper
- Sharpie Marker
- Pencil, Ruler, Cup, Spoon
Suggest Resources for a Unit Study:


Art Project Tutorial:
Prep: Drawing
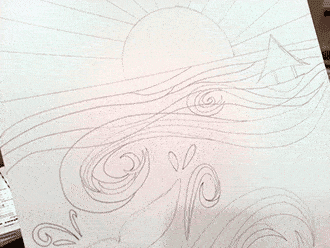
If you haven’t already, please visit the first part of our tutorial for instructions on drawing your Ocean scene. This page continues a project already in progress and shows you how to color your drawing.

Step 1
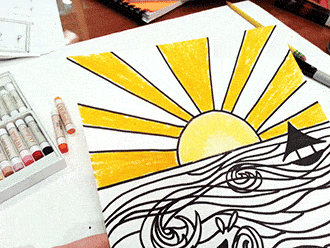
Using a sharpie marker begin to ink your drawing. I’m going to completely color in my added characters.

Step 2
Carefully draw in the lines of your rays.

Step 3
Star to ink in your ocean waves. You don’t have to follow your original lines exactly. The sharpie is thicker then your pencil, so decide which lines to keep and which to change up a bit. See how my drawing has a few shapes that are a bit too small to color in. Try to avoid that :)

Step 4
Start to pay attention to what waves you want up front, and which ones you want blended in. This larger wave I want up front, so I’m drawing my ocean lines behind it.

Step 5
Here is a shot of my completed drawing with ink.

Step 6
It’s time to color in your drawing. We are using oil pastels but you can use any medium that you like. I enjoy how simple it is to blend the pastels and the colors are bright and vivid so I think it is a good choice for this project. If you want more muted colors you might use colored pencils or water colors.

Step 7
Choose a nice bright yellow for your sun.
Step 8
Choose the next darkest yellow for rays and alternate coloring them in. Use this color to add a darker shade to your sun. (the bright yellow from the previous step should shine through the center still)

Step 9
Choose an orange to fill in the remaining rays. Choose the next darkest orange and add it to the beginning of the ray. See the photo for example

Step 10
Do the same for your yellow rays. Your rays should be going from darker to lighter in they’re respective hues.

Step 11
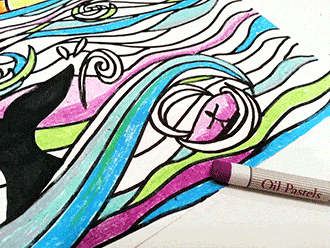
Take a minute to look over your drawing and visualize where the different blues and greens might go.

Step 12
Starting with your lightest blue or green begin to color in some different shapes. You want to space out your shapes a bit to make room for other colors.
Step 13
Continue in this way adding blues, greens and purples. Use darker hues to add shadow to the bottom portion of the lighter hues. In the photo you can see that I’ve used my dark purple to add shadow to my areas that are light purple.

Step 14
You can even take a green or light blue and blend it throughout the project.

Step 15
It is okay to leave a little bit of white. I’m keeping some shapes blank to look like areas where the surf might be tumbling above the surface and creating white water.

Step 16
We are going to highlight some of our shapes. Take the handle of a spoon and begin to scrape away the top areas of your waves. This will add dimension to your project.

Step 17
Carefully use your spoon handle to scrape away lines for the rays. In the photo you can see that I’ve tried to make my lines follow the shape of the ray.

Step 18
All Done! Here is my finished project.

Framing
These pictures look fantastic framed in black, it really makes your lines pop!

Leave a Reply