


No need to purchase expensive kits, you can make this covered wagon with resources and supplies you probably already have one hand.
These wagons take a little bit of gluing but they are sure to be a hit with your young ones as you learn about pioneer life and The Oregon Trail.
Materials:
- Popsicle Sticks
- Skill Sticks
- Brown Paper Bag
- Cardboard
- Hot Glue or Wood Glue
Suggest Resources for a Unit Study:


Art Project Tutorial:
Step 1
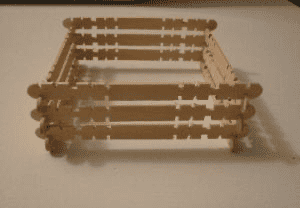
Using your Skill Sticks create the bed of your wagon. We built ours three sticks high all the way around

Step 2
Using regular Popsicle sticks, create a frame by gluing four of them together at the corners.

Step 3
After the corners dry, glue more sticks across the middle to form a solid plank. Then turn it over and apply glue to the bottom two Popsicle Sticks.

Step 4
Set your Wagon bed onto the glue and let dry. If you’re using a glue gun this step is much quicker, the wood glue will take a while to dry and you should set it somewhere where it won’t be moved.

Step 5
(This is an optional step, we did to keep our canvas up)
Using 4 Popsicle sticks, glue them around the sides of the wagon like posts.

Step 6
Cut a long rectangle shape from your paper bag. We used the side of the bag and that width worked pretty well. Curve up the edges as shown in the picture.

Step 7
Glue your paper bag to your wagon. We used wood glue, so we had to put on these little binder clips to hold it in place while it dried. If you have a glue gun, it would really speed up the process here.

Step 8
Using a small coffee cup, trace 4 circles onto your cardboard. Cut them out and poke a small hole in the center of each of them.

Step 9
Insert a Popsicle Stick into each of the wheels. You can use a glue gun around the sides if the hold is to big and they get loose.

Step 10
Glue the Popsicle sticks together to make the axle. You’ll have two sets of wheels like this.

Step 11
Glue the axles to the bottom of your wagon. Make sure that your front and back wheels are sitting evenly, and make any necessary adjustments.

All Done!
After your wagon is complete, it’s time to fill it up with some pioneer goodies! Make little scrap quilts and boxes, pots and pans, or even a clay family to put inside!

Comments (9)
Looks fantastic, I will use this for our little house on the prairie study.
[…] a covered wagon model – Using supplies you can easily find around your house, build your own covered wagon. Use your wagon to create your own stories and adventures – photograph or video tape the […]
[…] across this wagon from All Things Beautiful which is made from cardboard. But, then I found this wagon from The Crafty Classroom made from interlocking paddle pop sticks. As our boys are older, I […]
[…] See Covered Wagons […]
[…] See Covered Wagon how to The crafty Craft Room […]
[…] are cute wagons that I saw at delightfullearning or tutorial at The Crafty Classroom where you can learn how to make […]
[…] Let’s make our own simple covered wagon craft. As you build, discuss with your child what it would be like to move from everything you’ve known for the promises the Homestead Act and Westward Expansion offered. What would be the pros? What were the cons? (+) Or you can try this upgraded wagon tutorial. […]
Thank you for the instructions! I’m in the process of making this with my 6 year old right now, and she’s excited to finish it and add some of her horses to the front. We’re doing this along with our Little House in the Big Woods read aloud. :)
What are the dimensions of the finished wagon?