


Fall Leaf Art Project


There are so many amazing Fall Leaf Art Projects online that it’s hard to go wrong! We’ve done quite a few over the years with great success, but this year I think we’ve hit gold with our Watercolor Fall Leaf Art Project for Kids! UPDATE: IF you want to try this fall leaf art project with younger students, check out this tutorial and print our free fall leaf templates. This is a great way to include younger kids with your fall art projects.

This art project technique is inspired by these DIY Crystal Gems I found at Small for Big. (They are beautiful aren’t they? I think we’ll be making them soon too!)
Fall Leaf Art Project:
Materials:
(Watercolor Pencils are optional, I explain why below)

Step 1: Trace a leaf shape onto your paper. If you have little ones you might do this part for them while they hold down the leaf.

Step 2: Draw a dot in the middle of your leaf. Use a ruler to draw straight lines from the dot to the pointy end of each part of your leaf. If you’re leaf doesn’t have many distinctive points, try to just spread out five or six diagonal lines.

Step 3: Draw connecting lines for each of your diagonal lines. If your leaf has many points you can use them as guide lines for where to draw another shape. We’re trying to make sharp shapes like triangles, rhombus, etc.

Step 4: This is how your leaf will look when done drawing. It’s sorta like a snowflake!


Step 5: Using your watercolors, begin filling in each shape with a different color. Try to make parts of the shape with BOLD and DARK color, and other parts with white or watered down color. You can use a napkin to blot out color and make white areas. This is great for making texture as well.
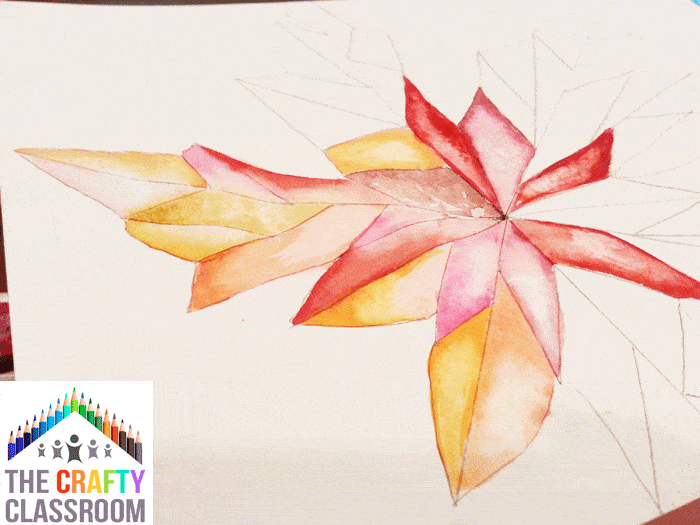
Step 6: Continue to fill in your shapes by alternating colors. We’re sticking mainly to Warm colors like reds, oranges, yellows, but don’t be afraid to add in some browns, purples, and greens too. These are all colors you’ll find in a fall leaf.


Step 7: Using a black watercolor pencil outline your leaf shape. You can use a sharpie marker as well, but I like the way a watercolor pencil “bleeds” into the painting a bit.
All Done! Frame your picture on black for a stunning display!

I love this project because the materials and the mess are minimal and children of all ages can participate. My 5 year old son did this Fall leaf and it turned out amazing!!

Here is a quick photo you can Pin for Later

Find Fall Leaf Templates, Coloring Pages, Worksheets, Sciene Resources and more here.

Comments (6)
What a beautful result – thanks so much for using the gems as inspiration!
Thank you for this leaf project. I am going to try it with grades 3,4,5 (in one classroom). I think it is a great project to learn geometric shapes as well as elements if art! Hoping for some fabulous results.
Your Welcome Bonnie! Do share how it turns out :)
It’s beautiful. I will enjoy doing one myself!
They are quite fun Gemma!
[…] Watercolor fall leaves […]